
Taking and using screenshots is a core part of my job. If you are also someone who’s often in need to capture screenshots for making presentations, or for school-related projects, then, fortunately, there are multiple ways to grab snapshots on your system. Since I am always in search of great tips & tricks to boost productivity; I am listing only the quickest methods to take screenshots on Windows 10.
PART 1 – What Are The Different Types Of Screenshots?
If you are impatient enough to read and know about multiple kinds of screenshots, you can skip this section and click on PART 2 to learn the methods!
| Types Of Screenshots | What Does It Mean? | Examples |
|---|---|---|
|
Refers to a single image of the computer, mobile or tablet screen, which is later saved as a photo. |
|
|
Refers to capturing the entire or just a particular region of the current screen, which can be saved as an image or video. It may sound similar to screenshot, but they are a little different. Screenshot refers to a static image only, whereas Screen Capture includes grabbing anything on your screen, like photos, GIFs or videos. |
|
|
Refers to transforming your captured screen into a video. |
|
Top 3 Recommended Ways To Capture Screenshot On Windows 10
| Quick Workarounds | Easy Way To Take Screenshots On Windows 10 PC | How To Do It? |
|---|---|---|
| Print Screen |
Step 1 – Press PrtScn Step 2- Screenshot will be copied to clipboard Step 3 – Press Ctrl + V to paste it into any program that displays images like Paint or MS Word Step 4- Save the image! |
 |
| Snipping Tool |
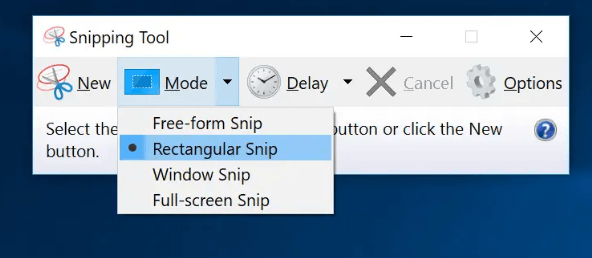
Step 1 – Launch Snipping tool Step 2 – Click New button Step 3 – By default, the snip type is rectangular. But you can choose from Free-form, full screen or a windows screen. |
 |
| TweakShot Tool |
Step 1- Install TweakShot Step 2- Click on the Big Eye icon to choose options Step 3- You can take Screenshots of a Rectangular region, Single window, Fullscreen, Scrolling Window, and can also record screen. |
|

Also Check: How To Screenshot On Snapchat Without Them Knowing?
PART 2- How To Take Screenshots On Windows 10?
Check them out and let us know your favorite way at the end of the blog in the comments section!
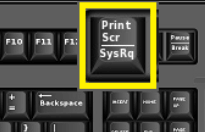
Solution 1 – Use The Keyboard Shortcut: Print Screen
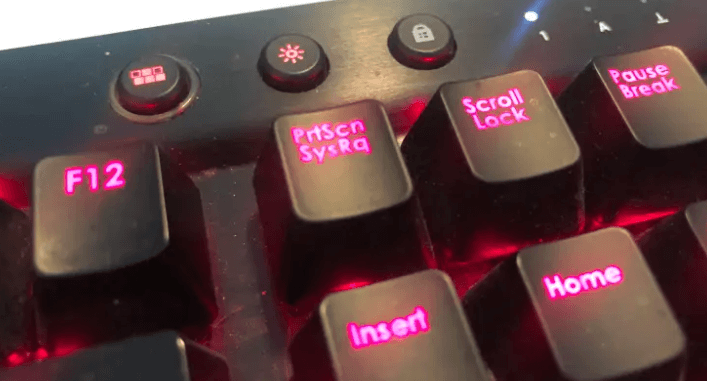
This is by far the easiest solution to take a screenshot on Windows 10 PC. All you have to do is press the ‘PrtScn’ button on your keyboard. On most of the keyboards, the buttons can be found usually between F12 and Scroll Lock. As soon as you click the “PrtScn” button, a screenshot of your display will automatically be copied to the clipboard. Now open your favorite photo editor or word processor in which you want to use the image. Press CTRL + V keys together to paste the screenshot & Save it like the usual way!
Alternatively, you can try pressing the keystrokes Windows + PrtScn to capture the screenshot & directly save it as a file in the Picture Folder.
Solution 2 – For Capturing Active Window: Alt + PrtScn
This is an excellent option if you just want to capture a screen of a single window. The captured image will be copied to the clipboard & you can paste it to any program like Paint or MS Word to save the image. Unlike Windows + PrtScn keyboard shortcuts, the image is not directly saved to the Pictured folder.
| Few More Keyboard Shortcuts | How To Take Screenshots On Windows 10 Laptop/Tablet? (With Fn Key) |
|---|---|
| Fn + PrtScn | Captures the entire screen & copies it to clipboard. |
| Fn + Windows + PrtScn | Take a screenshot of the whole screen & save it as a file directly. |
| Fn + Alt + PrtScn | Grab the screen of an active window. |
| For Surface Pro Tablet On Windows 10 (Because There’s No PrtScn Button) | |
| Fn + Spacebar | Take a screenshot of the current screen to the clipboard, so that you can paste it into any application. |
| Fn + Alt + Spacebar | Grab the screen of an active window. |
Also Check: How To Screenshot Instagram Stories Without Notifying User?
Solution 3 – Snipping Tool
If you would like to capture more flexible screenshots on Windows 10 PC, then using the Snipping tool is the right choice. The tool was introduced with Windows Vista & has not changed even a little bit apart from fixing the bug fixes. So, you can rely on it without any hassles. The Windows built-in tool supports capturing screenshots of an open window, rectangular area, the entire screen or a free-form area.
Additionally, it allows you to annotate the taken screenshots with multiple colored pens or highlighter & then save it as a photo or MHTML. Very useful, right? To start taking screenshots on Windows 10 using the Snipping tool, search for the tool from the search menu > launch it > click on the New button > choose the type of snip you would like to capture: Free form, Rectangular, Window or Full Screen. Once the screen starts fading out, drag the mouse and take the screenshot as required. Save it!
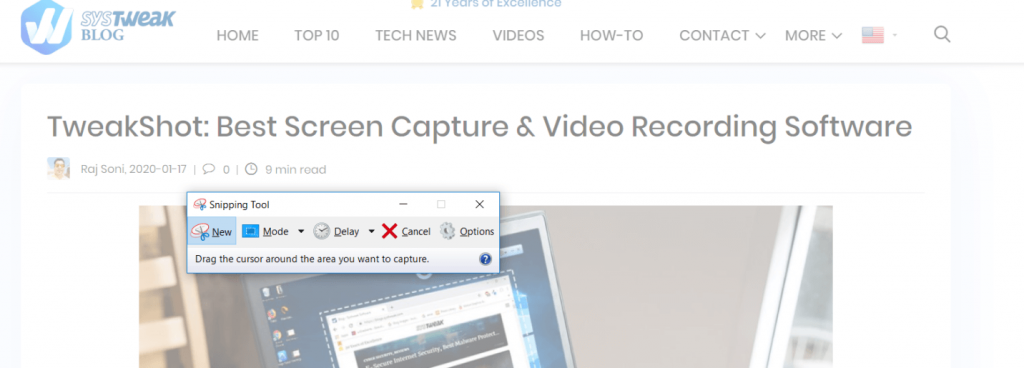
Solution 4 – TweakShot Screen Capture Tool

If you don’t mind spending a few dollars, try using TweakShot Screen Capture. It’s a top-notch tool that lets you capture high-resolution screenshots in a few seconds. Additionally, it offers tons of other features to screen record video, take multiple types of screenshots (like scrolling screenshots, a particular region, entire screen, etc.), a dedicated image editor and more. To take screenshots on Windows 10 using this excellent screen capture software. Just download it using the button below > double-click on the Big eye icon to open a set of multiple features > click on the desired option to take a screenshot & that’s all! Edit or add annotations accordingly. You can share the results directly via Google Drive, Dropbox, or OneDrive.
Solution 5 – Capture A Particular Region Of The Window
Just press the key combination Windows + Shift + S. A screen will appear greyed out & your mouse cursor will automatically change. Use the mouse pointer to drag the particular part of the screen you want to capture. The capture part of the screen will automatically be copied to the clipboard. Just paste the screenshot in any app you want. Save the image like the usual way!
Note: The method would only work for users with Windows 10’s Creators Update.
Also Check: How To Take Screenshots Of Recovery Mode In Android?
Solution 6 – Snip & Sketch App
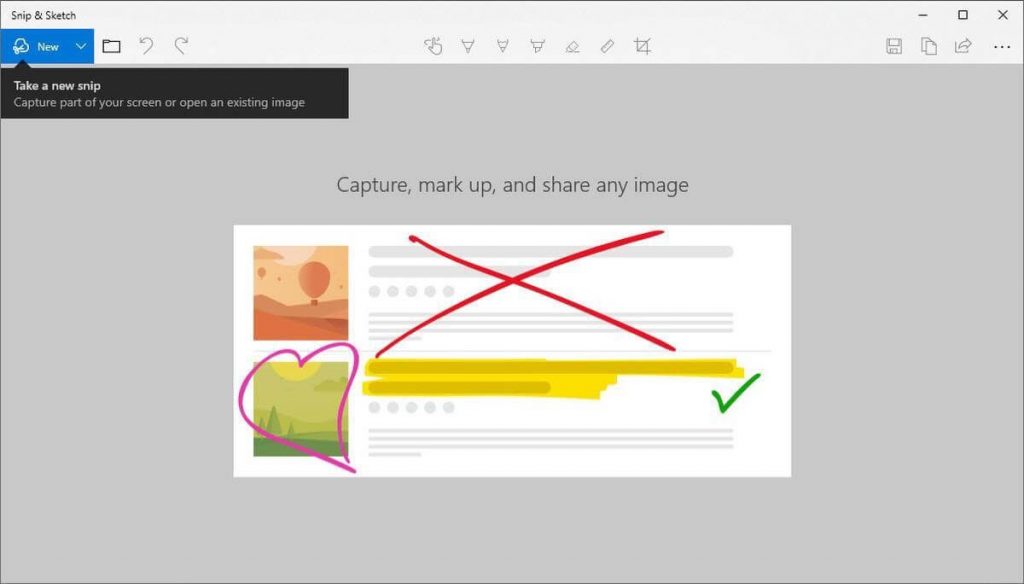
Microsoft also offers a modern screenshot tool called, Snip and Sketch. The tool comes with various functionalities to take screenshots quickly and easily, all packed in a modern interface. You can install the screen capturing tool from the Microsoft Store. It lets you annotate snapshots & other photos with an inbuilt pen, touch tools.
Also Check: Best Android Screenshot Apps 2020
Solution 7- Windows 10 Xbox Game Bar
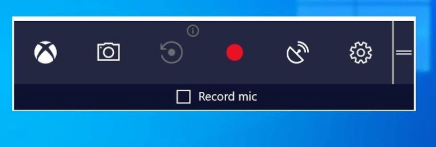
Windows 10 comes with game DVR capabilities designed dedicatedly for recording gameplay footage & capture screenshots for PC games. But you can certainly use the feature to take regular screenshots as well. Taken screenshots using Xbox Game Bar are automatically saved in PNG file format & can be found by following the path C:\Users\\Videos\Captures. To enable the functionality, use the simple keyboard shortcut: Windows + G. Click on the pop-up option ‘Yes, this is a game’. Hit the Camera icon to take the screenshot on Windows 10.
Solution 8- Using Screen Capture Plugin
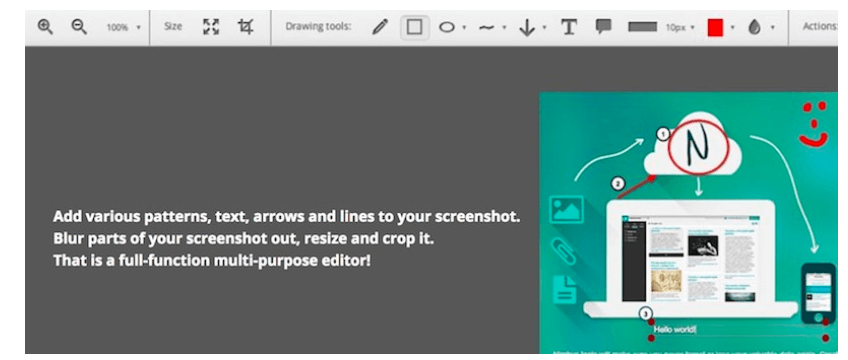
Want to take quick & quality screenshots on your PC? Try out Nimbus Capture plugin. The easy to use photo editor is available to the majority of the browsers like Chrome, Firefox, Opera, and operating systems like Windows & macOS. Just add the browser extension & start capturing full or partial screenshots without any hassles. Additionally, it allows users to edit and annotate the captured images with plenty of tools. You can even crop your images easily to hide the unwanted parts of screenshots.
Solution 9 – Use Microsoft Edge Web Note Tool
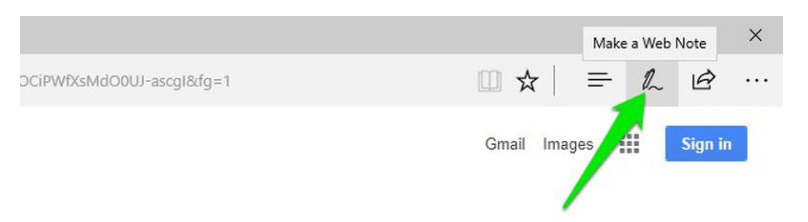
Well, several of you might not know, but your favorite web browser Microsoft Edge comes with a lot of useful tools. One such feature is annotating web content & sharing with others. Well, the tool can undoubtedly be used to take screenshots of web pages and save it locally. To start using the tool, launch Edge browser & click on the Web Note button, it is located at the top-right corner of the screen and looks like a pen icon. Click on it, and once the address bar turns into purple color, your screenshot will be captured. Now you can annotate it using multiple tools or add text. Hit the Touch Writing button and drag & drop the image on your desktop and save it on your system!
Also Read: How To Use Firefox ScreenshotGo App?
PART 3- How To Capture High-Resolution Screenshots On Windows 10 PC?

Several users might notice that after capturing screens from your Windows 10 PC, the overall quality appears low when you save the image. If you are tired of low resolutions screenshots, we suggest you try using TweakShot Screen Capture tool. It claims to capture the snapshots without compromising the quality & we could not agree to it more. The different types of screenshots captured using the dedicated tool was far better than captured using Windows built-in tools and apps.
To ensure improved quality of your screenshots, install TweakShot Screen Capture now & enjoy additional features like screen recorder & photo editor!
PART 4- Which Is Your Favorite Way To Take Screenshots On Windows 10 Computer?
Well, this was our detailed guide on how to capture snapshots on Windows PC quickly and efficiently. You can choose any of the methods mentioned above as per your need. My personal favorite remains using the dedicated tool to capture a screenshot with TweakShot Screen Capture tools. As it allows several features to capture almost every kind of screenshot, plus it offers the ability to screen record videos with mouse movements.
In case we’ve missed any easy trick to take snapshots on Windows 10 PC, please mention it in the comments section below! We’ll be happy to update our guide!
FURTHER READING