
For Windows users, issues like Blue Screen of Death, Black Screen with cursor after an update, and other performance issues are prevalent. And they believe computer virus; malware infections are responsible for it. But trust me, it’s not always true.
DISM host servicing process or DISM.exe, also known as Deployment Image Servicing, can also be responsible for it.
What is the DISM host servicing process?
Deployment image servicing and management popularly known as DISM is a command-line tool. The service is used to create a Windows Preinstallation Environment a.k.a. Windows PE in the background.
In addition to this, DISM can be used to count packages, enable, and disable Windows services. The dangerous thing about DISM.exe is that it can self-replicate in temp folders. Due to this, the system slows down, and high disk usage is caused.
This is not a standard behavior of a file; therefore; we need to learn how to troubleshoot this problem and fix the DISM host servicing process high CPU usage.
Additional Information:
According to Windows 10 experts, based on the location where DISM is stored it can be dangerous. Generally, DISM Host Servicing Processes is 27% dangerous for Windows.
When saved under C:\Windows it is 34% risky.
When found under C:\ Programs Files, it can be up to 19% dangerous.
And when in the user’s folder, it can be 28% dangerous.
So, in this post, we discuss how to fix DISM host servicing process high disk usage errors on Windows.
Common Problems Caused by DismHost.exe
- “
dismhost.exehigh disk usage.” - “
dismhost.exeis not responding.” - “
dismhost.exeAccess denied.” - “
dismhost.execould not be found.” - “
dismhost.exefailed.” - “Faulting Application Path:
dismhost.exe.” - “
dismhost.exehas encountered a problem and needs to close. We are sorry for the inconvenience.” - “Faulty application path:
dismhost.exe.”
Besides these error messages, Network Restricted Problem and other performance issues can also be caused by the DISM file.
Fortunately, there are several ways to fix this. To learn how to do it, follow the steps below and fix the High Disk Usage problem.
Solution 1 – Check DismHost.exe for Malware Infections
To check if DismHost.exe is infected or not, look for the following symptoms:
- Head to
C:\Windows\Temp,here check how many DismHost.exe you can see. If you see multiple DismHost.exe, it is infected. - Check for CPU Usage. For this open Task Manager by pressing Ctrl+Shift+Esc and see CPU usage. It is 100% it is infected.
- If you find hundreds of unknown files in
\Users\<username>\appdata\local\tempthen too. - Lag in computer performance
- Programs run automatically, and you are unable to close them.
If you notice any of the issues, certainly there’s a malware disguising as DismHost.exe. This needs to be taken care of urgently. For this using a complete system optimization tool that offers malware scanning, junk file cleaning is required. To perform all these tasks, we suggest using Advanced System Optimizer.
It is an all in one tool to clean and optimize PCs. Using it, you can quickly get rid of rouge files and fix issues that cause problems on your Windows 10 machine. To know in detail, read our review.
Solution 2: Deactivate the Superfetch service
To restore system performance issues, the first thing you need to do is disable Superfetch service.
This is recommended to boost system speed as Superfetch uses high CPU processes that slow down the PC.
To do so, follow the steps below:
1. Press the Windows logo key + R key from the keyboard.
2. In the Run window enter services.msc > Ok.

3. Next, under the Windows Services window look for Superfetch service.
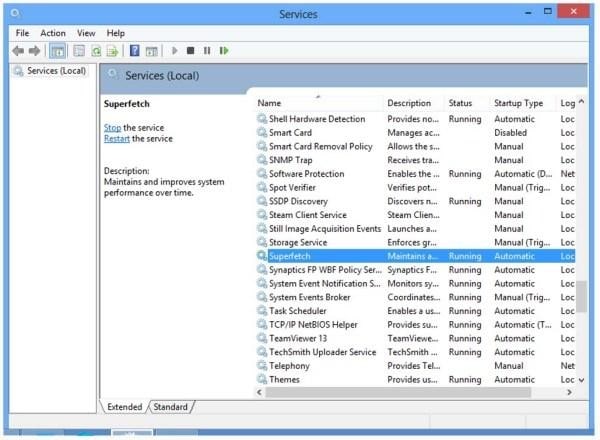
4. Right-click > Properties > Stop.
5. Now click the down arrow next to Startup type > Disabled > Apply > Ok.
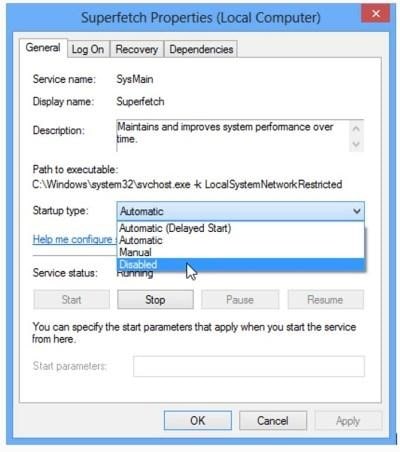
You will now feel a difference in system performance.
 Additional Tip
Junk files, temp files, unwanted data also slows down Windows systems. Therefore, to keep it running at its best, we recommend using the best system optimizer – Advanced System Optimizer.

Solution 3: Disable the Background Intelligence Transfer (BIT) Service
One more way to fix the DISM host servicing process is to disable the BITS service. A service used to transfer files online. To deactivate it, follow the steps below:
1. Type Services in Windows search bar and hit enter.
2. Now look for Background Intelligent Transfer Service > right-click Properties.

3. If the service is running, click the Stop button.
4. Next, select Disabled from the Startup type > Apply > Ok
5. Reboot Windows.

This should fix the problem. However, if the problem persists, move to the next step.
Solution 4: Delete DismHost.exe from Windows 10
If you see 100% CPU usage due to DismHost.exe, you need to uninstall it immediately. For this follow the steps below:
1. Type Control Panel in the Windows search bar.
2. Click Uninstall a program under Programs.

3. From here uninstall all unknown applications.
4. This will help restore CPU usage.
5. To confirm DismHost.exe is removed head to C:/Program Files and search for the file.
6. In addition to this, open Windows Registry Editor by pressing Windows + R keys and typing Regedit in it.
7. Here click HKEY_LOCAL_MACHINE key > Software.
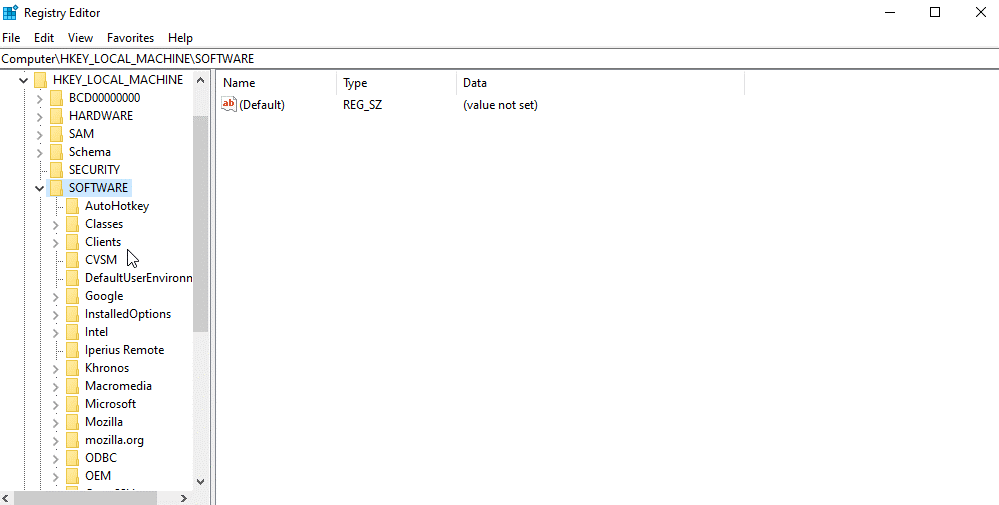
8. Look for the DISM Host Servicing Process if you find the folder and delete it.
That’s it, DismHost.exe is now successfully removed.
Additional Tip
To avoid facing DISM host servicing process issues, you need to keep the following things in mind:
- Windows 10 should always be updated. This will ensure you have the updated version of DismHost.exe
- Always keep a watch on system directories. If any unknown file, folder, or program is detected remove it. For this, you can use the top system optimizer – Advanced System Optimizer because doing so manually will be time-consuming.
With this, we conclude our post on how to fix the DISM HOST Servicing process high CPU usage. We hope the guide was helpful. If you have any suggestions or questions, do let us know in the comments section.