
If your computer throws a curveball by showing error messages that your system has recovered from a serious problem, then you should try DISM repair.
Since Vista SP1, Windows OS comes preloaded with this feature. This utility can be used for maintenance of Windows and resolve any such error messages. In this article, you will find that how to use DISM to repair Windows 10.
What is DISM?
Let us start with understanding DISM. DISM (Deployment Image Servicing and Management) is a command line utility which can be used to repair Windows , to create images for virtual recovery on Windows .
When your computer is having problems during boot you can use SFC (System file checker) which check and replace any corrupted files with a known good version. When SFC fails to fix the problem then the reason could be that it was unable to get necessary files from Windows image. In such scenario, you can take help of DISM to repair Windows image file (.wim)
Here are some command line commands that will help fix issues in Windows 10.
Note: Before you start it is strongly recommended to take a backup of your data on the computer and to create a restore point.
You can use three main options with DISM to repair the Windows image on your computer, which are CheckHealth, ScanHealth, and RestoreHealh — and you should use them in this order.
Using DISM CheckHealth option
You can use CheckHealth command to check if there is any corruption or not. This command can only be used to check existing corruption, it doesn’t perform any repairs.
You can run this command as following:
- Press Windows key + X keyboard to open the Power shell menu and select Command Prompt (Admin).
- Type the following command and hit Enter:
DISM /Online /Cleanup-Image /CheckHealth
Using DISM for ScanHealth option
This command can be used to scan for corruptions in Windows image deeply unlike CheckHealth this command may take 10 minutes to scan for corruptions.
To run this command, you need to go to the power shell and open the command prompt (Admin). If command prompt is already open in front of you, simply type the command line.
DISM /Online /Cleanup-Image /ScanHealth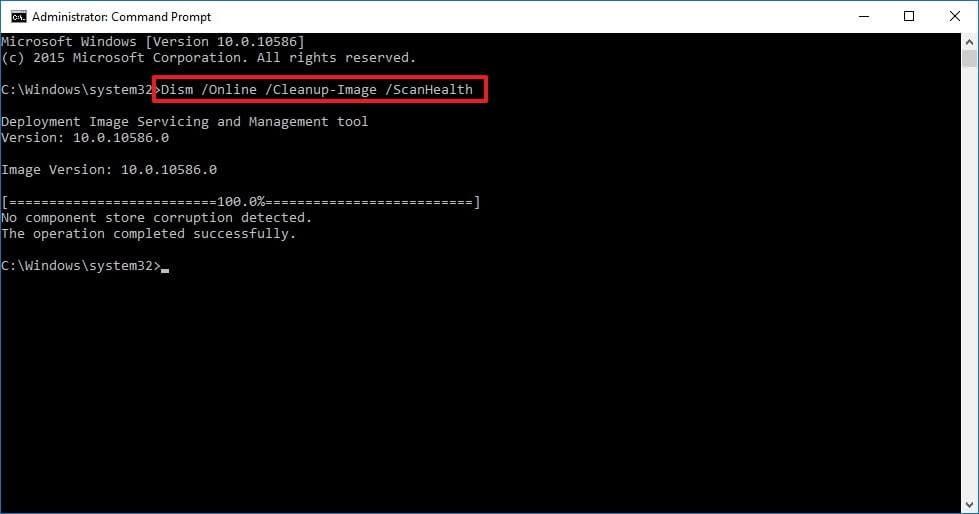
Using DISM restorehealth option
This command is the major part of using DISM to repair Windows 10 This command will perform automatic repair to your Windows image file. The process may be time consuming on some computers but by this command you can check for corruption scan and can repair it. If you are not running short on time, then you should directly run this command instead of the two mentioned earlier. This command restores Windows health directly from the last update.
To run this command, you need to type following command in the command prompt running with admin privileges.
DISM /Online /Cleanup-Image /RestoreHealth
If problem still persists, it may ask you for source of files. You can mention the source as Windows installation media or Windows 10 ISO file which can be created from here.
So now you do not need a technician just because of some scary error messages, as you know how to use DISM to repair Windows 10.