
You turn ON your system & instead of seeing the loading screen, you witness SYSTEM_THREAD_EXCEPTION_NOT_HANDLED error. Horrifying, isn’t it? But don’t fret, we are right here to guide you through our detailed article! Check out some of the best fixes to resolve the stop code on Windows 10!
About Windows 10 BSOD Error: SYSTEM_THREAD_EXCEPTION_NOT_HANDLED
Well, this type of Windows issue generally occurs due to incompatible drivers, system incompatibility, memory & IRQ conflicts. The stop code that usually appears with this error message is 0x0000007E & 0x1000007E. This indicates that system threads generated an exception that the error handler did not catch.
Listed are some of the common fixes to tackle the Windows problem. But before you move to proceed, we request you to recover important data. In case anything wrong happens, you have your data back with you in a secured way.
Read Our Complete Guide On: How To Recover Data On Windows 10?
Top Solutions To Fix SYSTEM_THREAD_EXCEPTION_NOT_HANDLED!
Case (A) In Case You’re Able To Sign-In To Windows
1. Find Out Incompatible Display Drivers
Well, faulty display drivers are one of the most common causes of SYSTEM_THREAD_EXCEPTION_NOT_HANDLED error on Windows PC. There are two ways to find and update drivers on your machine. You can either locate the problematic driver and then update it via Device Manager manually, or you can run a quick scan with a Driver Updater Software like Smart Driver Care to find and update all the faulty drivers or potentially at risk in one-go.
If you are willing to go with the manual method, follow the steps below:
Step 1- To identify the faulty driver, you can use the built-in Event Viewer to do so.
(Launch CMD > Type eventvwr & press Enter > From the Windows Logs > System > Source > Now you can check which driver is responsible for leading to SYSTEM_THREAD_EXCEPTION_NOT_HANDLED error on Windows PC.
Step 2- To start uninstalling the Drivers, launch the Run window and type devmgmt.msc & hit Enter button.
Step 3- From the Device Manager window, locate Display Adapters and double-click on it to expand the category. Now right-click on it to choose the Uninstall button.
Restart your PC to implement the changes successfully. Once you turn on the computer, the new drivers would be installed again!
Read Also: How To Choose The Best Driver Updater Tool For Your PC?
If you don’t wish to follow the hectic manual process, you can update drivers automatically using Smart Driver Care.
Step 1- Install the driver updater software for Windows 10, using the button below.
Step 2- Setting up Smart Driver Care is super easy.
Step 3- Click on the Scan Now button to start scanning the drivers for issues.
Step 4- A list of all the faulty drivers will be presented in front of your screen. You can either update only the display drivers or click on Update All button to install all the compatible and recent versions of drivers in one-go.
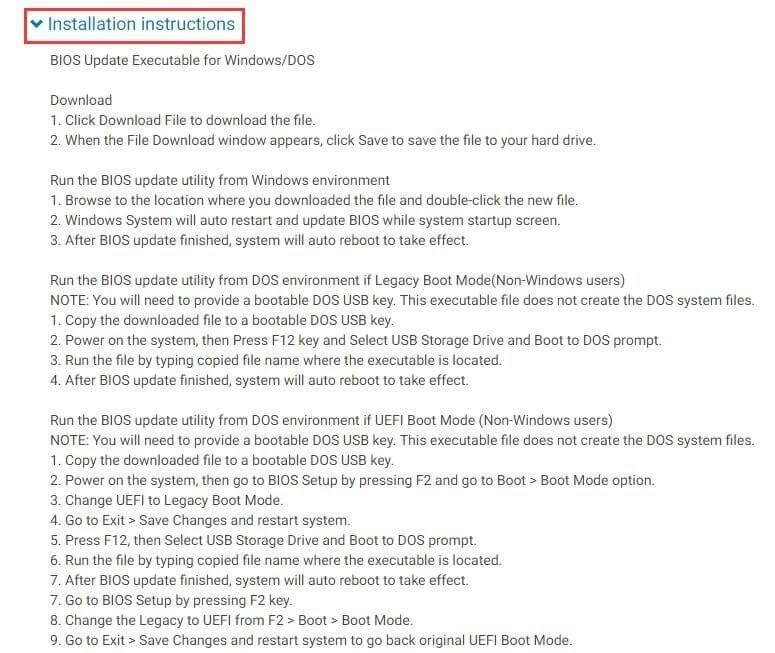
2. Check For BIOS Update
Sometimes BIOS incompatibility, memory & IRQ (Interrupt Requests) conflicts can result in SYSTEM_THREAD_EXCEPTION_NOT_HANDLED Windows 10 error. You can try updating your BIOS to fix the issue. Before proceeding, you should know the product name of the motherboard. To know the model number, you can do the following: (Run Command Prompt > Execute the command line ( wmic baseboard get manufacturer, product ) (without brackets) > The model number & device will be presented).
You can also head towards the device’s manufacturer site and search for the model number and download the BIOS from there. Though it’s little complicated to update the BIOS, you can certainly follow the instructions below!
3. Check For Hardware Compatibility
Most of the time, running incompatible hardware is also responsible for SYSTEM_THREAD_EXCEPTION_NOT_HANDLED Windows 10 error. Ensure you are operating according to the Windows 10 specifications. Learn how to find your Windows 10 PC’s requirements, versions, and other settings.
Case (B) In Case You’re Not Sign-In To Windows
If you cannot sign into Windows and encountering this Blue Screen Error then, try this method below:
Step 1 – Using another Windows PC, create a Windows installation media (DVD or USB).
New to this? Refer our guides:
Step 2 – On the Windows Language Setup Page, Hit (SHIFT + F10) to quickly access the Command Prompt. Now follow the path – Next > Repair Your Computer > Troubleshoot > Advanced Options > CMD Prompt.
Step 3 – Launch CMD & execute the following command line:
bcdedit /set {default} bootmenupolicy legacy
Step 4 – Hit Enter, as soon as you do that, you should see the message “The Operation Completed Successfully”.
Step 5 – Now execute the EXIT command line & remove the installation media to restart your computer.
Step 6- Quickly press the F8 key, before your Windows boot & the logo appears. This would help you to enter into the Advanced Boot Options.
Step 7 – Navigate to the Safe Mode option and hit the Enter key.
Now you are all set to uninstall the problematic Display Driver on your Windows PC. You can either take the help of a dedicated driver updater utility – Smart Driver Care or follow the manual process via Device Manager to uninstall & update the drivers.
Here are some useful links that would help you to manage your device drivers:
Hope this detailed guide helps you to resolve the Windows 10 Stop Code: SYSTEM_THREAD_EXCEPTION_NOT_HANDLED. Let me know your thoughts regarding the same in the comments section below. Also, if you’re facing any other standard Windows 10 Issues, feel free to share them with us. You can write to us on [email protected] or follow us on our Facebook Page!