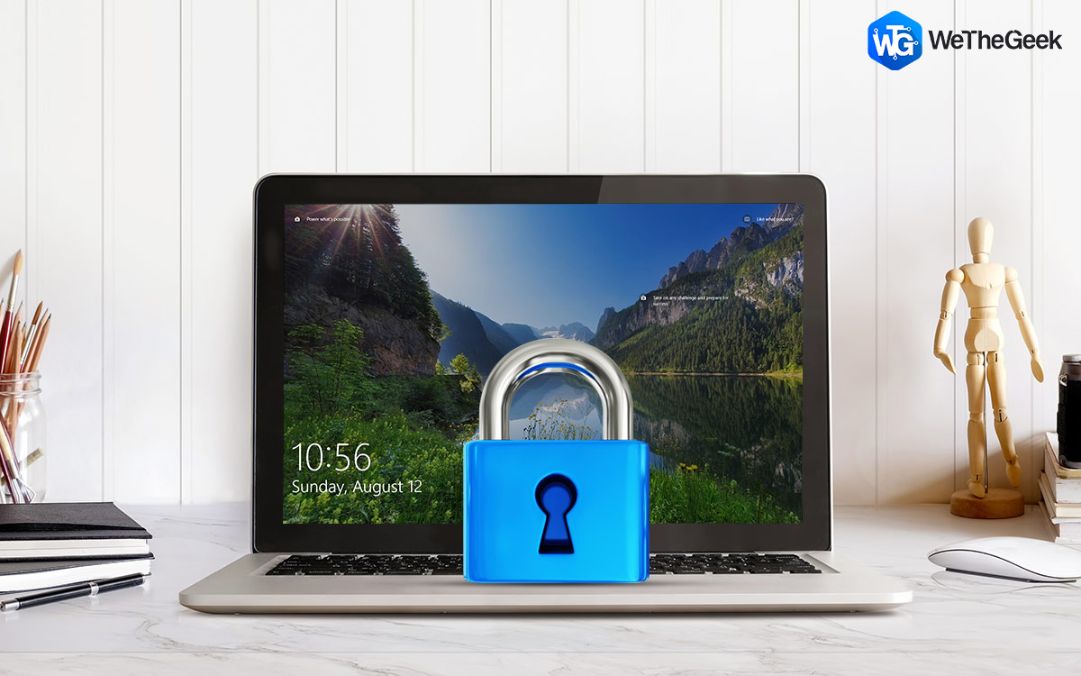
We have all heard of cybercriminals trying to hack into computers to steal data. To prevent this, certain security measures like firewalls, VPNs, encryption, and many other precautions are taken. But what if you get to know that you have always provided an open invitation to steal your data by keeping your computer unlocked. Screen lock in Windows 10 is the answer to defy the open invitation for others to temper with your device and data.
There are many ways of activating your Windows 10 Lock Screen to lock Windows when you take a break. Some of these methods are easy while others are difficult, and there are some which are advanced and interesting. We have incorporated a list of such methods for screen lock Windows 10. Read on, to know more about locking Windows 10 and then choose the best method that suits you.
10 Ways to Lock Windows 10
Multiple methods are listed below which use different ways. Most of the Windows 10 lock screen Settings can be performed by any user. Others require a little patient and understanding of the computer.
Activate Windows Lock Screen With Keyboard Only
Method 1. Quickest and Simplest way ever (You probably know it)
How to lock Windows 10 screen within seconds? A two-key combo will activate your Windows 10 Lock Screen almost instantly. It would require you to sign-in with your credentials to log back into Windows. This method to set screen lock Windows 10 and other versions is to press Windows Key + L on your keyboard.

Method 2. Another simple way (In case your Windows and L keys are not working)
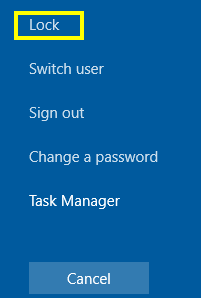
Another quick way to lock Windows 10 is to press the Ctrl and Alt and Delete keys together on your keyboard. It will open a blue screen with a few options, select – Lock. By far the easiest of the Windows 10 lock screen Settings which can be used by anyone.
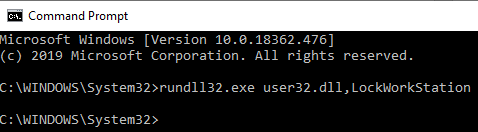
Method 3. The techie way. (I need something that involves commands)
If you are a tech-savvy person and would like to know which command is run while activating your Windows 10 Lock Screen, then open the Command Prompt, and type in the following command. It would lock Windows 10 the moment, you press enter on the CMD prompt.
Method 3 and a half. The techie way with a difference. (or maybe, almost similar)
This is another way to screen lock Windows 10 using a simple method.
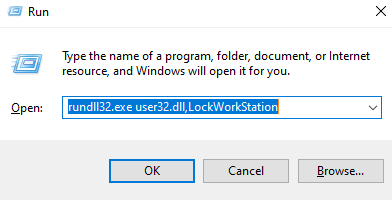
Step 1. Open the ‘Run’ Windows by pressing the Windows key and ‘R’ on the keyboard.
Step2. Type the following command in the Run box and click on the Enter key.
rundll32.exe user32.dll,LockWorkStation
Activate Windows Lock Screen with Mouse only
Method 4. The first one among the ‘no keyboard’ ways. (A few simple mouse clicks)
You can also lock Windows 10 Screen by using the Start Menu. It was easy and before your eyes till Windows 7. Since Windows 8, it has become a little less difficult than finding King Solomon’s treasure.
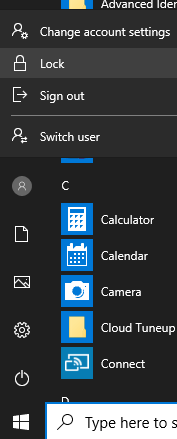
Step 1. Click on the Windows Start Menu icon on the bottom-left corner of your screen.
Step 2. Look at the left-hand small icons and click on the one that has your pic or a simple circle with a person clipart on it which represents your user account.
Step 3. Select ‘Lock’ and it would activate your Windows 10 Lock Screen.
Method 5. The techie way (Something that’s easy but not so simple)
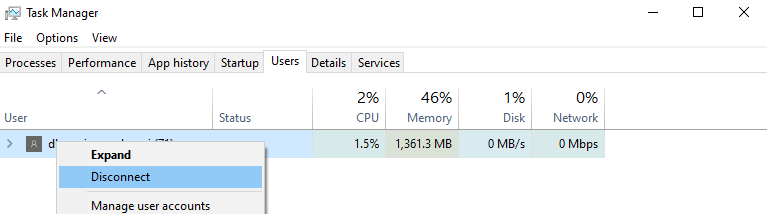
Windows Task Manager is a powerful tool that can enable the user to control all the processes of the Windows 10 operating system. As activating your Windows 10 Lock Screen is a process too, it can also be controlled from here.
Step 1. Open Task Manager by right-clicking on any space on your taskbar.
Step 2. Click on Task Manager on the menu list.
Step 3. Click on the Users tab.
Step 4. Select your account name, and right-click on it.
Step 5. Click on Disconnect & your Windows 10 will be locked at once.
Method 6. Create a Shortcut (We all love shortcuts)
Did you know you can create a shortcut to shut down Windows after a certain predefined time duration? To create a shortcut of screen lock Windows 10, which can be activated with a double click of the mouse. In case your keyboard is not working, carry out the following steps to lock Windows 10:
Step 1. Make a right-click on any blank area of your desktop.
Step 2. Choose ‘New’ on the menu list and then ‘Shortcut’.
Step 3. In the location box, type the following command.
C:\Windows\System32\rundll32.exe user32.dll,LockWorkStation

Windows 10 lock screen Settings using a shortcut is a smart move.
Step 4. Click on next and then rename the icon. The icon will be created on the desktop.
Step 5. You can change the icon image by clicking the properties of this shortcut. The screen lock Windows 10 shortcut is ready to use.
Activate Windows Lock Screen Automatically
Method 7: Enable Screensaver (Your Windows screen gets locked automatically, and you get a screensaver as well)
Screensavers have been losing popularity with time, but did you know that apart from the fact that screensavers look good. You can also use them to lock Windows 10 automatically. Here are a few Windows 10 lock screen Settings that you need to tweak.
Step 1. Type ‘Screen Saver’ in the Windows search bar on the bottom-left of your screen.
Step 2. From the results that appear, choose ‘Change Screen Saver’.
Step 3. In the new Windows that appear, choose any screensaver from the drop-down menu.
Step 4. Below the Screen Saver option, enter the time you want the screensaver to start after.
Step 5. Also tick on the checkbox, beside the time that is labeled as “On resume, display logon screen”. This will ensure that once the screensaver is activated on your screen after the time you have selected, it will always ask for the user credentials to sign in. This way even if you walk away from your system without locking it, rest assured it will automatically lock Windows 10 after a certain period which you have set.
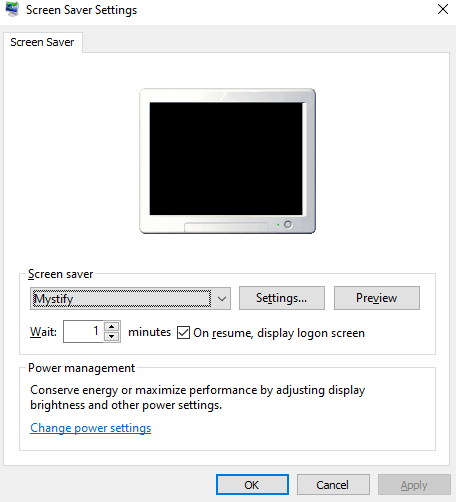
Note. Screen savers do not activate if there is a mouse activity on your screen. It would only enable once the system has been left idle for a certain period as determined by the user.
Method 8. Power & Sleep Settings (If your computer has nothing to do then let it sleep)
If you don’t like the screen saver method and want to keep it simple, then there is another way to activate your Windows 10 Lock Screen automatically, and that is to alter the ‘Power Settings’ of your Windows 10.
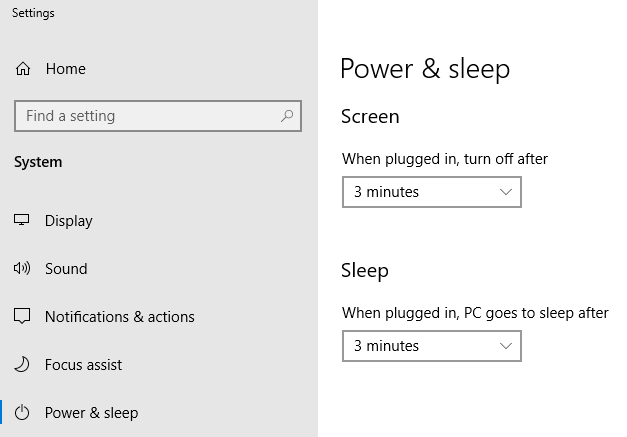
Step 1. Type ‘Power & Sleep’ Settings in the search box on the bottom-left of your screen. Click on the search result that matches with Power and Sleep.
Step 2. The Settings window will open. Configure the Screen and Sleep timers by adjusting the time from the drop-down menu. Your PC will automatically lock itself after you leave it idle for the time you have set. This is again an easy Windows 10 lock screen setting for you. However, a simple mouse movement will wake it up, and it might not ask for a password to sign-in.
Step 3. To enable a password prompt, after each time it sleeps, you need to access your account settings by typing “Your account info” in the search bar on the bottom-left of the screen.
Step 4. Click on the account setting and from the left-hand menu, click on ‘Sign-in Options’.
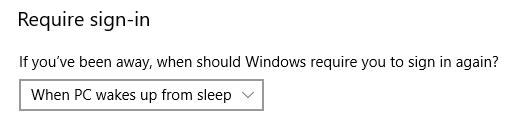
Step 5. On the right-hand side, locate ‘Require Sign-in’ and under that title, toggle the drop-down menu and choose ‘When PC wakes up from sleep’. This will enable the function to sign-in every time your PC goes into sleep mode, due to inactivity.
Note: Some PCs take time to wake up from sleep and hence, the screen saver method is preferable.
Method 9. Ask Cortana (Why click or tap when you can just ask for it.)

Cortana, Microsoft’s digital assistant is capable of certain functions on voice command, and one of them is to lock Windows 10 when you ask it to.
Step1. Enable Cortana on your Windows 10.
Step 2. Say out loud. “Hey Cortana, lock my computer.”
Step 3. Cortana will ask for a verbal confirmation. Just provide a “Yes” as a reply, and your computer screen lock Windows 10 will be activated.
Method 10.Dynamic Lock (Probably the best, only if you can get it to work.)

You can always connect your phone to your PC with Bluetooth. Once paired, enable Dynamic Lock, and when you move away from your computer, your computer locks itself as your phone goes out of the Bluetooth range. This is one of the smartest screen lock Windows 10 methods. To enable this setting:
Step 1. Pair your phone with your Windows 10 PC using Bluetooth.
Step 2. Access the Account Settings and sign-in options.
Step 3. Under the Dynamic lock, select the checkbox which states “Allow Windows to automatically lock your device when you are away”.
Step 4. You are set. Try taking your phone away from your PC and it will auto-lock Windows 10 within a minute.
For more information on how to connect, read.
Note: Your PC must be Bluetooth compatible, and you must be at least 30 meters away for the Bluetooth connection to disconnect.
Bonus – How To Remove Windows 10 Lock Screen (Not Recommended)

I wouldn’t recommend anyone to remove the Windows 10 Lock Screen as it is important for Security and Privacy purposes. But if someone wants to remove the screen for some time, then the steps are:
Step 1. Type ‘Registry’ in the search box on the bottom left corner of the screen.
Step 2. Click Registry Editor. A new window will open.
Caution: Registry is the backbone of your Windows 10 PC. Any wrong changes can crash your system, and it would be nearly impossible to restore it unless you do a fresh reinstall.
Step 3. Follow the navigation path below and only click on the described folders.
HKEY_LOCAL_MACHINE>SOFTWARE>Policies>Microsoft
Step 4. Under Microsoft, locate a folder by the name of Windows and right-click it.
Step 5. Click NEW and then KEY. A new entry will be created.
Step 6. Rename the Key created with ‘Personalization’.
Step 7. Now right-click Personalization and click on NEW and then (D-Word 32) bit value.
Step 8. Rename the entry you just created with ‘NoLockScreen’ and double click it.
Step 9. The Value data field would have ‘0’ mentioned. Erase it and change it to ‘1’.
Step 10. Click on Ok. Close all Windows, save your work, and restart your computer.
You will not be able to lock Windows 10 now.
Note: To re-enable the Lock Screen, Change the Value data from 1 to 0 and restart the computer.
Also, if you want to lock certain files and folders on your Windows 10 PC, then read.
Locking your computer is very important as you don’t want anyone messing up with your files and folders. Nor do you want someone to know what you do on your computer. Privacy is your right, and it is you who has to first start exercising it by remembering to lock Windows 10. There are many ways described above on how to do it. Choose the best one that suits you and keep your data from being accessed by someone who shouldn’t do so. Do let us know which method you like the best, and also drop in a note if you find issues in using any of the methods. Your suggestions and comments are welcome in the comment section below. We would like to know your views on this post to make it more useful.
We love to hear from you!
Follow us on social media – Facebook and Twitter. Share the information with your friends and others by sharing the article on social media. We love to get back to you with a solution. We regularly post tips and tricks along with solutions to common issues related to technology.
Related Topics-
Bluetooth not Working on Windows 10? Here’re Top 5 Fixes.
How To Personalize Windows 10 Spotlight Lock Screen.
Windows 10 Keyboard Shortcuts That You Could Use!
Download 25+ Best Free Themes For Windows 10 Desktop In 2021.