It’s been a while since Windows 10 Spring Creators update rolled out! Most of us must’ve explored the new features and surely a few hidden gems of this latest Windows 10 update. Yes, we know that the Privacy settings are the main highlight of the Spring update but there are a few display settings as well that can offer you a high resolution display on your Windows 10. By making these few tweaks in the display settings you can fix a lot of display troubles and blurry app issues.
So, here’s a quick guide on how to change Windows 10 display settings to make it look best as ever!
1. Size Scaling

Windows 10’s high resolution display is pretty awesome, but don’t you think it makes all the text and app icons look so small? So, if you’re facing trouble while reading the text, apps and icons on Windows 10 here’s what you need to do. Head on to Settings> System> Display and look for the “Scale and Layout” option. By default you will find the Scale and Layout set as 100%, so you can now adjust the settings and bring your Windows in the best possible form. Play around with the settings and set the scaling which you find most readable and soothing to eyes.
2. Change Screen Display Resolution

No matter how costly LCD screen we get for our desktop, we hardly put in any efforts to change its display settings. With Windows 10’s new Spring update you have got the high resolution display, but if you still find it blurry for any reason here’s what you need to do. As each pixel on your LCD screen is directly mapped to Windows 10’s internal display settings, you can try making a few changes on LCD screen’s display (External buttons) and might find something useful!
3. Fix Blurry Apps

As we read in the first point about Windows 10’s scaling and layout options which helped us in increasing the size of text and app icons. But sometimes when we make a few changes in scaling settings it results to blurriness of apps! So, to rectify this blurry app issues we have to access the advanced scaling options. Head on to Settings> System> Display> Advanced Scaling Options. A new window will appear, here toggle the “Let Windows try to fix the app so that they’re not blurry” option. Once you toggle this option Windows will get to work and make the display look better!
4. Use The Night Light Option Effectively
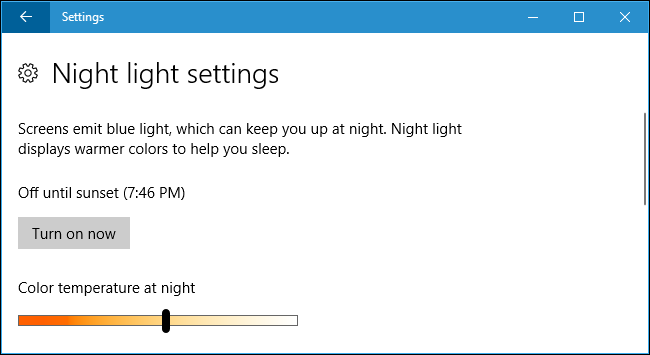
Windows 10 new Night light setting allows you to switch to warmer display colors so that you get a better night sleep without straining your eyes. To access Night light setting on Windows 10 head on to Settings> System> Display and toggle the “Night Light” switch. If you dig in deeper you’ll also find a few advanced Night Light settings which allow you to adjust the color temperature of how warm you want your display to be!
5. Calibrate Color Display

Did you know Windows 10 has one built in color calibrator? Yes, that’s right! This amazing tool helps you assess the display in the best possible manner by offering you a few sample test images. You can find the Color Calibrator option in the Control Panel of Windows 10. Try it today!
6. Tune Up Text

Just like how Color Calibrator works for images, you can also do the same to tune up Windows 10’s texts. Find ClearType text Tuner, this tool will give you five sample texts to read so that you can go ahead and pick the best text display settings on your system.
So folks, hope you liked our brief summary on how to change Windows 10 display settings. By following these few tips and tweaks you can surely enhance your system’s display!