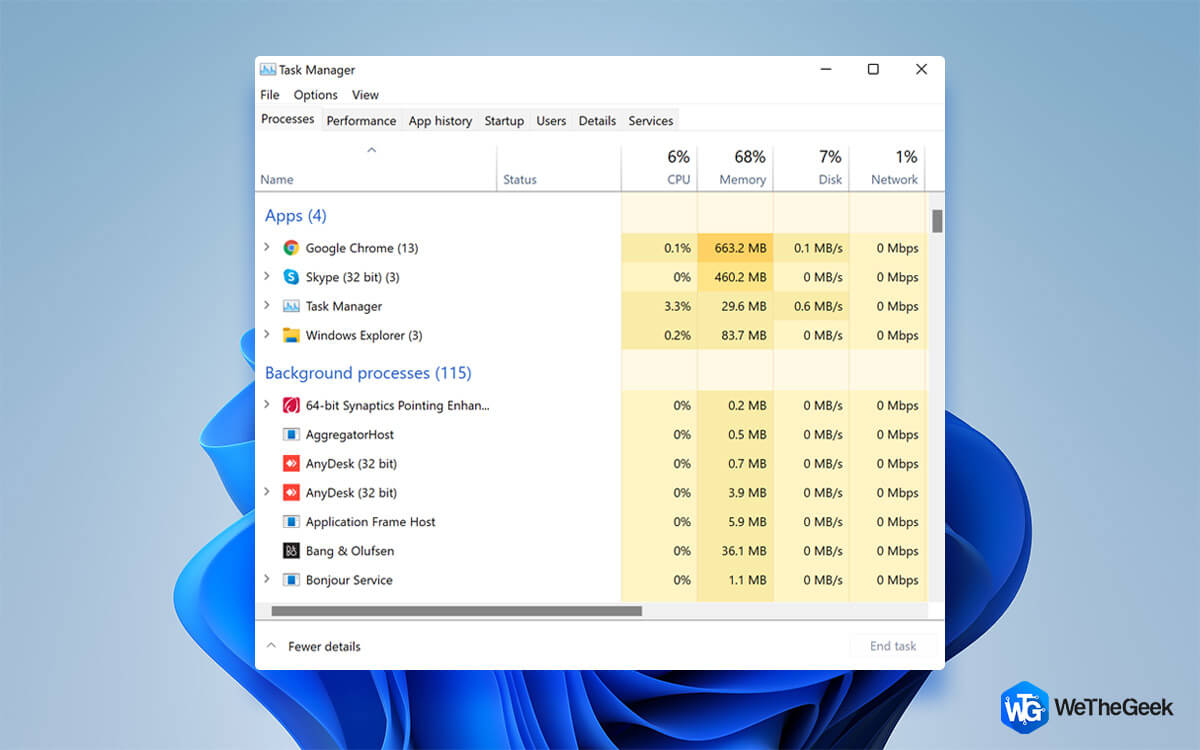
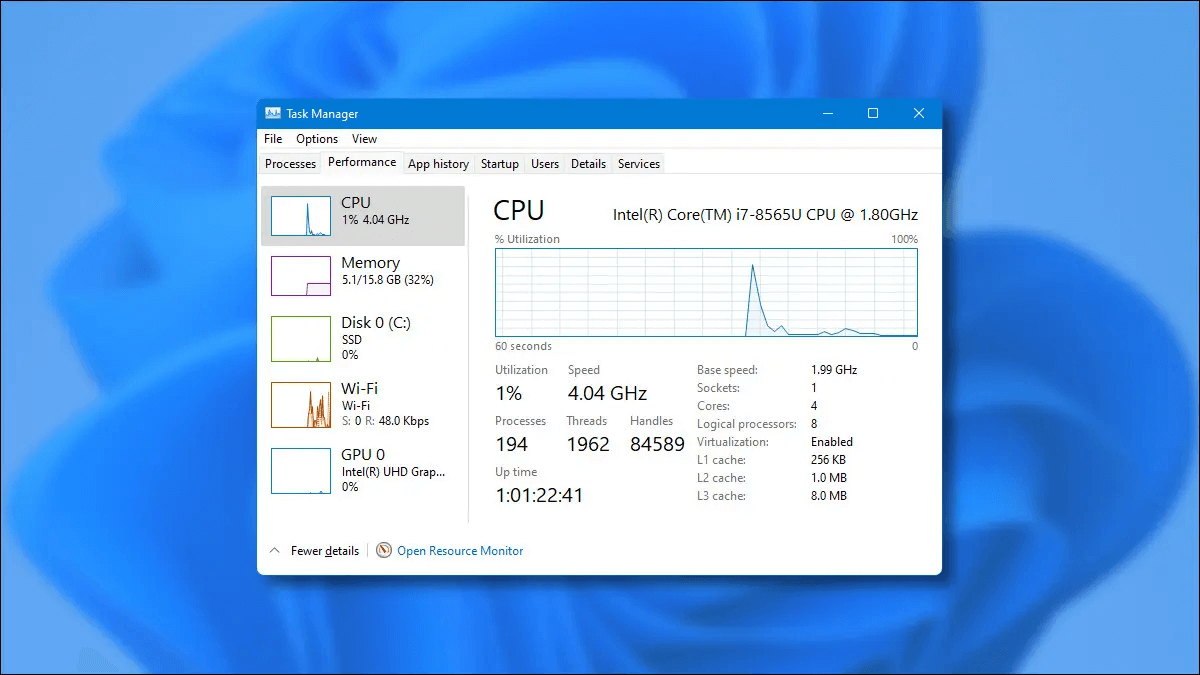
Troubled with high disk usage on Windows 11? When the CPU or OS is consuming 100% of disk space, it surely creates panic. Isn’t it? Windows Task Manager lists down the CPU usage capacity for each app and service. If the disk usage capacity remains high for a longer duration, your device might stop responding at any point or may lead to certain other issues.
What Causes High Disk Usage On Windows 11?
Well, if your computer takes forever to load and you’re at 100% disk usage, it could be due to the operating system or other programs and services running in the background. Besides this, some of the most common reasons for high disk usage on Windows 11 could be Windows Superfetch, Virus/Malware attacks, running outdated drivers or firmware, etc. Often, the problem may appear due to the blend of several issues.
Now that you know the potential reasons for “Why is my disk usage so high on Windows 11? Let’s look at some of the most effective solutions to fix the problem.
Also read: How To Fix 100 Disk Usage Windows 10 Error
How to Fix High Disk Usage Windows?
In this post, we have listed a few solutions that will allow you to fix high disk usage on Windows 11 so your device can efficiently utilize system resources to perform better.
So, without any further ado, let’s get started.
1. Optimize Your System With A Powerful PC Cleaner
To prevent high disk usage on Windows 11, we recommend our users comprehensively clean up the clutter and get rid of all the memory-hogging programs that may hamper your performance. For this purpose, we recommend using Advanced System Optimizer; it’s a wonderful computer cleaning and optimization software with various modules to restore your computer to prime performance.

It includes features like a junk cleaner, driver updater, hard disk defragmenter, duplicate files remover, memory optimizer, registry fixer, startup manager, uninstaller, system protector, privacy protector, file shredder, and more. It even offers a Smart PC Care module that instantly discovers and eliminates underlying PC problems. Once you’ve optimized your system using its features, make sure you restart your computer, and you’ll observe a significant performance boost and enhanced boot time.

It has minimal impact on your computer performance, so you can stay assured that it will not add to the high disk usage problem on Windows 11.

Not only this, but it also offers the ability to run scheduled scans so that you don’t have to stay physically present in front of your PC. Let Advanced System Optimizer do the job, and you can be easily free from 100% disk usage issues on Windows 11.

To know more about this wonderful utility, read the following guides:
- Advanced System Optimizer Review: Is It A Good PC Cleaning Software?
- Why Your PC Needs Advanced System Optimizer
2. Disable SysMain (Windows Superfetch) Service
SysMain, formerly known as Superfetch, is a dedicated service used by Windows 11 and 10 to preload applications and programs into memory before launching them. Microsoft has designed this service with the primary aim of launching the software as quickly as possible. Since it works automatically without any intervention and stays engaged while loading apps from disk to memory, it causes high disk usage.
After referring to various user reports, Windows SysMain seems to be one of the major causes behind 100% disk usage on Windows 11. To fix this, you can consider disabling the SysMain service for a while and see if it helps in improving overall speed and performance. To do so, here’s what you need to do:
STEP 1 = Launch the Run Window. You can press the shortcut keys – Windows + R to open it.
STEP 2 = Type services.msc and hit the Enter button.

STEP 3 = From the Services window that appears on your screen, scroll down and look for SysMain or Superfetch. Double-click on the same to open its properties window.

STEP 4 = Now, on the SysMain Properties pop-up box, you need to change the Startup type to Disabled and hit the Stop button to halt the service. Make sure to click on the Apply button, followed by OK!

Now, you will start noticing the overall disk usage is reduced on Windows 11. You can consider rebooting your computer to check whether it gets increased or not!
3. Reset Virtual Memory
Virtual Memory is one of the most useful features that allows you to instantly free up RAM’s storage space. The high disk usage on Windows usually occurs due to a shortage of RAM space. Hence, in this scenario, we can use virtual memory to compensate for the shortage of storage space on RAM. It can be achieved by transferring a few files and pages from the random access memory to your device’s disk storage. To reset the virtual memory, follow these quick steps:
STEP 1 = Hit the Windows icon and open Settings. Select “System”. Scroll down and find the “About” option.

On the next window, hit on the “Advanced System Settings” option.

STEP 2 = In the System Properties window, switch to the “Advanced” tab and then hit the “Settings” button placed in the “Performance” section.

STEP 3 = In the next window that appears on the screen, switch to the “Advanced” tab and then hit the “Change” button.

STEP 4 = Uncheck the “Automatically manage paging file size for all drives” option.

STEP 5 = Now, we have to specify a maximum storage space size capacity for RAM. Just make sure that you enter the figure in megabytes and it should be approx. 1.5 times the physical RAM capacity of your device. Tap on “Set” after entering the figures.
STEP 6 = Hit the OK button to save the recent changes.
STEP 7 = After resetting the virtual memory, the next step is to get rid of temp files and obsolete data. Press the Windows + R key combination to open the Run dialog box. Type “Temp” in the textbox and hit Enter.

STEP 8 = Press Control + A to select all files, right-click on the selection and then select “Delete” to get rid of temp/junk files stored on your device.

Also read: Fix 100% Disk Usage By System And Compressed Memory In Windows 10
4. Customize Power Settings
Altering your Power Settings in a below-mentioned way can certainly help you fix the annoying Windows 11 high disk usage problem. All you need to do is:
STEP 1 = Open the Control Panel window and look for Power options.

Hit on the “Change Plan Settings” option.

STEP 2 = Select “Change advanced power settings”.

STEP 5 = Hit the drop-down menu and select the “High Performance” option instead of “Balanced”.
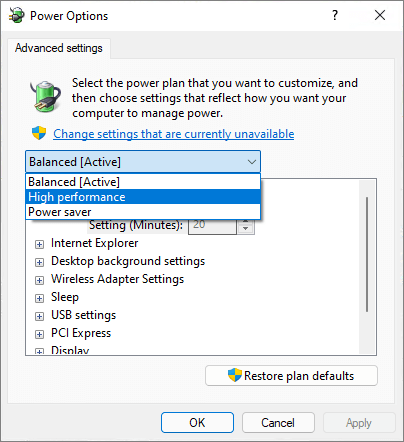
STEP 6 = Hit the OK and Apply buttons to save changes.
Also read: Simple Steps to Fix Driver Power State Failure on Windows 10, 8, 7
5. Disable Notifications
The next workaround to fix the “High disk usage on Windows 11” issue is by turning off the Windows notifications temporarily. Here’s what you need to do.
STEP 1 = Open Windows Settings and look for the “Notifications” module and click on Notifications & actions settings.

STEP 2 = Toggle off the option as shown in the screenshot below!

Disable notifications for all apps and services, and then save your settings.
Also read: {FIXED}: MsMpEng.exe On Windows 10 High Disk Usage Issue
6. Fix the StorAHCI.sys Driver
The following workaround has helped numerous Windows 11 users. So, you can try your luck and see if it helps you too:
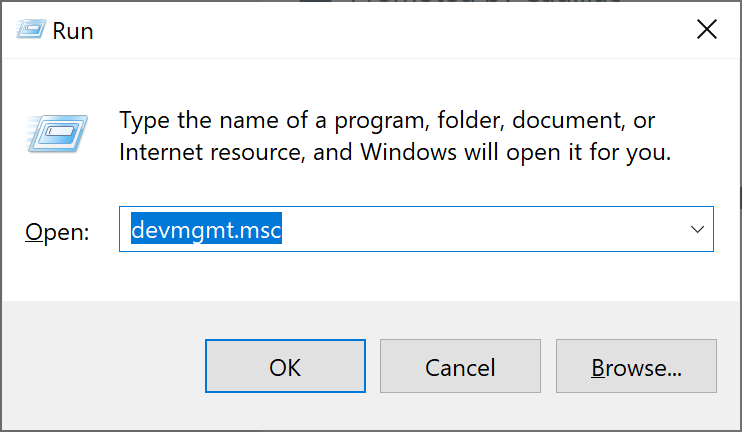
STEP 1 = Press the Windows + R key combination to open the Run dialog box. Type “Devmgmt.msc” in the textbox and hit Enter.
STEP 2 = In the Device Manager window, look for the “IDE ATA/ATAPI Controllers”. Tap on it.
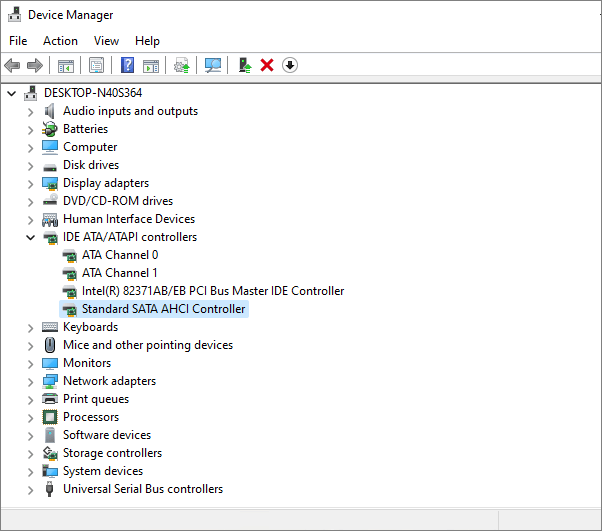
STEP 3 = Select “Standard SATA AHCI Controller”. Right-click on it and select “Properties”.
STEP 4 = In the driver properties window, switch to the “Driver” tab.
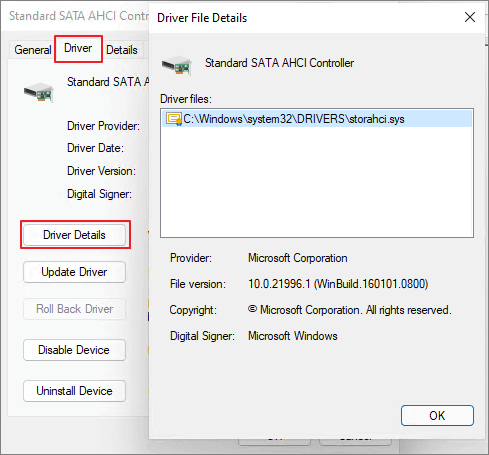
STEP 5 = Hit the “Driver Details” button. Now check if you see a file named “storahci.sys” in the window. If yes, tap on OK and close this window.
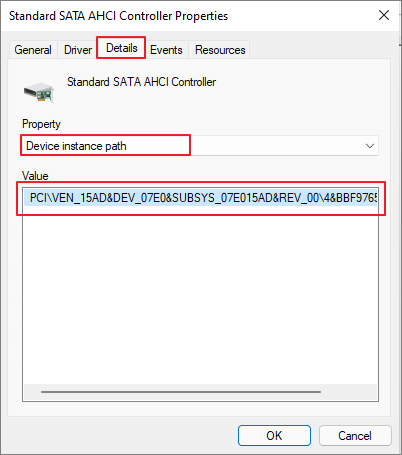
STEP 6 = Head back to the “Standard SATA AHCI Controller” properties window, switch to the “Details” tab.

STEP 7= Select “Driver path Instance” and then copy the location path listed under “Value”.
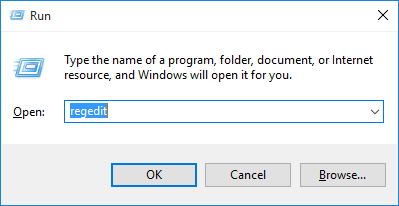
STEP 8 = Press Windows + R key combination, type “Regedit” and hit Enter.
STEP 9 = In the Windows Registry Editor box, navigate to the following path:
HKEY_LOCAL_MACHINE\System\CurrentControlSet\Enum\PCI\ \\Device Parameters\Interrupt Management\MessageSignaledInterruptProperties
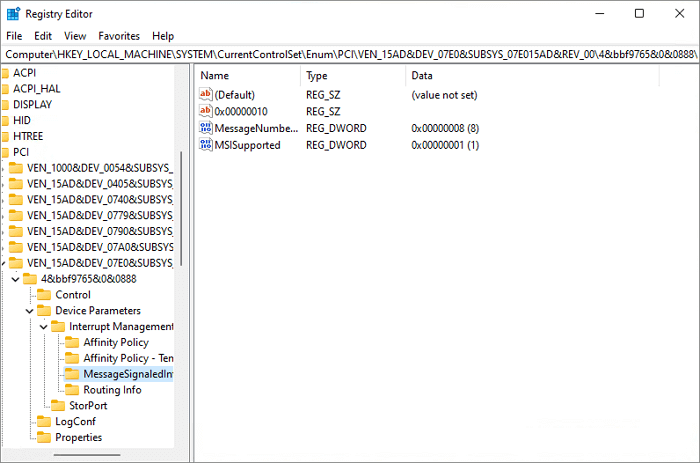
STEP 10 = Double-click on the MSISupported file. Enter “0” in the Value data field. Hit on the OK button.
After performing the above-listed set of steps, open Task Manager and check if you still see high disk usage on Windows 11.
Frequently Asked Questions: More About High Disk Usage On Windows 11
Q1. Why is my disk usage so high in Windows 11?
It could be due to the operating system or other programs and services running in the background. Besides this, some of the most common reasons for high disk usage on Windows 11 could be Windows Superfetch, Virus/Malware attacks, running outdated drivers or firmware, etc. Often, the problem may appear due to the blend of several issues.
Q2. How do I fix the disk 100% on Windows 11?
There are multiple solutions to fix 100% disk usage on Windows 11:
- Optimize your PC
- Disable SysMain (Windows Superfetch) Service
- Reset Virtual Memory
- Customize Power Settings
- Disable Notifications
- Fix StorAHCI.sys Driver
Q3. Why is the system making my disk usage so high?
Some of the most common reasons that lead to high disk usage include too many active applications, when an upgrade is in progress, background apps consuming IO resources, shortage of RAM storage space, and other probable causes. A few reasons for high disk usage are stated below:
- Having outdated drivers or firmware.
- Your system has been targeted by a virus or malware.
- You have multiple conflicting applications.
- You have dozens of processes running in the background.
Q4. How do I free up disk space on Windows 11?
To declutter your system, there are plenty of things that you can do:
- Remove temporary files
- Clean browser/app caches
- Use Disk Cleanup
- Delete unwanted duplicate files
- Disable hibernation
- Manage startup items
Q5. What is Disk Usage?
The Disk Usage column in the Windows Task Manager is pretty crucial. Disk usage lists the percentage of your hard disk that is currently being used by your device to perform various tasks and functions. High disk usage on Windows can lead to several issues like device failure or crash, inadequate performance, unresponsive apps, and more.
NEXT READ: 70 Ways To Make Old System Run Faster: Speed Up Your PC
Was this post helpful? Did these solutions help you in decreasing the disk usage percentage on Windows 11? Feel free to share your thoughts in the comments space!