
| Blog Summary: The SPPSVC service is responsible for managing the activation and licensing of Microsoft products, such as Windows and Office. However, sometimes it can malfunction or get corrupted, leading to high CPU usage. There are several possible causes and solutions for this problem, which we will explain in detail in this blog post. |
Have you ever noticed that your computer is running slower than usual, even when you are not doing anything intensive? Have you ever checked the Task Manager and found that a mysterious process called Microsoft Software Protection Platform Service (SPPSVC) is taking up a huge chunk of your CPU resources? If you have, then you are not alone. Many Windows users have reported this problem and wondered what is causing it and how to fix it.
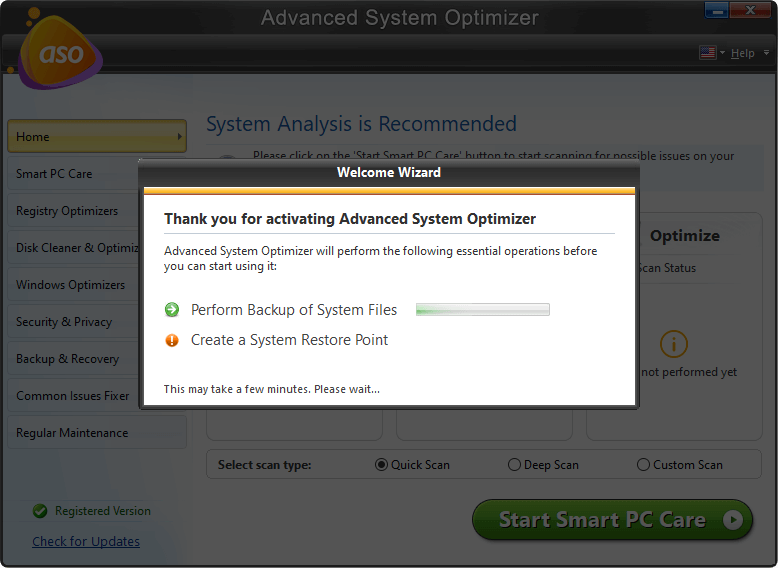
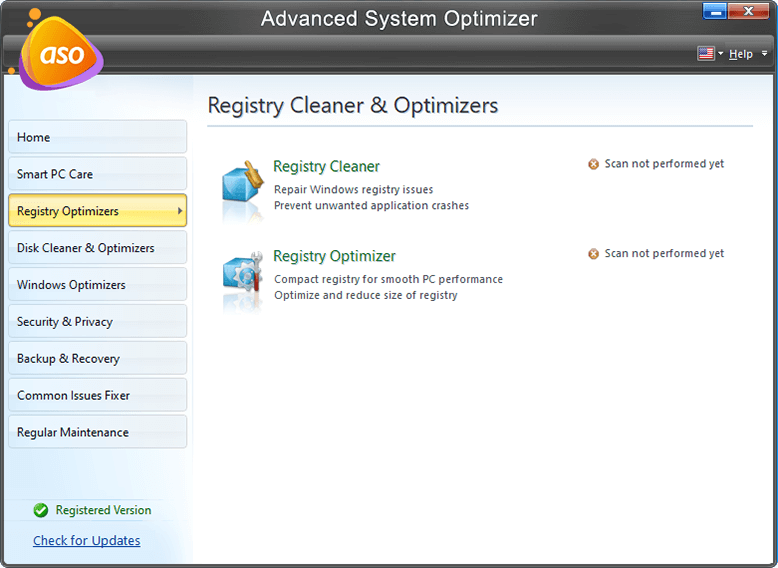
WRITER’S TIP = Oftentimes, junk files, unwanted data, invalid registry entries, disk errors, and more, can also cause performance lags. To resolve it, we have a tip for you. Try using Advanced System Optimizer – the best PC cleanup and optimization tool to fix all the common problems that cause the PC to run slower than ever before. It features multiple modules to clean the PC, optimize the registry, update drivers, eliminate privacy-exposing traces, and more to restore the best speed & performance.

What Is Microsoft Software Protection Platform Service (SPPSVC.EXE)?
The Microsoft Software Protection Platform Service is a system service that manages the activation and licensing of Microsoft products, such as Windows and Office. It runs in the background and checks periodically if your software is genuine and up to date. However, sometimes it can cause high CPU usage, which can slow down your computer and affect your performance.
What Causes SPPSVC Service Causing High CPU Usage?
There are several possible reasons why the SPPSVC service is using a lot of CPU resources, such as:
- A corrupted or outdated license file
- A malware infection or a virus attack
- A conflict with another program or service
- A faulty or incompatible hardware device
- A system error or a bug
Remember, if you are using a genuine Windows copy but are running a pirated copy of other Microsoft utilities (like Microsoft Office), you might also face this problem.
How To Fix High CPU Usage Caused by SPPSVC.exe on Windows 10/11 PC?
By following these steps, you will be able to fix the SPPSVC high CPU usage problem and make your computer run faster and smoother.
Method 1: Run Windows Troubleshooter
To check if there is any discrepancy with the operating system, let’s run the troubleshooter. To do so, follow the steps below:
1. In the Windows search bar type, are Troubleshoot and select Troubleshoot Settings from the search results.
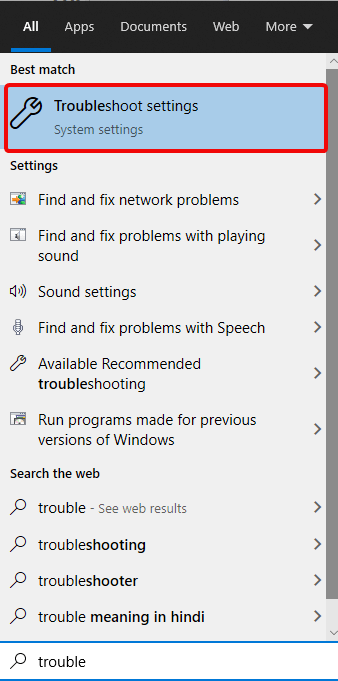
2. Now type System Maintenance in the Find a setting window.

3. Press the enter key. This will System Maintenance window

4. Click Advanced > Run as administrator > check mark the option Apply repairs automatically > Next.
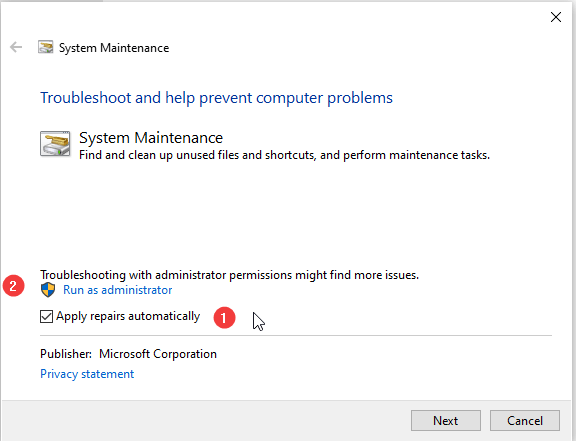
5. The system Maintenance window will now run as administrator. Click Next and wait for the troubleshooter to detect errors.

If any errors are detected, they will be fixed. You can view them by clicking View Information.
6. Once it is done to apply changes, reboot the PC.
Method 2: Boot In Safe Mode And Perform a Clean Boot
To confirm if the process still eats many CPU resources, we suggest booting in safe mode or performing a clean boot. Both these methods boot the system with necessary files and drivers. This means you will be able to isolate the problem creating files and will be able to identify what is creating problems.
Click here To learn how to boot in safe mode. However, if we cannot identify the problem of creating files in safe mode, we suggest performing a clean boot. To do so, follow the steps below:
1. Press Windows + R
2. Type msconfig > Ok
3. Click Services tab > checkmark the box next to Hide all Microsoft services. Once you do so, all Microsoft related services will be disabled. Now what you see are third-party services.
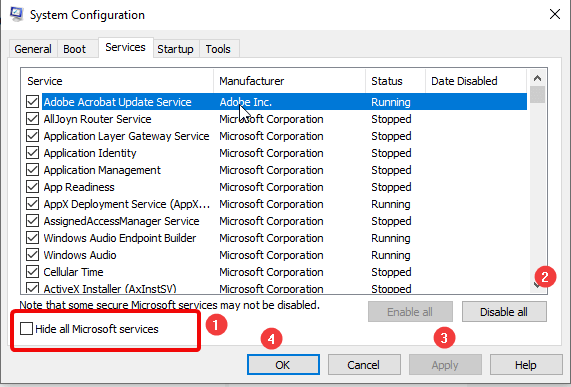
4. Hit Disable all to stop third party services from running temporarily.
5. Apple > Ok > close System Configuration window.
6. Now press Ctrl+Shift+Esc
7. This will open the Task Manager. Here click the Services tab > select each service > right-click > Disable
8. Now reboot the system and see if CPU usage has come down to normal. If the problem persists, it means some external program is creating problems. Hence, check all the installed programs and uninstall any unknown application.
Method 3: Run System File Checker
System File Checker (SFC) helps scan the system for corrupt system files. Using it, you can look for corrupt Windows files and fix them.
To run an SFC scan, follow the steps below:
1. Open elevated Command Prompt
2. Type SFC /scannow and press Enter. The process might take some time to wait for it to finish. Do not turn off the system in between the process.
3. If any errors are encountered, type DISM /Online /Cleanup-Image /RestoreHealth in the elevated Command Prompt window.
4. This will replace the corrupt files so that you no longer face the problem.
Note: To perform this action, you need to be connected online. Also, the time it takes will depend on the connection speed.
Once the errors are fixed, reboot the system and check if the sppsvc process is running fine or not.
Method 4: Scanning for Malware
Sometimes, due to malware or virus present in your system, you might also face sppsvc High CPU Usage. Hence scanning the system with the best antivirus tool is important. To know which are the best antivirus, click here. This will help detect viruses that disguise as genuine Microsoft processes.
In addition to this, you can run the System Protector module offered by Advanced System Optimizer. It will scan the system for infections and will clean them. To use this best and powerful PC cleaner, follow the steps below:
1. Download, install, and launch Advanced System Optimizer.
2. Click Security & Privacy > System Protector
3. Run the scan and wait for it to complete.
4. Clean all the infections and check if the process is working fine or not.
If this doesn’t work, then try disabling sppsvc service. To learn how to do that, move to the next method.
Method 5 : Disable sppsvc Service
If the above methods did not help try, disabling the service. This might help.
Note: Disabling the service will show the “Windows is not activated” watermark.
Note: Before deciding to use Registry, Editor, be sure you want to do it. A small mistake can damage your OS. Once you are sure you want to do this, only then follow the steps explained below:
1. Press Windows + R
2. Type “regedit” > Ok
3. Navigate to : HKEY_LOCAL_MACHINE\SYSTEM\CurrentControlSet\Services\sppsvc
4. Look for the “Start” key in the right side window
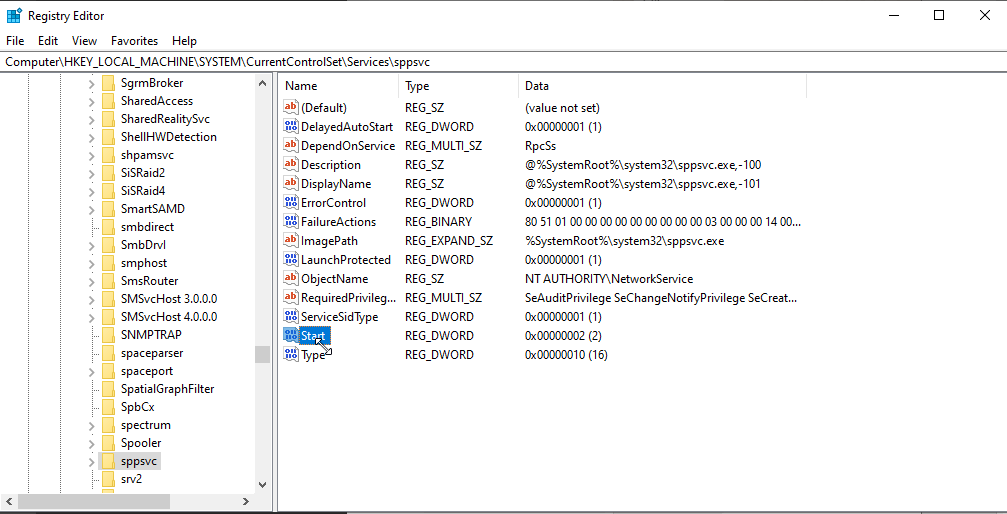
5. Double click and change the value data to “4”.

6. Press OK and exit.
7. Restart the system; the problem should now be resolved.
In addition to this, we suggest stopping the service. To do so, follow the steps below:
1. Press Windows + R
2. Type services.msc > Ok
3. Look for the Software Protection service. Right-click > Stop
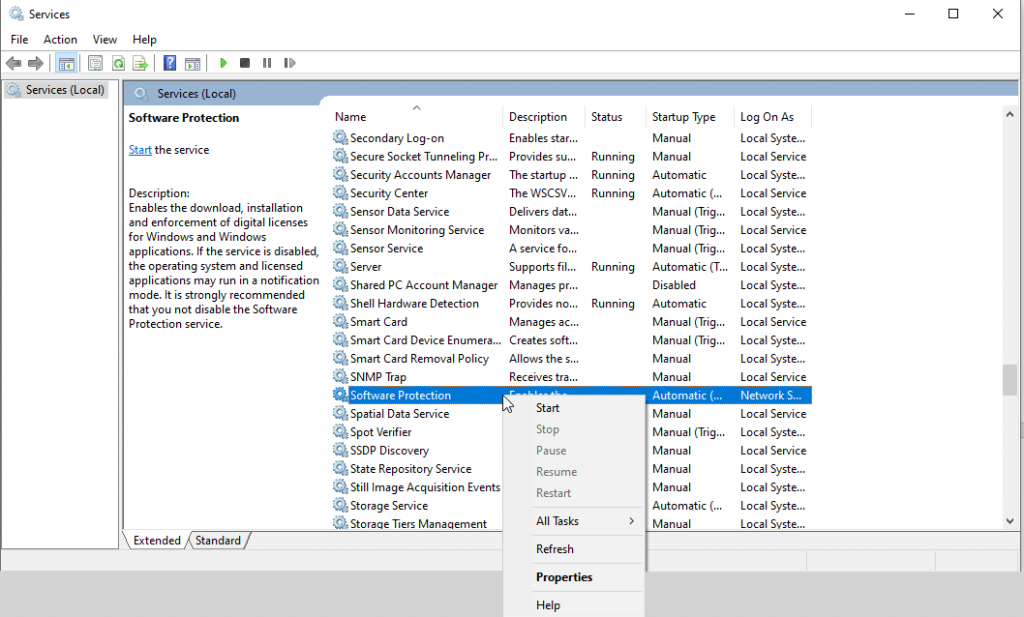
If there are any other entries related to the service, remove them, and restart the system. All this will help resolve the sppsvc problem.
This will instantly stop the service and all the related tasks of Software Protection from your computer.
That’s it all. Using these steps, you can resolve sppsvc High CPU usage. Besides, we suggest removing the task from Task Scheduler also. To do so, press Windows + S. Type Task Scheduler > expand the library > and open the following path:
Microsoft > Windows. Now in the right pane find SvcRestartTask > right-click > Disable.
If there are any other entries related to the service, remove them, and restart the system. All this will help resolve the sppsvc problem.
Method 6: Update Windows
Most problems occur with an outdated system, therefore it is recommended to update your Windows version. Get the latest Windows 11 updates as and when rolled by following these steps –
- Open Settings.
- Go to Windows Update.
- Click on Check for updates.
- Click on Download and then install all the latest updates for Windows.
Method 7: Use System Restore
System Restore is helpful when you wish to undo your current changes on your system. System Restore saves an image with the last Windows settings and registry entries. Here’s how to use System Restore to go back to previous settings to try and fix the error message –
- Open Start and type – Create a restore point. Open it.
- The System Properties tab will be opened now. Under System Protection go to System Restore.

- Select the last saved Restore Point and then click on Next.


Then, you need to click on Finish on the Confirmation tab. This will take you to the restart and you can see the changes as on the date mentioned in the Restore point. This will hopefully help you get rid of the error which started to appear to your regarding the high CPU usage.
Method 8: Reset Windows
If the System Restore method does not work, go with the Reset Windows option instead. This is necessary because there might be an issue with the system files. We will follow the quick steps in order to Reset Windows –
Note- This will remove all the third party applications and settings made by you from your PC. Proceed with caution and make sure to take a backup of your data on an external drive.
1.Open Start and type Reset this PC. 
- Recovery window will open up on your screen. Click on Get Started under Reset this PC.
- Next, you need to select between – Keep my files and Remove everything.

Next, follow the on screen instructions and you can easily reset your PC. This will eventually fix the high CPU usage for the Sppsvc.exe service.
Conclusion: Resolving SPPSVC High CPU Usage for Optimal PC Speed and Efficiency
Experiencing higher CPU usage with SPPSVC.exe can significantly impact your PC’s performance, making tasks frustratingly slow. To address this issue, you can begin with troubleshooting, scanning for malware, or running Windows in safe mode. For more advanced resolutions, consider using System Restore or Reset PC options.
For a comprehensive and efficient approach, we highly recommend utilizing Advanced System Optimizer. This powerful tool encompasses different modules, allowing you to fix multiple issues at once, ensuring your PC runs smoothly and optimally. With Advanced System Optimizer, you can take control of your PC’s performance and enjoy a seamless computing experience.
FAQ
What is Sppsvc.exe?
Sppsvc.exe is a file by Microsoft, and it is also known as Microsoft Software Platform Protection Service. The service is used to manage digital licenses for Windows and its applications.
Can I delete Sppsvc.exe?
Sppsvc is a trusted file; hence we do not recommend deleting it. However, if you think it is infected, running an antimalware tool is recommended. For this, you can try using System Protector offered by Advanced System Optimizer.
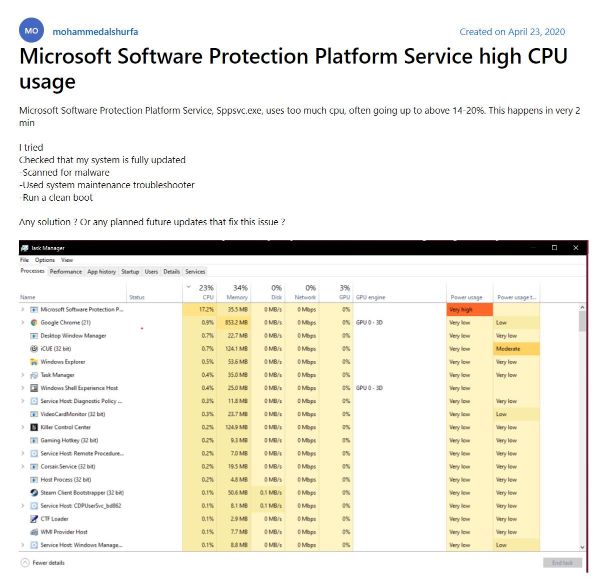
How can I identify if SPPSVC is causing high CPU usage on my PC?
To identify if SPPSVC is causing high CPU usage on your PC, you can take the help of Task Manager. Follow these steps:
STEP 1 = Press Ctrl + Shift + Esc to open Task Manager.
STEP 2 = Click on the Processes tab.
STEP 3 = Locate and click on “Microsoft Software Protection Platform Service (sppsvc.exe)” in the process list.
Observe the CPU usage percentage. If it is consistently high, SPPSVC is likely the culprit.
Are there any specific Windows versions or configurations more prone to this issue?
Well, there is no definitive answer to whether there are any specific Windows versions or configurations more prone to the SPPSVC high CPU usage issue. However, the issue is more common on older versions of Windows 10 or 11, like version 1803 or 1903. Updating to the latest version can help resolve or reduce the problem.
How to prevent SPPSVC high CPU usage in the future?
To prevent SPPSVC high CPU usage in the future, follow these tips:
- Keep Windows and Office products updated to the latest versions to avoid bugs or issues that can cause SPPSVC problems.
- Activate Windows and Office products with valid license keys to ensure proper functioning and avoid activation-related SPPSVC issues.
- Regularly scan your system for malware or virus infections to prevent interference with SPPSVC.
- Check for conflicting programs or services that may trigger SPPSVC to run excessively.
- Identify and replace faulty or incompatible hardware devices that could lead to SPPSVC running longer.
- Run system troubleshooters or repair tools to fix errors that may cause SPPSVC to run more frequently.
Mridula
Malware protection is also important as sometimes the malware sits in your computer with a name similar to the system files. Advanced System Optimizer helps in providing the system care and protection against malicious infections.Dheeraj Manghnani
Microsoft Software Protection Platform can be resolved by these stepsMansi Vijay
Performing a clean boot helped me to get rid of the high CPU usage issue. Thanks for the solutions!