
BAD_POOL_HEADER (0x00000019 Error Code) is an annoying Windows issue that occurs when there’s a problem with the system’s Hard Drive or RAM. The stop code can appear without any prior warning signs & is related to the inability of the PC to process those tasks that are utilized via physical memory.

Those hardware related issues can occur due to system aging, damaged components, corrupted/damaged drivers or missing Windows system files. Whenever the (BSoD) Bad Pool Header error appears, it usually turns out fatal for the ongoing work you’re dealing with. Your file may get corrupt, recent changes made get disappeared, file system errors or device drive gets faulty.
Before Beginning!
Also Read: Best Software for Cleaning PC
Before you proceed with fixing the BAD_POOL_HEADER Windows 10 Error, make sure you recover all your missing data using a dedicated recovery utility like Advanced Disk Recovery!
From test files to videos, Advanced Disk Recovery is capable of locating and restoring an unlimited amount of data, no matter what data loss situation is!

Here’s the list of different fixes we’ll discuss to troubleshoot Bad Pool Header Windows 10 Error
Method 1- Update Windows OS Version
Not updating to recent operating systems is one of the most common reasons what causes
(BSoD) Bad Pool Header Windows 10. So, in case you’re using an older version of Windows, update it right away.
1. Go to Windows Settings > Update & Security > click on Check for Updates button.
2. This could take time. So, keep patience and let the Windows look for the latest upgrades for your PC.
3. If the message appears on your screen saying, updates are available. Review them & click on it to install essential updates.

Make sure you do not shut down your system during the update process!
Method 2- Remove Recently Installed Software Or Hardware
If this is the first time, you’re witnessing the Bad Pool Header Windows 10 error, after installing software or hardware. Chances are these new installations are a problem. So, go on remove them or disconnect the hardware.
To uninstall multiple software or your Windows 10 machine, try using Advanced System Optimizer. It needs a single click to uninstall various programs, along with their associated files in one go.
Method 3- Running Windows Diagnostic Tool
Faulty RAM memory is one of the top reasons, leading to Bad Pool Header Windows 10 error. Use the built-in functionality – Memory Diagnostic tool to start running tests & automatically detect and eliminate memory issues, if there are any.
1. Type Windows Memory Diagnostic or ‘mdsched’ in the search box & go to the first result that appears.
2. Run diagnostics by clicking the Restart now and check for problems button.

Method 4- Update Device Drivers
Windows drivers are crucial for your OS to run smoothly. Updating your device drivers is super-easy & you can do it automatically using a third-party utility like Smart Driver Care.
The driver updater software is designed to replace and update outdated, faulty or damaged device drivers. It works quite well to enhance the performance of your system as well!
1. Once you have installed Smart Driver Care on your Windows 10, the software will automatically start scanning for drivers that have become outdated, corrupted, damaged or missing.
2. Click on Update All button to get everything fixed in one place.

The newest & most compatible versions of device drivers would automatically be installed on your system for smooth functioning.
Method 5- Try Clean Boot State
If the above methods weren’t helpful to repair the BAD_POOL_HEADER on your system, then you need to boot your PC in Clean Boot mode & try to figure out what caused the actual problem. Using this method, your system will boot up with minimum utilization of drivers and boot programs. Further, you’ll be able to take the necessary steps to identify what caused the problem & then restart the PC till the defect is detected.
1. Go to the Search box > type MSConfig & hit Enter button!
2. From the pop-up box in General tab > Selective start > Uncheck the box next to ‘Load System Services’ & also ‘Use Original Boot Configuration’ option.

3. Now under, Services tab > hit the ‘Hide all Microsoft services’ option. Select the services & click on the Disable All button. Proceed with the OK button!
Restart your Windows 10 machine & you’ll be in Clean Boot State. Observe if you are still seethe BSoD error BAD_POOL_HEADER.
Method 6- Disable Fast Startup Feature
Still, witnessing (BSoD) Bad Pool Header Windows error? Maybe the ‘By Default Enabled Fast Startup’ feature is interfering with the system. In such a scenario, try temporarily disabling the functionality.
1. Go to Control Panel > Power Options > Choose what Power buttons do > Under Shutdown Settings > Simply uncheck the Turn on fast startup option.
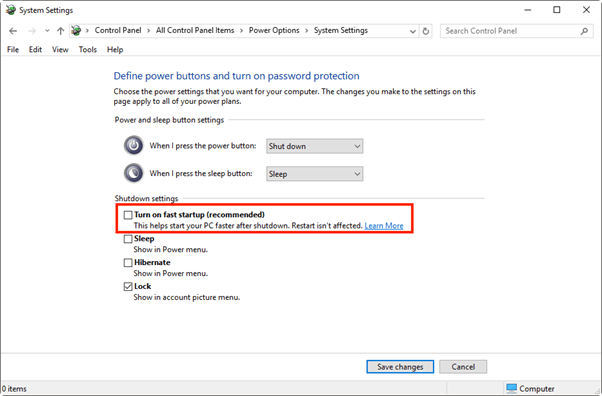
Save all the changed & restart your PC to see it solves the Bad Pool Header on your Windows 10 system.
Fixed: BAD_POOL_HEADER Windows 10 Error!
Hope you were able to fix the (BSoD) Bad Pool Header Windows 10 error with these effective methods. If nothing worked & you’re planning to get a new hard disk, make sure you extract all important data out from the old hard disk & backup everything well on other storage devices or maybe to the cloud!