
Are you looking for a way to disable Bing in Windows? Even if your answer is no, give this blog a read, as you might change your mind. Did you know Windows 10 sends all the search results you enter in the Start Menu to their servers so they can present Bing results to you?
Bing search is usually activated on Windows, and if you use the Start menu to search for something, you will get answers from both your local PC and Bing. This is a good idea in a general way, but you can simplify the search process and make it much easier by deactivating the Bing search from Windows 10. The reasons may differ from user to user; it might be privacy, bugs, or simply a personal distaste.
Note: When you use the Windows search bar to perform a search, it displays the local search results in the first instance, such as inside system settings, files, or applications. When nothing is discovered in the local results, Bing search enters the fray, and Windows searches for the term you entered and displays the most relevant results in the search results.
Also Read: How To Fix Start Menu Search Not Working On Windows 10?
Ways to Disable Bing from the Start Menu?
Try out these solutions to disable Bing in Windows.
Solution 1: Use the Registry Editor to Remove Bing
This feature of integrated Bing search from the Start Menu is controlled by a new registry setting that was introduced with Windows 10 May 2020 Update. To disable Bing in Windows, you must update the Windows registry. Follow the steps –
Note: Editing Registry entries can cause system malfunction or complete system failure in some cases. Move with the steps only if you are a computer expert, and remember to take a registry backup. Open Registry Editor, Go to File>Export>Save at a location. To restore, go to File>Import>Select the file. Read more about modifying entries in Registry Editor here.
Step 1: To begin, open the Start Menu and Type “regedit” on the search bar. Click on the Registry Editor.
OR,
To access the Registry Editor, use the “Win + R” Windows 11 keyboard shortcut to launch the run dialogue box and enter “regedit.”

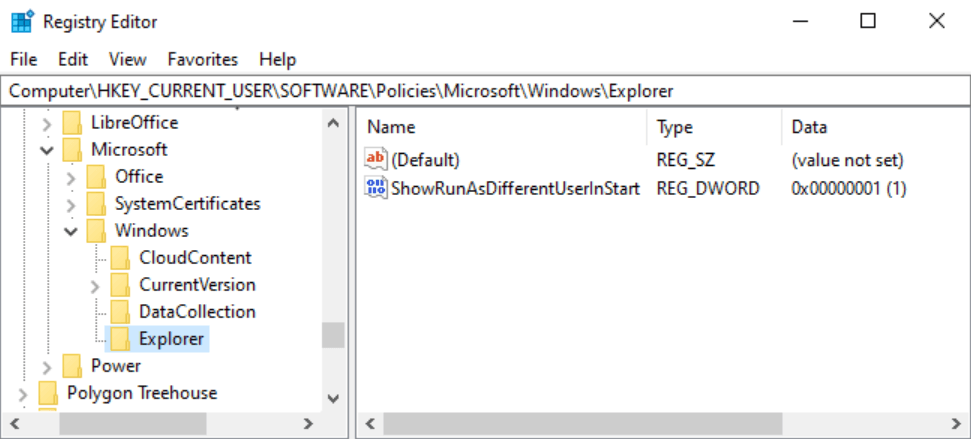
Step 3: You must use the left pane to browse to the following key. You may also put the following address into the address bar of the Registry Editor and hit Enter.
Computer\HKEY_CURRENT_USER\SOFTWARE\Policies\Microsoft\Windows\Explorer
Step 4: Start a unique DWORD value. For this, you need to right-click on an empty spot in the right pane. Select New > DWORD (32-bit) value. This particular DWORD value will assist you in removing the Bing search option from the Windows 10 Start Menu.
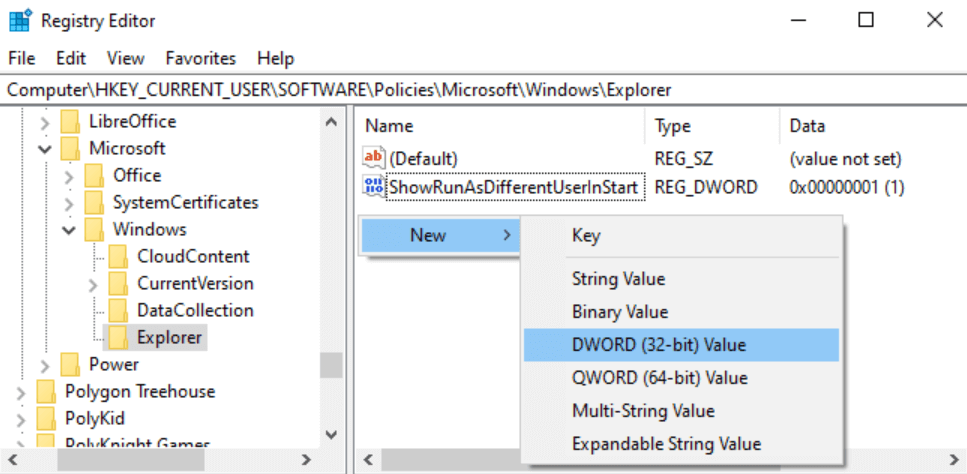
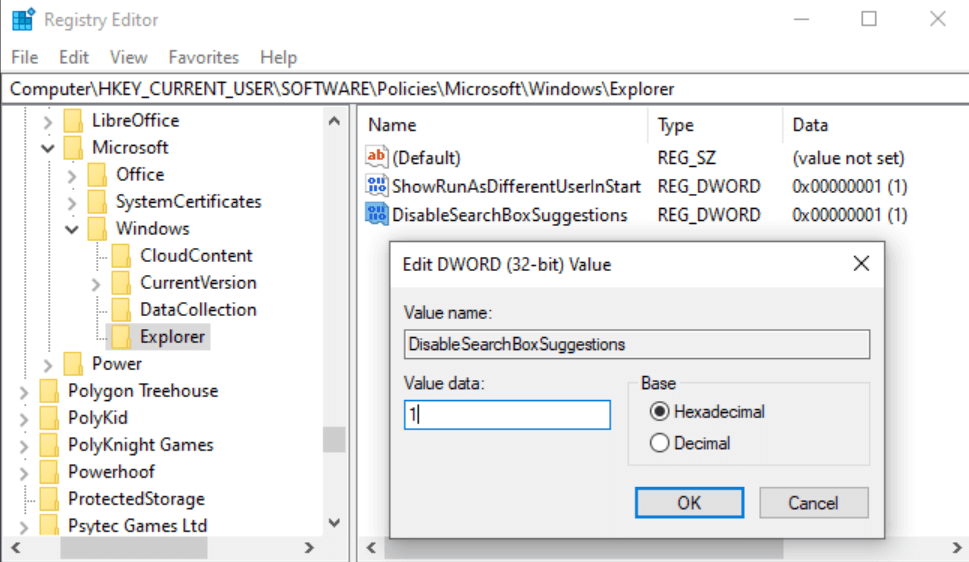
Step 5: Change the new item’s name to “DisableSearchBoxSuggestions.” Double-click it and change the value data to “1.”
Step 6: For your modification to take effect, you should reboot your PC, log out and sign back in, Or at the very least restart Windows Explorer.
Also Read: Customise Windows 10 Start Menu For Improved Experience
What is the technique to disable Bing for the older Windows versions?
To disable Bing in Windows 10 versions 1909, 1903, or earlier, perform the following steps:
Step 1: By entering “regedit” into the Start Menu, you may access the Registry Editor.
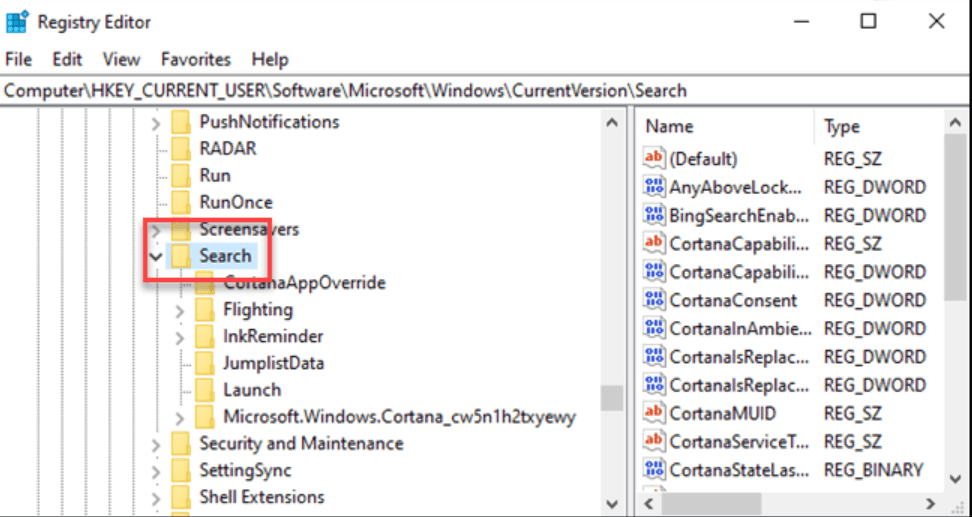
Step 2: Navigate to
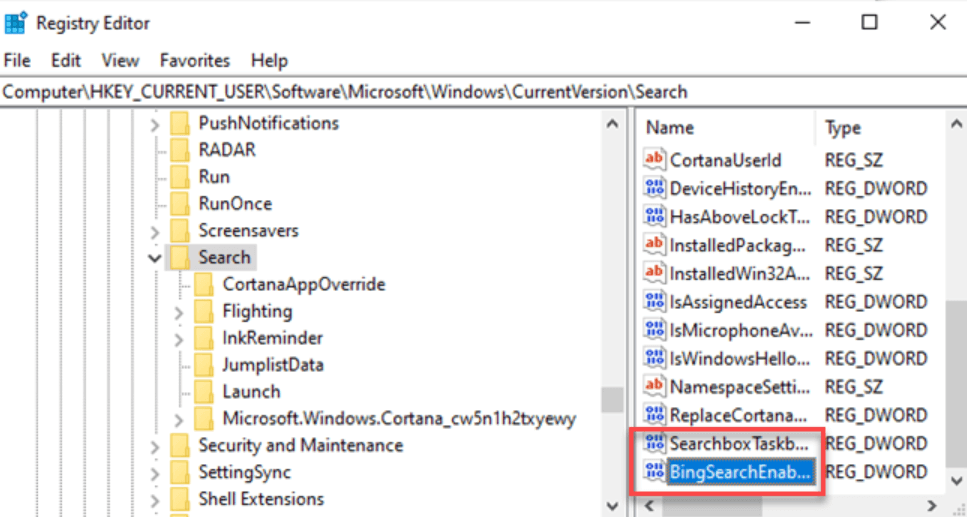
HKEY_CURRENT_USER\SOFTWARE\Microsoft\Windows\CurrentVersion\Search
Step 3: Click and hold the Search folder.
Step 4: Create a new key. Then select New > DWORD (32-bit) Value from the menu.
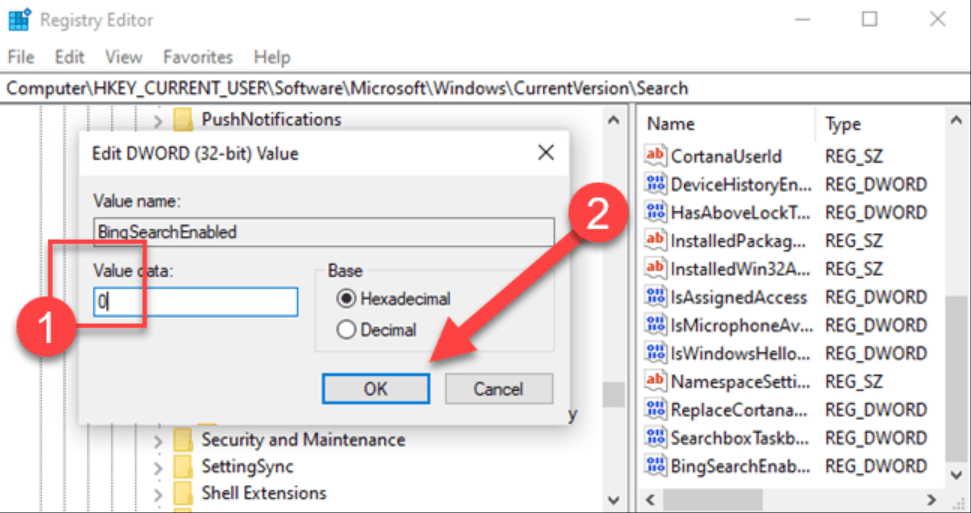
Step 5: Set it to “BingSearchEnabled.”
Step 6: Right-click or double-click the “BingSearchEnabled” value. Open the Properties window. To proceed, change the value to “0” and click OK.
Step 7: The value “CortanaConsent” may be found in the right pane. Change the value of CortanaConsent to “0.”
Note: Keep in mind that the aforementioned Registry setting will also disable advertisements in Windows Search along with removing Bing search since it disconnects from Microsoft’s Bing services.
Must Read: 8 Tips and Tricks to Search Smarter on Bing.
How can you re-enable the Bing integration in your system?
If you are thinking to re-enable Bing integration after you get rid of Bing, then you simply need to navigate to
HKEY_CURRENT_USER\SOFTWARE\Policies\Microsoft\Windows\Explorer
From there, you will need to delete the DisableSearchBoxSuggestions value. Following that, you should simply restart your computer. Now, you will be able to remove Bing from Windows 10.
FAQs
Q1. How do I stop Windows 10 from opening with Bing?
Ans: You can quickly stop Windows 10 from opening with the Bing integration using the Registry Editor (regedit) or the Registry file (the older way).
Q2. How to remove Bing integration from the Start menu?
You simply need to go through the following steps to disable Bing in Windows :
- Launch regedit. Start, type “Registry Editor,” and then select the first result.
- Go to the Windows key and create a new key.
- Make a new 32-bit DWORD.
- In Windows 10, disable Bing Search.
- Check to see whether the Bing Search disabling worked.
Q3. How do I get rid of Bing permanently in Windows 10?
Step 1: You need to open the Internet Explorer and then simply navigate to the option of Tools. Click on Manage Add-ons from there.
Step 2: From the left menu, choose Search Providers, then Find new search providers to add Google to the list.
Step 3: Go to Google and select Set as default.
Step 4: Select Bing and then click Remove.
Also Read: How To Completely Remove Bing From Chrome Browser?
Conclusion
So, now you understand the concept of turning off Bing search integration with Windows 10. It’s very simple, and the best solution is to use the Registry Editor and create a new key to disable Bing. Follow the steps mentioned above through screenshots, and that is how you do it. If you liked the article, do share and provide your feedback.
We hope the article was helpful for you in learning how to remove Bing from Windows 10. We would like to know your views on this post to make it more useful. Your suggestions and comments are welcome in the comment section below. Share the information with your friends and others by sharing the article on social media.
We love to hear from you!
We are on Facebook, Twitter, Instagram, and YouTube. Let us know of any queries or suggestions. We love to get back to you with a solution. We regularly post tips, tricks, and answers to common technology-related issues.
Related Topics –
How To Clean Junk Files With Advanced PC Cleanup
How To Recover Deleted Restore Points In Windows 11/10
10 Best CPU Benchmark Software For Windows 2022
How to Fix Slow Internet Speed Issue on Windows 11?
10 Best Disk Management Software for Windows 10, 8, 7 (2022)