
Bing (because it’s not Google) is the second most used search engine today after Google. It is safe, secure and trustworthy, as it is developed by Microsoft and data fetched by its search results comes directly from Microsoft’s own database, which is constantly updated. However, despite all that, there are many who don’t prefer to use Bing for number of reasons. Here are some quick steps that can help you remove Bing from Chrome.
Also Read: Looking for an Alternative Search Engine?

How to Remove Bing from Chrome Browser?
There is more than one method to remove Bing from the Chrome browser. Each method is different and is to be used in a specific situation. Here are three methods on how to remove Bing from Chrome Browser.
How to remove Bing from Chrome and replace it with another Search Engine?
This is the simplest of all methods and should be the first one to try if you want to get rid of Bing on Chrome. The steps are listed below:
Step 1. Open the Chrome Browser by double click on the icon on the Chrome Shortcut.
Step 2. Locate the three dots on the right top corner of the browser window and make a single left click. A list of options will be displayed.
Step 3. Click on Settings and a new tab in the browser will open.
Step 4. Locate Appearance from the menu on the left side, and click on it.
Step 5. The options and settings that are categorized under Appearance will be displayed in the centre.
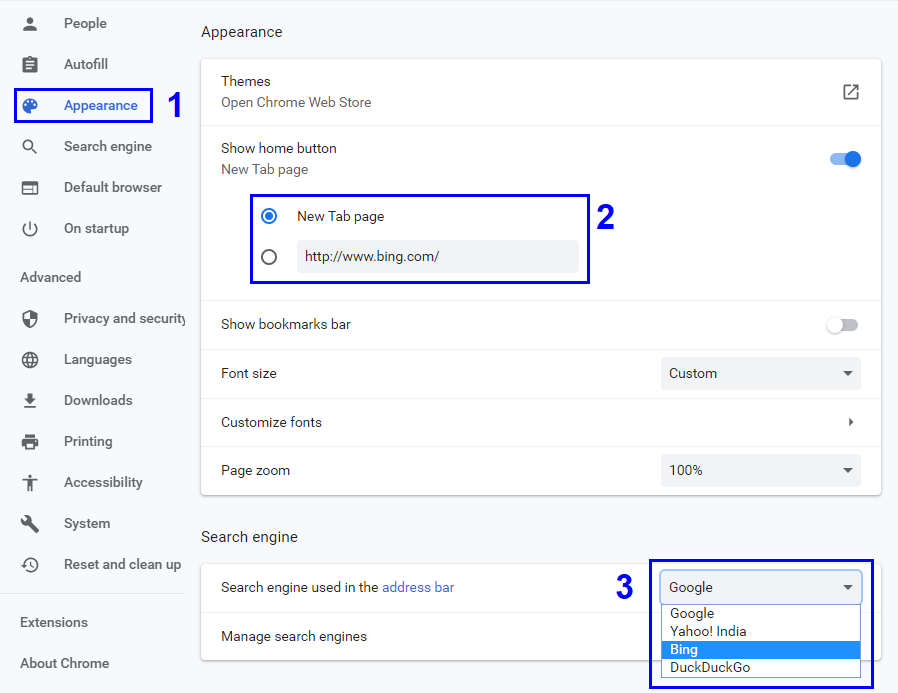
Step 6. Check for the Show Home Button option, and if enabled, then check if the home page is set to Bing. Click on the radio button, next to New Tab Page, or enter a new web page other than Bing.
Step 7. Scroll down to the Search Engine section below, and click on the drop-down next to the search engine used.
Step 8. Choose any Search Engine from the list except Bing.
Step 9. Close the Settings tab, and restart the browser.
These steps will remove Bing from Chrome as the HomePage and Search Engine. However, Bing still exists on your Chrome browser and can be activated again, should you require it.
Also Read: Why must we Install the new Microsoft Edge with Immediate effect?
How to remove Bing from Chrome’s Search Engine list?
As mentioned earlier, Bing is Microsoft Window 10’s default search engine, and although it is not possible certain updates have the potential ability to change your search engine back to the default Bing. In this case, you should completely remove all traces of Bing Search Engine from your browser, and to do that, follow these steps:
Step 1. Open Google Chrome and click on the three dots and access the Settings Tab.
Step 2. Select Appearance and navigate to the Search Engines section, and locate Manage Search Engines.
Step 3. Click on the arrow beside it, and this will lead you to a different window.
Step 4. Next, among the list on the top, which displays the default search engines, search for Bing, and click on three vertical dots next to it.
Step 5. You will get a small list of options, and you are supposed to choose Remove from List.
Step 6. This will remove Bing from Chrome’s Search Engine List, and it cannot be set again until you add from the options below.

Note: You can add any other search engine you wish from here.
Step 7 Now, it is time to check any remaining existence of Bing in your Chrome browser. Scroll down a bit further down under the search engine options and locate On Startup options.
Step 8. Click on the radio button, next to Open a Specific Page or a Set of Pages, and check if the Bing web address is mentioned here.
Step 9. If you find Bing, then click on the three dots next to it and click Remove.
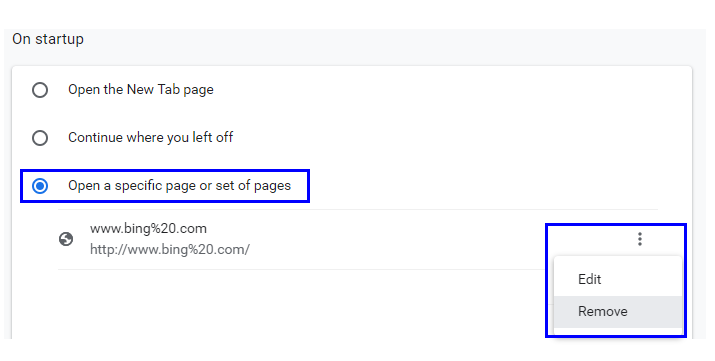
Step 10. With this final step, the task of removing Bing from the Chrome Browser is now complete.
How to remove Bing from Chrome by resetting the Browser?
Sometimes, you may experience that even though, you follow all the steps to get rid of Bing on Chrome but somehow it comes back. This is due to the fact that there are some traces of Bing hidden in your Chrome Browser and are not identifiable. In such rare cases, it is recommended to reset your Chrome Browser.
Step 1. Open the Chrome Browser, and navigate to the Settings tab.
Step 2. From the menu options listed on the left-hand side, click on Advanced, which will further display more options.
Step 3. Choose Reset and Clean Up, and then, click on Restore settings to their original defaults.
Step 4. Read the prompt carefully, and then click on Reset Settings.

Note: Resetting your Browser will restore your browser to default state and clear off the settings of your start-up page, new tab page, search engine, and pinned tabs. It also includes clearing your browser cookies and cache along with disabling your extensions. However, your bookmarks, history, and passwords will remain as it is.
The Final Word: How to remove Bing from Chrome?
I hope that answers your question of How to remove Bing from the Chrome browser and the fact that you would be an expert in doing so on your computer as well as others. Personally, I would prefer to give my Chrome browser a Reset every couple of months, so that it gives me the feeling of a new browser quite often.
If you know of any other methods or need a resolution to a tech-related issue, then drop in a note in the comments section below, and I will surely assist with the same. Also, don’t forget to subscribe to us on our Social Media Channels: Facebook Channel, and Youtube Channel for interesting tech-related articles.
Dwin Dykema
Option A does not work as you say. Option B I tried and Chrome is still defaulting to Bing for the browser. Not ready to try Option C.remove bing
still opening bing whatdo i do??