
When you use the dual operating system on your Windows, every time the Windows Boot Manager screen comes up asking to choose the operating system to start. This is a great way when using dual boot but if you are using only the OS it slows down the boot process. In this tutorial, we will explain what Windows Boot Manager is and how you can enable or disable the Windows Boot Manager screen in Windows 10.
What is Windows Boot Manager?
Windows Boot Manager commonly known as BOOTMGR is a small piece of software that loads from volume boot code. It is essential for booting Windows. Furthermore, the Windows Boot Manager is hidden and located in the root directory. Winload.exe is executed by BOOTMGR essential for the Windows boot process.
Usually, the disk partition that doesn’t have a drive letter and is often labeled as System Reserved has BOOTMGR. If you don’t have a system reserved partition, BOOTMGR will be located on the C drive.
BootMGR is missing is the most common error faced by Windows users. To resolve it, you can see that our article on BOOTMGR is missing.
Now that we know what Windows Boot Manager is, let’s move further to know why we need to disable it and how to disable the Windows Boot Manager.
The Need to Disable Windows Boot Manager
If you are using dual OS, Windows Boot Manager gives an option to choose the operating system. However, when there’s only one OS this slows down the boot process. Therefore, to reduce the wait time we should disable the Windows Boot Manager.
However, the Windows Boot Manager cannot be completely removed but we can disable it. All this can be done via the System Configuration (msconfig.exe) tool. Here’s how to do this:
How to Enable/Disable Windows Boot Manager on Windows 10?
To reduce wait time and to speed up the boot process on Windows 10 use the given methods to disable Windows 10 boot manager.
Tip: Be careful while using the steps explained below any unnecessary change made might lead to a mess.
Method 1: Use Command Prompt
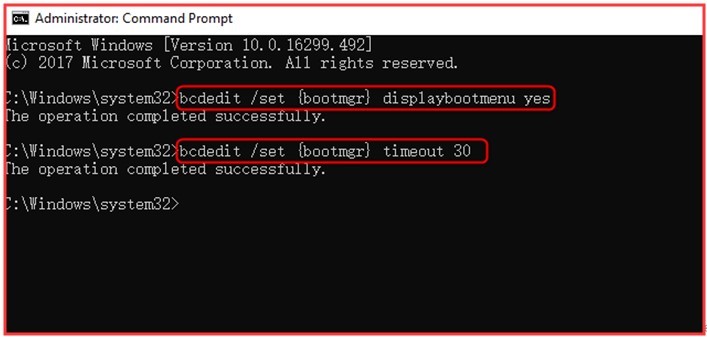
Step 1: Type cmd in the Cortana search box, right-click Command Prompt and select Run as administrator.
Step 2: Enter the following commands one by one in the command prompt window and press the Enter key after entering each command.
- bcdedit /set {bootmgr} displaybootmenu yes
- bcdedit /set {bootmgr} timeout 30
Tip: Here, the timeout followed by the number tells for how long the boot manager will be displayed. The timeout value is in seconds.
Step 3: To disable Windows Boot Manager, enter bcdedit /set {bootmgr} timeout 0 and press Enter.

Alternatively, to disable BOOTMGR you can use bcdedit /set {bootmgr} displaybootmenu no command and press Enter.
Remember: If you use the above command you cannot use below Method 2
Method 2: Change System Properties
Editing system properties will help enable or disable the Windows Boot Manager.
Step 1: Press Windows + R to open the Run dialog box.
Step 2: Here, type sysdm.cpl and click OK.

Step 3: This will open the System Properties window. Here select Advanced option > Settings under Startup and Recovery option.

Step 4: Checkmark the option Time to display list of operating systems box and set the time value. Click OK to save the changes.

Step 5: To disable BOOTMGR, uncheck Time to display the list of operating systems box or edit the timer to 0 and click OK.
Using these simple steps, you can easily enable or disable Windows Boot Manager on Windows 10. In addition to this, if you are facing a problem with permissions to allow a dual operating system to read further.
Usually, when the secure boot option is enabled you are not allowed to boot Windows when more than 1 OS is installed. Therefore, to allow dual boot you’ll need to disable secure boot.
What is a Secure boot?
Secure boot is a feature of the Unified Extensible Firmware Interface (UEFI), a replacement for BIOS. It is a security gate with a more advanced interface and enough technical options. Secure boot analyses codes before they are executing if a code has genuine digital signatures, Secure Boot will let it pass. However, if the digital signatures are unrecognized it will be blocked by Secure Boot from running and the system will require a restart.
Therefore, to use a dual operating system sometimes you might need to disable Secure Boot. However, keep in mind we do not recommend disabling Secure Boot as it helps keep you safe.
Disabling Secure Boot will allow you to perform the following operations:
- Booting Windows from external device USB, etc.
- Booting Windows using password recovery tools
Steps to disable Secure Boot on Windows 10
1. Type Advanced Startup in Cortana search bar. Select Change Advanced Startup options.

2. Now under the Settings window click on Recovery option in the left pane > Restart now under Advanced startup.

3. This will restart your Windows 10 in an advanced mode where you will get various advanced options.
Click Troubleshoot.4. Next, click on the Advanced options.5. Here, select UEFI Firmware Settings. This will restart your system click on restart on the next screen.6. Your system will now restart in BIOS. Here click on the security tab under BIOS settings.
7. Choose the Secure Boot option using the up and down arrow key.
8. Next, use the arrow keys to change Secure Boot from Enabled to Disabled.
9. Press enter, save the settings and exit.
Wasn’t it simple? Do share your feedback in the comments box. If you find this article helpful, share it with others and follow us on the social network to stay updated with the latest articles, tutorials, and tech news.
Frequently Asked Questions –
Q1. What is Windows Boot Manager?
Windows Boot Manager is a legitimate software provided by Microsoft. It is a UEFI based small in size but the crucial piece of software to set up the boot environment.
Q2. How do I get to Windows Boot Manager?
To access Windows Boot Manager, you need to head to the Start Menu> Settings > Update & Security> Recovery. Under Advanced Startup, click on the Restart button and it will reboot your PC. That’s where you see the Windows Boot Manager in action to help your device boot up.
Q3. Do I need Windows Boot Manager?
Yes, you need Windows Boot Manager on your Windows PC to help you boot up the device properly. Do not remove it from the computer or else the computer can malfunction or fail to boot.
Q4. What happens if I delete Windows Boot Manager?
If you deleted Windows Boot Manager from your computer, it will not function properly and also the Windows version logo will not appear on the screen. If you have more than one drive on your device and you want to stop seeing the Windows Boot Manager menu, you can remove a partition.
Edward Hajdas
Hope that this works for me will let you know if it workedEdward Hajdas
This system did not work on my hp15-dw 1083 wmEkant
Remove space between / and set.Srishti Sisodia
Thank you for your comment and suggestion.