If you are connecting your phone to your Windows PC and see no sign for long, then it could be USB device not recognized in Windows 10 issue, which can indeed frustrate you. There can be an emergency, and you might not be able to transfer important files from your USB port. So here we would like to tell you about the solution to this problem. It is as simple as the wrong application of the USB but could also go to the USB device driver issue on Windows. Let’s discuss it all in this post to help you learn how to fix USB device not recognized.
Try using one of the best driver updater software for Windows. We have an excellent driver updater from this list for you – Smart Driver Care. It has all the features one will require to update all the device drivers from its large database. It is essential to update them as the old drivers harm your computer. We shall start with examining the USB port, and the USB device to ensure that it is not the issue for the USB device not recognized in Windows 10.
Also learn: How to update device drivers on Windows 10 and older versions.
Methods To Fix USB Device Not Recognized In Windows 10
Method 1: Manual method
Check for the given points for your USB device not recognized in Windows 10 can be a common problem.
- Restart your computer as the first point and reconnect the USB device.
- Check USB port on your computer for any physical damage. For some devices, overheating can cause the ports to be damaged. You can get this checked with a technician if none of the below-mentioned methods, including the driver update, helps.
- Check the USB device for any physical damage, and if possible, try connecting it with another computer. If it works with another computer, then the USB device is perfectly fine.
- Try and connect other USB devices and check if they are working correctly. If yes, then the problem lies with your USB device and not the computer.
- Check the power management settings. Power management settings are capable of turning off the externally connected devices. This is done in terms of saving the power for more useful consumption on Windows. Follow through with the given steps to change the settings:
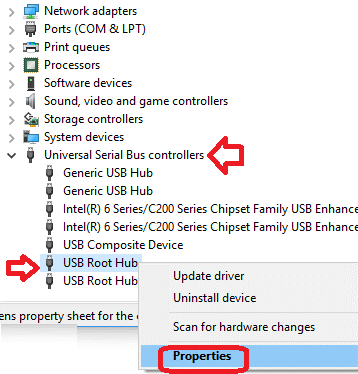
Step 1: To open Power Management settings for USB Root hub run the command on Windows. Press Windows Key + R to open Run Command. Now type devmgmt.msc and click on OK.
Step 2: In this tab, click on Universal Serial Bus controllers. Right-click on the USB Root Hub option. Go to Properties from the options.
Step 3: Under the Properties tab for the USB Root hub, go to the Power Management section. Check for the option Allow the computer to turn off this device to save power. Uncheck this option in case it has been opted and click on Apply.
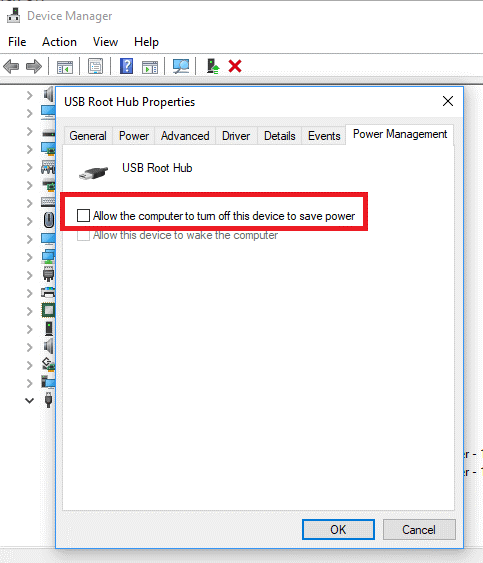
Now, you are good to use your USB device with the computer.
Also Read: How to enable/disable USB port on Windows.
Method 2: Use Smart Driver Care


Smart Driver Care is a number one tool to update all device drivers on your Windows PC. It comes as a one-click solution for the computer when it is suffering from incompatible, missing or outdated drivers. You can always rely on its large database of device drivers to fix the issues on your computer. It will help you with no sound, printer not detected or display issues caused by device drivers. Smart Driver Care is a driver updater, which will scan your computer and show you a list for all the outdated drivers.
Step 1: Download Smart Driver Care from the given link below:

Step 2: After the successful download, install the program correctly. Give the system permissions to make changes to the settings.
Step 3: The scan will run automatically as Smart Driver Care is done with the setup. This scan will show you results for the system driver’s current state. It will present you with a list of the drivers which need to be fixed.
Step 4: You need to recognize the USB driver from the list and select it after that click on Update. Else, you can choose all the drivers shown in the list, and click on the button Update All.
Step 5: You will see the tool take a few minutes to update all the drivers. Once finished, it will ask you permission to restart your computer. This is an important step, so do not skip it as you need to allow the restart to apply the changes to the system.
Now, you can check your USB device with the Windows 10, and it will be correctly working. This is how you can use Smart Driver Care to fix USB not recognized in Windows 10 issue.
Conclusion:
You can use both the methods to fix USB device not recognized in Windows 10. It’s easier to update device drivers in Windows 10 with the help of a driver updater. We recommend using Smart Driver Care as it is one of the best driver updaters available in the market.
We hope this article will be helpful to you as you are trying to fix your Bluetooth devices not connecting to your computer. We would like to know your views on this post to make it more useful. Your suggestions and comments are welcome in the comment section below. Share the information with your friends and others by sharing the article on social media.
We love to hear from you!
We are on Facebook, Twitter, LinkedIn, and YouTube. For any queries or suggestions, please let us know in the comments section below. We love to get back to you with a solution. We regularly post tips and tricks, along with solutions to common issues related to technology. Subscribe to our newsletter to get regular updates on the tech world.
Related Topics:
How to update Graphics Drivers in Windows 10.
How to update video drivers in Windows 10.