
Data powers everything we do and is undoubtedly one of our most important assets. And when it comes to storing or transferring data on the go, USB sticks are our first choice. Isn’t it? The importance of USB flash drives in our day-to-day lives cannot be neglected. USB drives are easy to carry, extremely useful, and frequently used to back up files and data. As the world has become more digital over time, it gives us more reason to rely on USB storage drives.

Image source: Make Use Of
So, before we unplug or remove a USB device from your Windows PC, we first tend to eject it to avoid data loss or corruption of files. You must launch the File Explorer app, right-click on the USB drive, and select “Eject.” Once you eject the USB drive, Windows pops up a notification saying, “The USB mass storage drive device can now be safely removed.” This is the right way to eject a USB drive on your Windows PC securely.

But what if Windows 11 fails to eject a USB drive? Well, this sure sounds tricky.
In this post, we have listed several solutions that you can use to fix the “unable to eject USB drive” on Windows 11.
Let’s begin!
Also read: How To Fix Windows Doesn’t Assign Drive Letter to External & USB Drive.
Can’t Remove USB Drive on Windows 11? Here’s the Fix!
Solution 1: Terminate Apps using Windows Task Manager
If any background process or application still uses files stored on the USB Drive, Windows may fail to eject the USB storage media securely. Here’s how you can fix it:
Press the Control + Shift + Escape key combination to launch Windows Task Manager. Switch to the “Processes” tab.

Go through the list and hunt for a program or app that you still think is using the USB drive. Once you find it, right-click on the process and select “End Task.”
Reboot your device and check if the issue was resolved.
Also read: How to Create a Bootable Windows 11 USB Drive.
Solution 2: Use the Disk Management Utility
Windows offers you a variety of ways to eject a USB drive securely. You can also use the Disk Management utility to eject a USB storage device in case you cannot do it using the File Explorer app. Here’s what you need to do:
Right-click on the Windows icon placed on the Taskbar and select “Disk Management.”

The “Disk Management” window will now appear on the screen. Right-click on the USB removable drive you want to remove and select “Eject.”

Exit all windows and then reboot your device.
Solution 3: Via the Settings App
Using the default Settings app on Windows to securely eject a USB drive. Follow these quick steps to proceed:
Tap the Windows icon on the Taskbar and select “Settings.” Switch to the “Bluetooth and Devices” category from the left menu pane.

Select “Devices.” Now, tap on the three-dot icon placed next to the USB drive and select the “Remove Device” option.
Hit on the “Yes” button to confirm your action.
Solution 4: Use the Safely Remove Hardware Utility
Press the Windows + R key combination to open the Run dialog box. Type the following command in the text bar and hit the Enter key.
RunDll32.exe shell32.dll,Control_RunDLL hotplug.dll

You will now see the “Safely Remove Hardware” window on the screen. Select your USB drive and hit on the “Stop” button.

Press the OK button to confirm.
Solution 5: Use the Device Manager App
Press the Windows + R key combination to open the Run dialog box. Type “Devmgmt.msc” in the textbox and hit Enter.
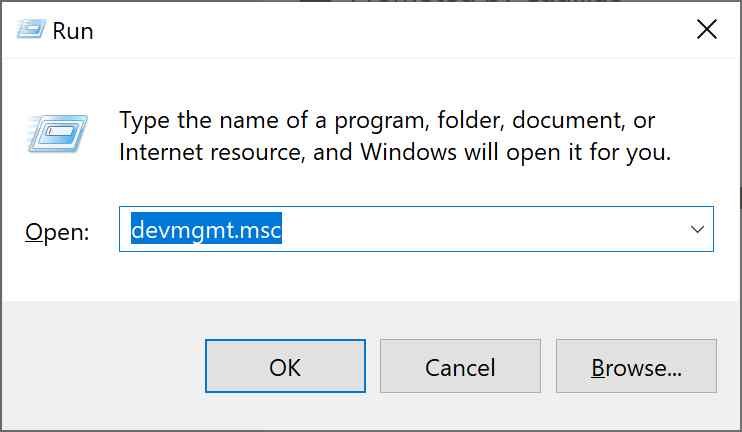
The Device Manager window will now open on the screen. Select “Disk Drives.” Right-click on the USB drive you wish to eject and select “Properties.”

In the Properties window, switch to the “Policies” tab.
Select “Better Performance” and hit on the OK button.
Also read: How To Update USB Drivers In Windows 10
Solution 6: Run the Hardware and Devices Troubleshooter
Launch Command Prompt in admin mode. Execute the following command to run your device’s hardware and devices troubleshooter.
msdt.exe -id DeviceDiagnostic

You will now see the “Hardware and Devices” window. Hit on the “Next” button to run the troubleshooter.
Also read: 5 Uses Of USB Drive You Probably Don’t Know
Conclusion
Here were a few simple workarounds to overcome the “Unable to eject USB drive on Windows 11” issue. You can use any of the above-listed methods to eject a USB removable media on your Windows PC securely.
Was this post helpful? Feel free to share your thoughts in the comments box! Follow us on social media – Facebook, Instagram and YouTube.