Wondering how to create a bootable Windows 11 USB drive? Well, you’ve come to the right place! The latest update of Windows brings together a wide array of useful features that can maximize your productivity, offering you a revamped virtual creative space for getting things done.
Windows 11 is making its public debut later this year, and yes we’re excited! From a rejuvenated Start menu to new multi-tasking windows, Windows 11 is packed with everything innovative. To upgrade to Windows 11, the minimum requirements to meet include a 64 GB or larger storage space, 4 GB RAM, 1 GHz processor, and a DirectX 12 compatible graphics card.
Windows 11 will be available to download in just a couple of months. However, if you want to create a bootable Windows 11 USB drive, you can do that as well. Let’s quickly learn how to make a Windows 11 bootable drive in just a few steps.
Also read: How to Create Windows 10 USB Bootable Drive
1. Check System Requirements

First things first, right? Before you begin the process, make sure you have a USB flash drive of 8 GB (or more) in handy.
Once you’ve arranged a USB stick of at least 8 GB storage capacity the next step is to install the Windows 11 ISO file. We will recommend you trust Microsoft’s official website, as you should only rely on trusted sources for safety concerns. Well, there’s also an option to download the Windows 11 ISO file from any third-party website but yes, that’s totally up to you.
And at last, the last step is to ensure that your device meets minimum system requirements to handle the upgrade. Visit Microsoft’s official webpage listing Windows 11 specifications to see if your PC fulfills the basic requirements that are needed to install the update.
Once you’ve made sure that everything is in place, you can proceed to the next step!
Also read: Fixes “Unable To Reset PC. A Required Drive Partition Is Missing” Error
2. Download a Third-party Tool to create a Bootable Windows 11 USB Drive
The next step to create a Windows 11 bootable drive is to download a dedicated third-party tool to get the job done in minimum steps.
Visit this link to download Rufus.
Rufus is a light-weighted, fast and legit tool that allows you to create a bootable USB drive easily. Once you’re done installing the Rufus utility tool on your PC, let’s move to the next section.
How to Create a Bootable Windows 11 USB Drive
Follow these quick steps to begin the process of creating a Windows 11 bootable USB drive.
Launch Rufus and then plug in the USB stick to your PC or laptop. Also, just quickly ensure that no additional storage devices are connected to your system at this moment.
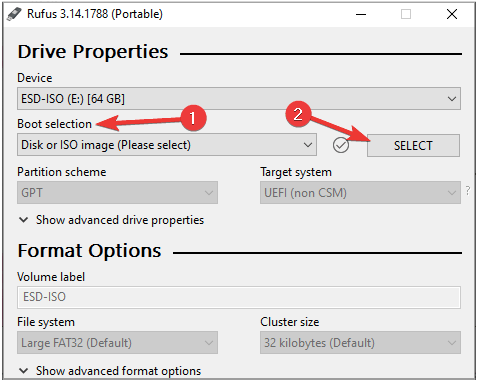
In the Rufus utility tool window, select the respective storage device. (USB flash drive)
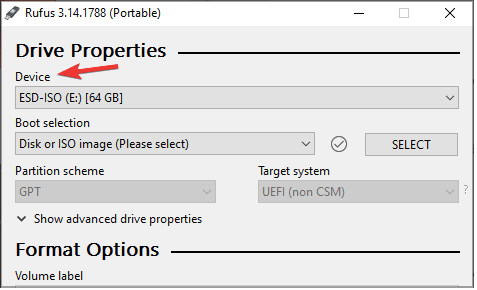
Set the Boot Selection value as “Disk or ISO image”. Tap on the “Select” button placed right next to this option.
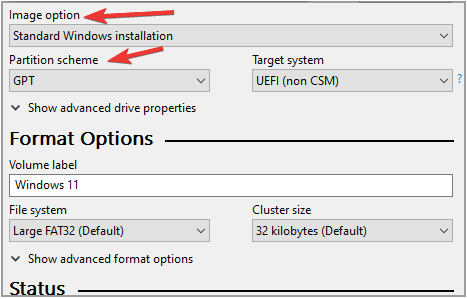
Now, in the next window, set the “Image Option” value to “Standard Windows Installation”.
Select “GPT” as “Partition Scheme”.
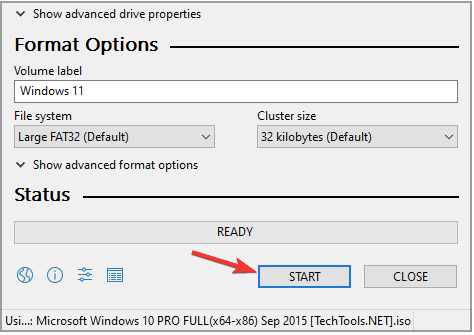
Scroll down and then hit the “Start” button to create a bootable Windows 11 USB Drive.
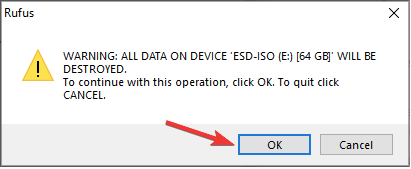
Windows will pop up a confirmation message displaying that all the currently stored data on the connected USB stick will be erased. Tao on OK to confirm and proceed.
Follow the on-screen instructions and wait for a few minutes until the process is completed.
Once the process is finished, your bootable Windows 11 USB drive will be ready to use. You can now remove the USB flash drive from your machine and keep it somewhere safe. Your bootable USB drive is now ready. You can use your bootable USB drive on your PC or on a different PC to install Windows 11.
Also read: How to Fix No Bootable Device Found Error?
Conclusion
It’s always a good idea to have a backup of the installation file. Isn’t it? You can use the above-mentioned steps to create a bootable Windows 11 USB drive.
Was this post helpful? Feel free to share your thoughts in the comments space!
rufus buck gang
Deberias publicar mas temas como esta. Gracias, Un saludoMridula Nimawat
Gracias.