
When you insert the Seagate external hard drive on your computer, you may find that it may refuse to get detected. As a result, the disk, folders, and data saved on it become inaccessible. This is undoubtedly an annoying issue with Seagate storage devices that may/may not get identified in several circumstances. You may consider formatting it if there is no vital data on the hard disk. But, if it contains a large amount of critical data, encountering “Seagate hard drive not showing up” can be a critical issue.
In this post, we’ll explain why your Seagate external hard drive isn’t showing up or being identified and the solutions to fix this issue.
Must-Read: How to Recover Files from External Hard Drive Not Detected
What are the leading causes of encountering “Seagate hard disk not detected”?
Some potential reasons are listed below:
- The USB port and linked cable are faulty or damaged.
- Running outdated Windows/macOS.
- The file system is not supported.
- Problem with the motherboard.
- A virus-infected USB device.
- Hard drive partitioning concerns.
- The hard disk drive is either corrupted or outdated.
- External drive damage or corruption.
| FIRST, Recover Data From The Seagate Hard Drive!
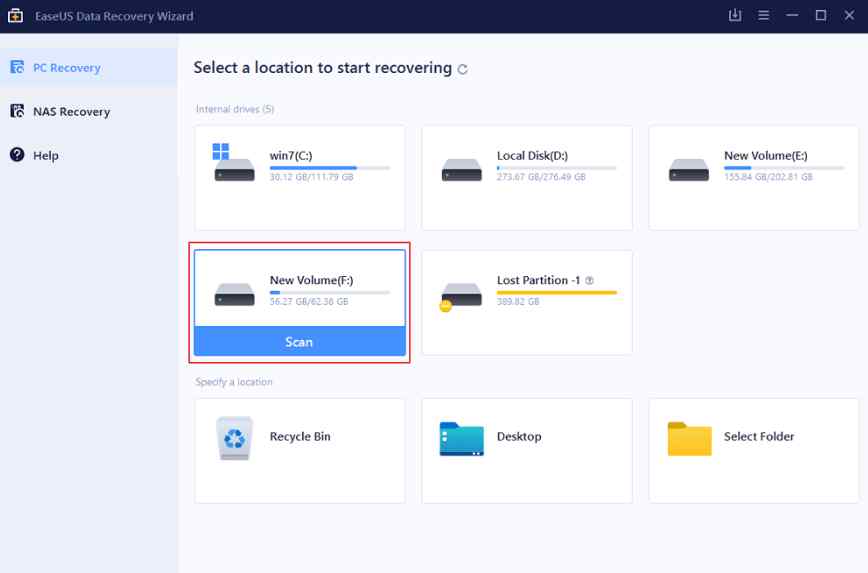
There is a significant possibility of data loss when attempting to resolve issues associated with the Seagate hard disk not detected. Hence, you should back up all your data before proceeding with the troubleshooting workarounds. Additionally, consider recovering data from the Seagate external hard drive so that no potential fix harms your stored data. We recommend using a reliable hard drive data recovery software, such as EaseUS Data Recovery Wizard, to rescue files and folders from inaccessible, damaged, and RAW external hard drives. Some of the most significant features of EaseUS Data Recovery Wizard are mentioned below: ● Quick and simple All it requires is three clicks to complete the data recovery process. No additional skills or perquisites are necessary to get started with the tool. ● Powerful scanning modes There are several scanning modes to choose from. For instant results, choose Quick Scan mode and locate recently deleted files and folders using the basic algorithm. Deep scanning mode searches storage devices sector by sector to guarantee successful file recovery. ● Preview before the recovery You may see a preview of all the files accessible for recovery. To minimize superfluous recovery, select the file types you wish to recover. ● Recover various file types Using EaseUS Data Recovery Wizard, you can quickly restore various file types and formats, including documents, images, music, video, email, and others. ● Deals with common data loss scenarios EaseUS data recovery software can recover all your missing/lost/deleted files in a single scan, be it due to human error, virus attack, or storage device getting formatted or corrupted. Follow the steps mentioned below to back up and recover data using EaseUS Data Wizard: Step 1: Download the latest EaseUS Data Recovery Wizard version using the Download button below. Follow the on-screen directions to install the program successfully! Step 2: On your PC, launch EaseUS Data Recovery Wizard. Click the “Scan” button after selecting the drive from where you want to retrieve lost files. If you’re going to get back your missing data from an external storage device, make sure to connect the external device to your computer first.
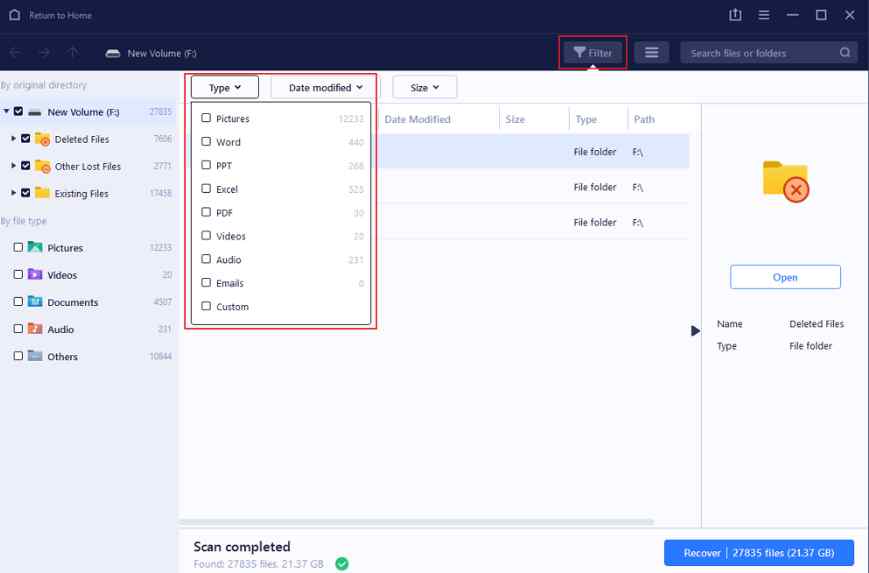
Step 3: The data recovery program will immediately scan for the deleted/missing/lost files and folders. Additionally, you can filter specific files quickly after the scan is completed by clicking the “Filter” button.
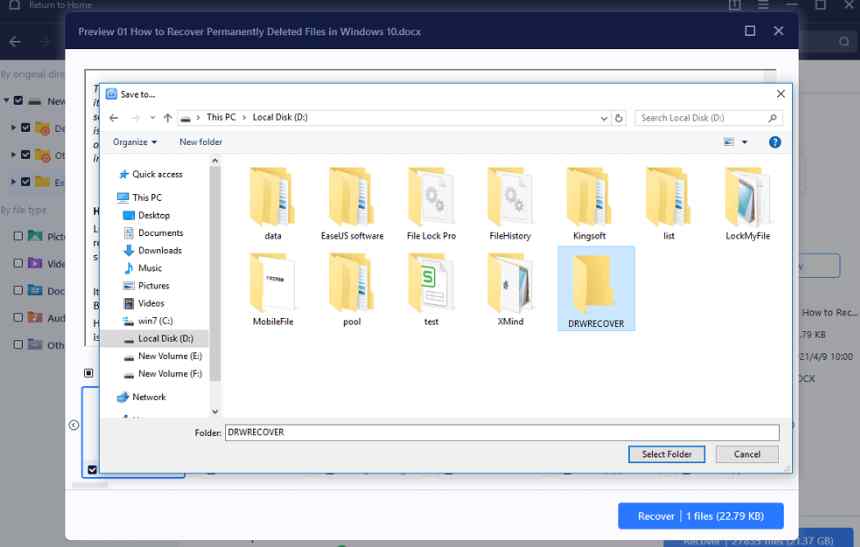
Step 4: Preview the list of files/folders listed out by EaseUS. Finally, mark the files you want to get back and click on the “Recover” button. Make sure you select a secure location where you would like to save all the recovered files.
Now that you’ve successfully recovered your accidentally deleted, missing, lost files and folders from your hard drive, follow the workarounds shared below to fix the “Seagate hard drive not showing up” error on your Windows PC. |

How To Fix “Seagate Hard Disk Not Detected” Problem On Windows PC
Follow the list of workarounds in the sequence shared below and let us know which one fixes your problem of the “Seagate external hard drive not working” issue.
Solution 1: Use a different USB Port and USB Cable
You will notice that your Seagate external hard drive only flashes, but your PC has not detected it. In such a scenario, you must remove the hard drive from the USB port and re-insert it into a new USB port. You may also consider restarting your PC and reconnecting your Seagate external hard drive to the computer.
If it doesn’t help, you can attach it to a new computer or use a different USB cable to resolve the Seagate hard disk not detected issue.
Solution 2: Display all the hidden devices on your Windows
Consider displaying all hidden devices if your Seagate portable hard drive fails to appear. Here’s how it’s done:
- Press Windows + R, type “devmgmt.msc” and press Enter.
- Select Show hidden devices from the View menu.

- Do you see any grey entries? Select the Uninstall option from the context menu.
- It is now time to restart your computer!
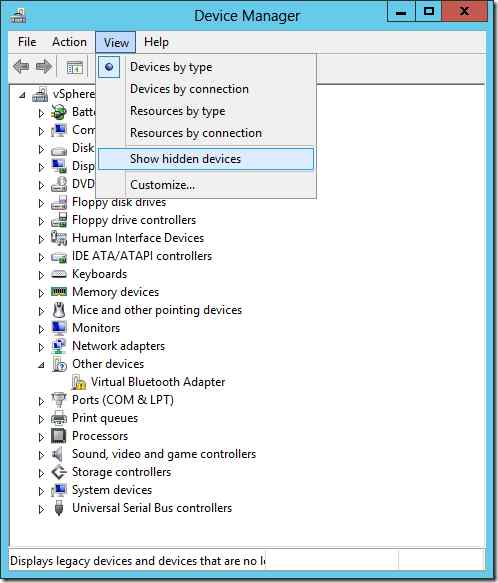
Hopefully, you will not face any issues connecting your Seagate external hard drive to your PC.
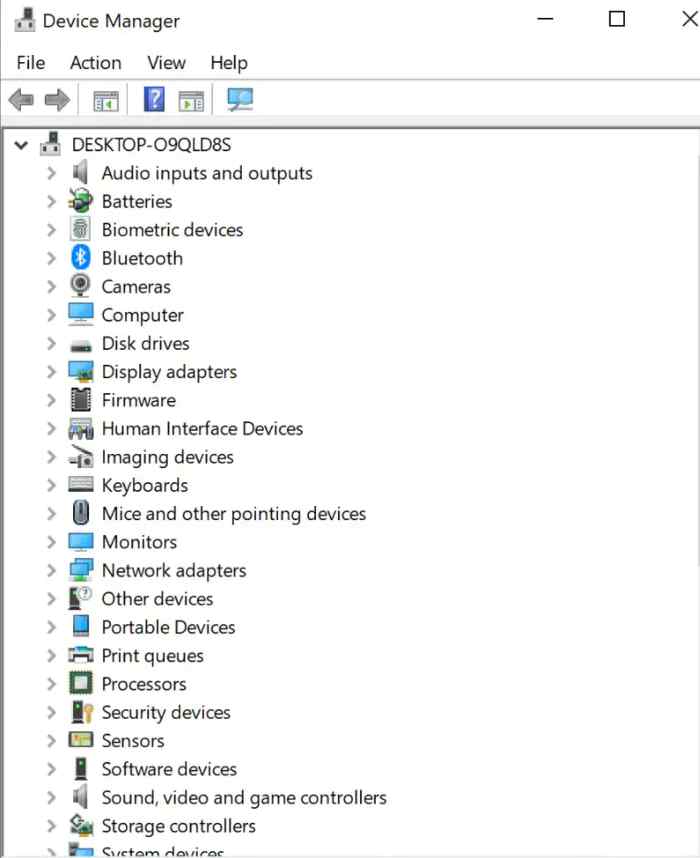
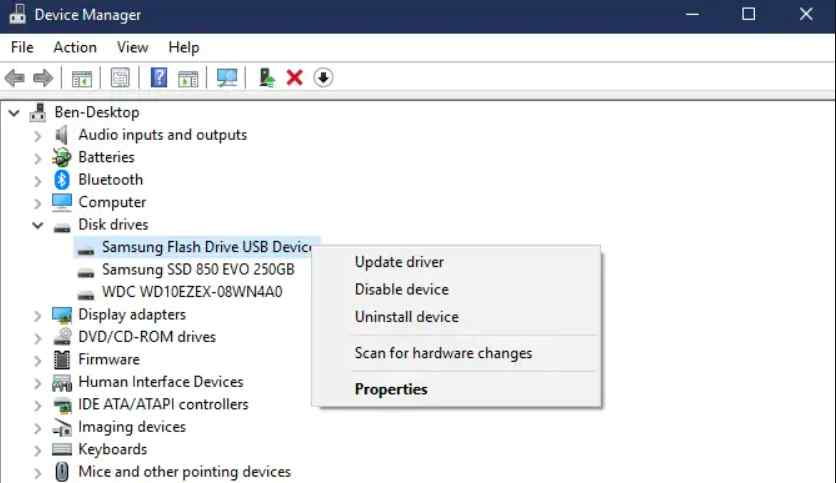
Solution 3: Update Seagate Hard Drive Driver
If your hard drive is not identified in Device Manager or Disk Management, consider reinstalling or updating the Seagate disk driver before attempting again. Here are the specific actions to take:
Step 1: Connect the broken Seagate external hard disk to your computer.
Step 2: In the search box, type device manager and choose “Device Manager” on the menu.
Step 3: Expand disk drivers and right-click on your external hard drive; then choose “Update Driver.”
Step 4: When the procedure is finished, select “Search automatically for updated driver software” and restart the PC.
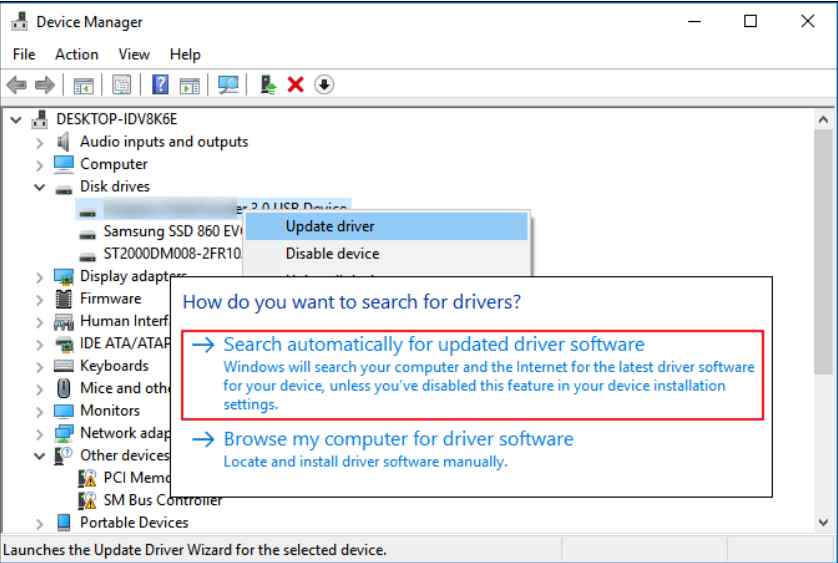
Alternatively, you can take the help of a dedicated driver updater software to get the job done. The application will not only help you to update drivers for external storage devices only, but it also supports batch driver installation.
Solution 4: Use a different device
Think rationally. If the drive is corrupted, the computer will not recognize it. So, try it on another device and see whether it’s detected there. It might be the device’s fault if the drive is unavailable on another Windows or Mac. So, you may either replace it or seek assistance from the manufacturer or a repair company.
If it only works on a Windows PC, it’s probably not formatted for macOS. If your hard disk works on another Mac that hasn’t yet upgraded to macOS Monterey or the latest Ventura version, you’ll need to work around certain macOS quirks to get it operating again.
Must Read: Hard Drive Has Wiped On Windows 11/10, What To Do?
Solution 5: Turn on the visibility of the external hard drive on your Mac
External disk visibility must be enabled in macOS Monterey, Big Sur, or Catalina. Set your preferences by doing the following:
Step 1: To begin, open Finder and select Preferences from the menu. Select General from the drop-down menu.
Step 2: Check ‘Hard drives’ and ‘External disks’ checks under ‘Show these things on the desktop.’

Step 3: Remember that you must enable external hard drive visibility.
Step 4: Likewise, navigate to Finder > Preferences > Sidebar. Check the ‘Hard drives’ and ‘External disks’ checks under ‘Show these objects on the sidebar’ Mac external hard drive visibility.
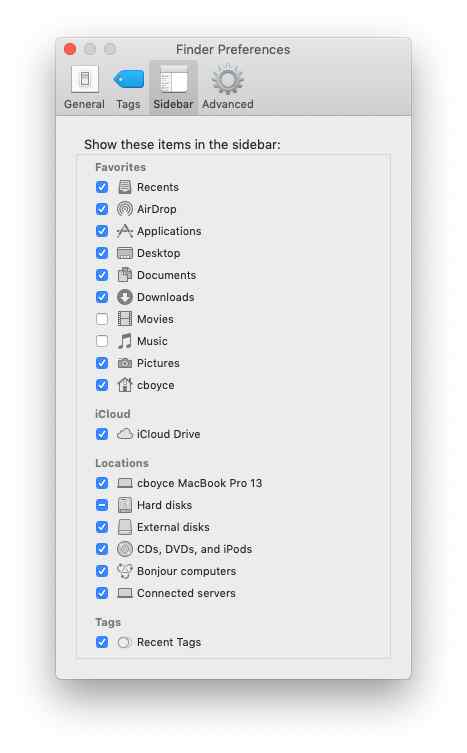
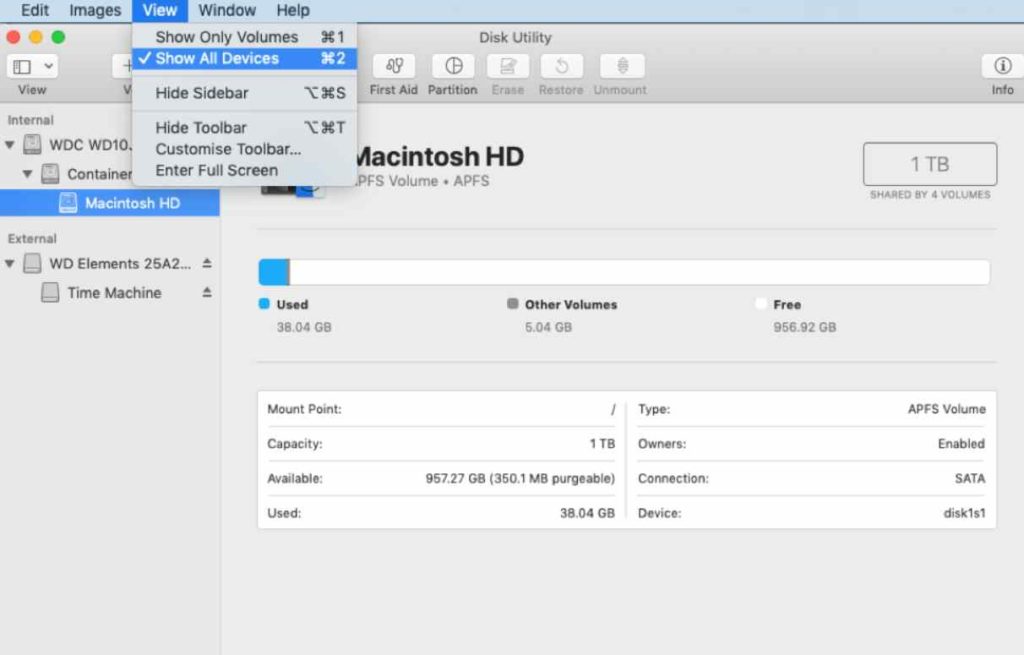
Step 5: Go to Finder > Applications > Utilities > Disk Utility as well. To see all mountable and non-mountable devices in Disk Utility, go to View > Show All Devices.
Hopefully, this instantly resolves the Seagate hard disk not detected an issue on your Mac without any hiccups.
Solution 6: Use the Disk Utility on Mac
If your Seagate external hard drive is displayed in the disk utility, you may take a deep breath since your hard drive is in good working order. Mounting the Seagate hard disk makes it accessible in most circumstances. When you put in a USB, the operating system immediately installs the hard disk. However, if your Seagate hard disk is unmounted, you can install the hard drive manually. Follow the instructions below:
Step 1: Navigate to the Disk Utility tab.
Step 2: After you’ve opened the tab, right-click on the external drive in Disk Utility and select Mount. Alternatively, you may use the ‘Mount’ button at the top of the window.
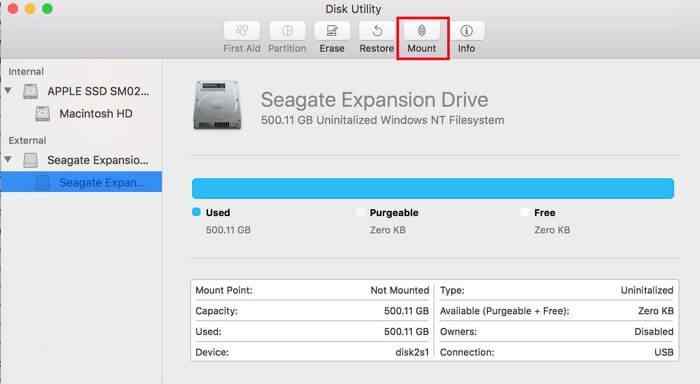
Did this help you to fix the “Seagate hard drive not showing up” on Mac? If the issue persists, check out the next workarounds listed below!
Must-Read: How To Fix Disk Utility Won’t Erase Hard Drives On Mac
Solution 7: Repair Seagate External Hard Drive using First Aid
If your Seagate external drive does not appear on Mac, even after manually mounting the hard drive using Disk Utility, your hard drive may have disk issues. Seagate’s native disk repair program, First Aid, offers you a solution for repairing your external hard drive. Follow the instructions in First Aid to repair the hard disk.
Step 1: Go to the Dock’s Launchpad icon and look for the Other Option.
Step 2: Locate and launch Disk Utility.
Step 3: Select the unmountable Seagate external hard disk and select First Aid from the menu at the top.
Step 4: To repair the hard disk, click Run.
Hopefully, this fixes the issue with “Seagate external hard drive not working on Mac.” If it worked out for you, share your experience in the comments below!
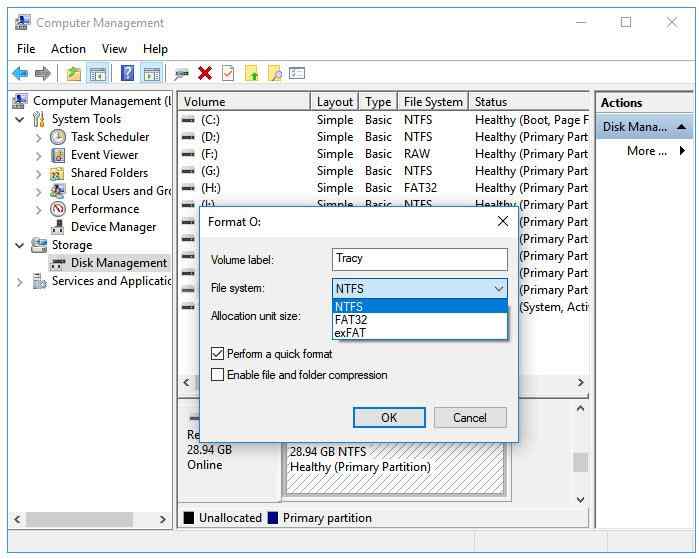
Solution 8: Format the raw Seagate Hard drive to NTFS
If your external hard drive appears as RAW or Unallocated in Device Manager or Disk Management on your computer, you need to format it.
Step 1: First, you need to plug in the Seagate external hard drive and launch the Disk Management.
Step 2: Right-click the inoperable RAW drive and select “Format.”
Step 3: Assign a label to the volume, select NTFS as the file system, and select “Quick Format.” To begin the formatting, click “OK.”
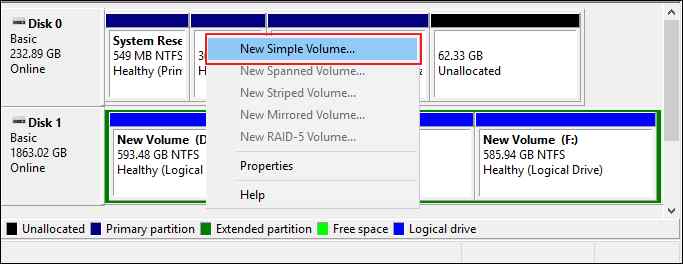
Solution 9: Form a New Partition
Another typical reason for this Seagate hard drive not showing up is because your drive is unallocated in Disk Management. You will need to establish a new partition for it in this case. Here’s how to go about it.
Step 1: Firstly, you have to right-click the unallocated disk and select New Simple Volume from the menu that appears.
Step 2: A new Simple Volume Wizard will be shown. Follow the wizard’s instructions to set the volume size and provide a drive letter or path.
Step 3: Finally, remove the Seagate external hard disk and reconnect it to the PC. The disk will then be identified and shown in the Windows File Explorer.
That’s it! This way, you can quickly get away with the annoying “Seagate hard disk not detected” problem on Windows PC.
Solution 10: Update Your PC With Latest System Drivers
Corrupted drivers or waiting driver updates may be interfering with the connection. Seagate external hard drive identified but not visible might be due to awaiting upgrades. So, as soon as feasible, update the device drivers.
Step 1: Launch Device Manager and navigate to the driver’s category. We will select the Universal Serial Bus Controller category since we are attempting to connect a Seagate hard drive to a computer.
Step 2: Right-click the driver to bring up the “Update Driver” menu. Update the driver by clicking on it. If there is no update option in Device Manager, you can find the driver on the device manufacturer’s website.
Once you update the drivers, there’s a high probability the problem of the Seagate hard drive not showing up will be fixed. You may take the help of a reliable driver updater program like Advanced Driver Updater to get the job done effectively and efficiently.

Conclusion
You now know that there are several remedies you may attempt if Windows PC and Mac do not recognize your Seagate external hard drive. Furthermore, if you lose the hard drive data, the EaseUS Data Recovery wizard application can assist you in any situation. So, no more permanently losing your valuable data due to random errors.
Follow us on social media – Facebook, Instagram and YouTube.
Frequently Asked Questions-
Q.1. Why can’t I access my Seagate external hard drive?
Check to see if the drive has a drive letter. Check that other drives have a letter if it is missing. If the other drives have letters but the external does not right-click and choose to change the drive letter or path. Click Add, then select a letter and click OK.
Q.2. How do I fix an unresponsive external hard drive?
Open This PC (My Computer) on the desktop and pick the appropriate external hard disk. Right-click it and choose Properties -> Tools -> Check.
Q.3. How do I get my Seagate external hard drive to work?
There is no need to do anything unique or extra to make the drive function on a Windows-based computer. Connect the power and USB cables, and the drive should display in (My) Computer/This PC and Windows Explorer/File Explorer.
NEXT READ:
- How To Recover Data From An External Hard Disk Not Detected
- How To Restore Hard Disk Capacity and Recover Missing Space?
- How to Format a Hard Drive in Windows 11
- Deleted Files from Hard Drive Still Can’t Free Up Space? Here Are the Fixes
- {FIXED}: External Hard Drive Not Showing Full Capacity On Windows (2022)
- Second Hard Drive Not Detected on Windows 10