
Hard drives installed on a Windows 10 laptop or a desktop can sometimes pop up an error “Unknown Not Initialized.” This error is visible in the Disk Management menu on the Windows 10 computer. In such a scenario, users are unable to access the content of that drive. Not until you initialize it. But does initialize the disk drive or hard drive erases data? And if the answer is YES, it’s a major concern for users as they face a total loss of their data that may include various personal/professional files.
In this piece, we’ll discuss how you can initialize the disk without any fear of data, for you have Advanced Disk Recovery at the rescue.
What is Disk Initializing?
Usually, disk initialization is associated with the functioning setup of newly purchased hard drives. For example, you get a new hard drive, just installing it on the system doesn’t suffice. Hard drives are required to be manually initialized to function on the concerned PC as Windows OS can’t automatically recognize its installation.
However, sometimes, due to system errors, the initialized disk becomes unusable, and the OS asks for re-initialization. Re-initialization of the disk puts your drive data at risk of deletion and wipe-out. So, how do you initialize your disk without losing your data?
How to Initialize a Disk?
In case your drive is new, then there is no data in it, and you don’t have to worry about any potential loss. You can use the general manual method to initialize the disk.
Step 1: Right-click on the Windows Start button and head to Disk Management.
Step 2: The uninitialized disk will be marked as the same. Right-click on that disk button and select Initialize Disk.

The disk initialization process will automatically begin and complete itself. Now, what you need to do is allocate the disk. Here’s how to do that:
Step 1: Right-click on the unallocated drive on your Windows 10 Disk Management menu.
Step 2: Head to New Simple Volume.
Step 3: Firstly, you’ll be required to format that particular drive.
Step 4: Now, you can assign a drive letter to the disk and use it to store data.
But, this is feasible, when the disk is new. What if, there is an old disk that has become inaccessible due to some system errors. To access it, you’ll need to initialize it, but it will result in data loss.
You’ll have to execute an additional process between the initialization and allocation process to safeguard your data.
How to Initialize a Disk without Losing Data?
Once you’ve completed the first two steps of initializing data, before heading to allocation, execute a hard drive recovery process. That’s where Advanced Disk Recovery comes in. Advanced Disk Recovery is one of the best and most reliable hard drive recovery software for Windows-powered computers. It can not only perform data recovery on an unallocated disk drive but can also retrieve data from formatted hard drives.
Here’s how you can use Advanced Disk Recovery
Step 1: Download Advanced Disk Recovery.

Step 2: On the Welcome tab of the software, select the storage area, you wish to run the recovery process.
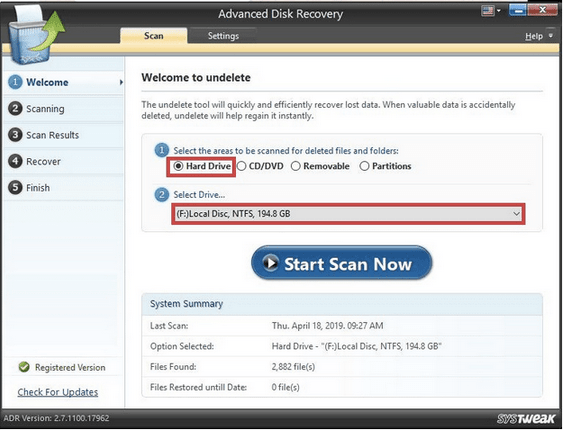
Step 3: Click on Start Scan Now button.
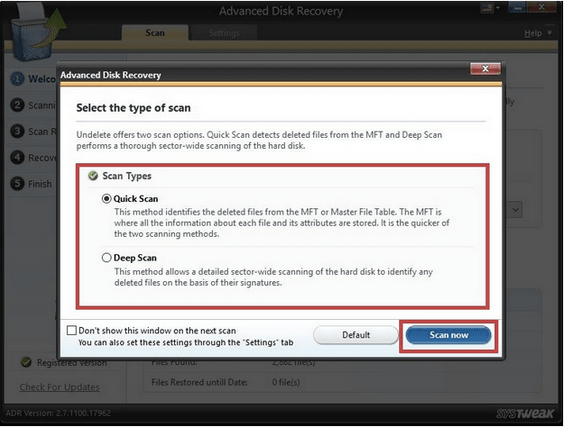
Step 4: Advanced Disk Recovery offers two types of scans. One is Quick Scan, and the other is Deep Scan. We recommend using a deep scan method as it scrutinizes the logs of the drive extensively to extract any file or data that can be recovered.
Step 5: Select Scan Now.
Step 6: Advanced Disk Recovery will scan and find the items or traces that can be potentially recovered. Mark and select the files that you wish to recover.
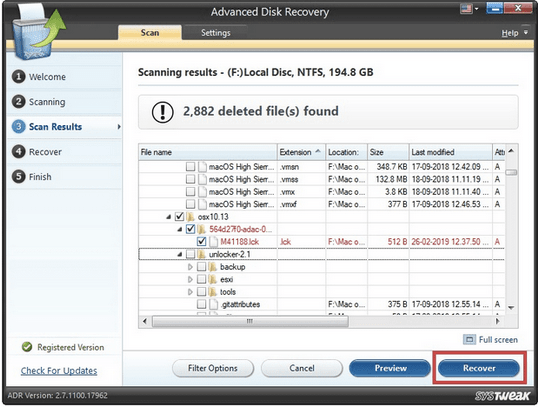
Step 7: Click on the Recover button at the bottom-right corner of the menu.
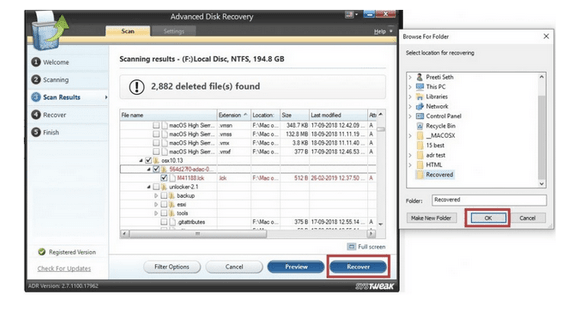
Step 8: The recovered data is stored in a Recovered folder. Select the storage area to save that particular folder upon recovery. DO NOT select the same storage drive that is being scanned as a storage area for recovered items.
Now the automatic process for recovering the selected data will begin. Since it was a Deep Scan process, the whole thing may take some time depending on the Internet speed.
Loss of data is a significant concern; however, with Advanced Disk Recovery, you can proceed with unexpected disk initialization without the fright of losing your personal or professional data. The software tool will scan and recover all the deleted files in no time. Moreover, the tool is also compatible with previous versions of Windows OS.
Note. This process is to be executed before the allocation process. After recovery, you can go through the allocation or disk partition without hassle or worry.
Tell Us What You Think:
Tell us if this resolves your issue, and keep yourself updated on such solutions to your daily tech troubles by following WeTheGeek at Facebook, Twitter, and YouTube.
Also, let us know your opinion on Advanced Disk Recovery. Download it now!
You May Also Like