
Disk management is as simple as managing your shelves where you can decide space storage, capacity, status, and more for future betterment. In the same way, through disk management in Windows 10, you can go through type, layout, the capacity of each disk, their partition and fault tolerance.
Let’s just scroll through the article to know the details of disk management so you may know how to perform better actions without using any outdoor software in most cases.
How To Open Disk Management?
Having so many ways, let’s begin with the quickest.
Method 1: Right-Click The Start Menu
As you right-click the Start menu on the bottom left corner of Windows, you will be able to find the option of ‘Disk Management’. Click it and work ahead.

Method 2: Windows + R
Just press your Windows icon on the keyboard along with ‘R’.
After this, when the Run command box opens, type diskmgmt.msc which shall take you to disk manager.

Method 3: Computer Management Through Control Panel
- From the ‘Search’ typing or shortcut in the Start menu, open the Control Panel.
- Choose System and Security.

- From the next box, pick Administrative Tools
- In Administrative tools, tap Computer Management
- On the left side, you will be able to find Disk management under the header of ‘Storage’. Click it and arrange your work accordingly.


Method 4: Search Disk Management In The ‘Search’ Box
- Just type Disk Management in the Search box and choose the option ‘Create and Format hard disk partitions.
- Once you open it, you will reach the final block for managing the space.

How To Operate Disk Management Efficiently?
Notice the Disk management and disk partition box that appears on your screen. You can find the name, size, and status of each disk and maintain the utility that suits your system.

1. Create Disk Partition With Disk Management
- It is quite simple to create another partition in the disk space, only if the free space is available in the disk size. To make a new partition, just right click on Unallocated Space (in the bottom half of the box) and choose New Simple Volume.
- Specify the size/volume in MB and click Next.
- Assign the Drive Letter after which you have to format the partition into default file.
- Click Finish and notice the new partition in your Windows 10.
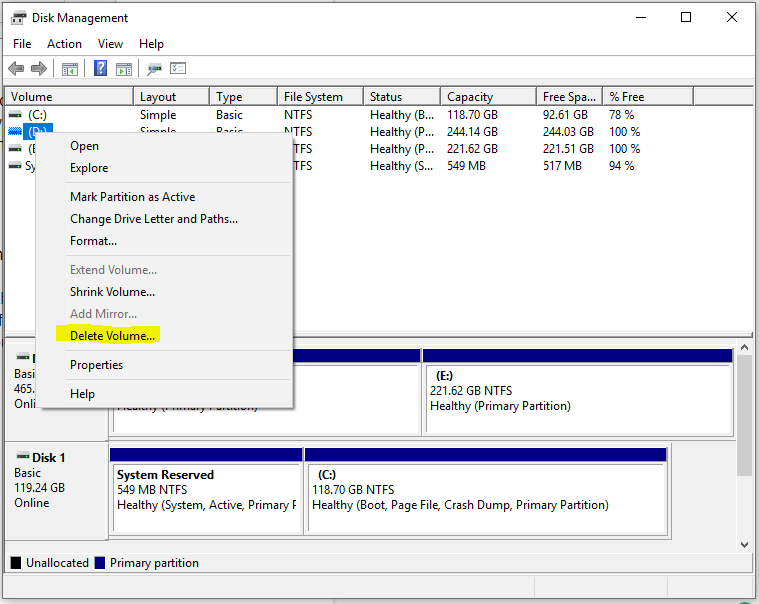
2. Delete A Disk Partition With Disk Management
If at some point, you wish to delete some disk space while keeping space free, you can easily do that with one click.
- Just stand on the folder (E.g. D:), right click on it and tap the ‘Delete Volume’.
- Once you are ready to do that, a command will ask your final response while warning to take a backup of the drive. Click ‘Yes’ and watch out your free space.
3. Resize A Disk Partition With Computer Management
Interestingly, you can always resize like expand or contract your disk space without formatting any of it.
- Make a right click on the drive, say (D:) and right click it.
- You can find the option of Shrink Volume. Tap on it.

- After clicking it, some time will be taken by your computer in querying the shrink space while identifying all the possibilities.
- Once the sub-window opens up, it asks you the amount to shrink in MB which you can enter as per the requirement.

4. Change The Drive Letter Of The Partition
- As the Disk management box is open, you have to right-click the drive whose name you are willing to change.
- Tap ‘Change Drive Letter and Paths’ option.
- In the next option box, as you click ‘Change’, all the alphabets crawler will appear in front. You can slide it down and pick the one you want to name.
- Click ‘Yes’ once a confirmation is asked.

5. Format The Disk Partition
Before moving ahead, remember that the formatting will remove all your data. So, any next step shall not be taken without taking data backup.
- Click right on the drive you wish to format.
- Choose the Format option. Once done, you need to choose Volume Label, File system, and Allocation unit size in the open Window. Click OK to move forward.
- When asked if you wish to continue or not, click OK. The work is done.

What To Do If The Partition Is Deleted Or Formatted And The Data Is Lost?
There might be a few chances when the data gets lost while you are handling the partition manually due to any careless mistake and the backup is also not made to make things worse. For such a situation, it is better to install any specific software, so you can get back all the files the way they were. Some of them include:
1. Advanced Disk Recovery:

If your data is lost in any case, just install Advanced Disk Recovery that scans your drive for deleted files thoroughly. While previewing, you can choose to recover the ones needed. Specify the location where you wish to recover them and the work is done.

2. EaseUS:

With 3 quick steps that include selecting location, scanning, and finally recovering your files, EaseUS will recover back your documents, images, videos, audios, emails and much more.
Moreover, EaseUS is quite easy to use, has fast scanning speed and is perfect to grab your space back.

3. Acronis Disk Director:

Due to any data corruption, accidental deletion or poor organization, if your partition has been lost, seek through Acronis Disk Director. The software automatically searches the deleted files while the wizard takes you through the quick detailed process by itself.
You can also choose Manual mode and control over the whole process as per requirement.
The Final Word On All About Disk Management And Partition Handling In Windows 10
Technology and computers have always made our life simpler since ages. But it is necessary that we keep the disk management in the line so as to control the space, corruption free files, and haphazard saving. For such cases, disk management and disk partition software can be learned through the above article.
Organize nicely and have a secured space! Follow us on social media – Facebook, Instagram and YouTube.