Windows 10 is an exceptional operating system, and every upgrade comes with even better ways to deal with issues that users face. Yet, there are times when things go out of hand. For instance, many users have come across “Windows 10 Scanning and repairing drive’” stuck issue. This essentially means that when you are trying to scan or repair a particular drive (C:, D:, E:, F: or any other drive), it gets stuck at a particular % or takes forever to complete.
Why Am I Facing “Windows 10 Scanning And Repairing Drive Stuck ” Issue?
If the Windows 10 scanning and repairing drive feature is stuck, it could be possible that –
- The drives are not configured correctly
- The hard drive you have has bad sectors
- You possible have a virus in your PC
- You didn’t shut down your PC properly
Ways To Resolve Windows 10 Scanning And Repairing Drive Stuck Issue
1. Sure-Shot Way To Fix “Scanning And Repairing Drive” Issue
Before getting into any manual steps, let’s first have a look at an easy and effective way that will help you solve the “scanning and repairing drive stuck” issue with utmost ease and effectiveness.
You can use a Windows utility such as Disk Speedup which is a specialist in wiping out defragments from hard drive, wiping out junk and repairing file systems. Let’s see how you can use Disk Speedup to check your drives for any issues –
- Install Disk Speedup from the link mentioned below. Run the installer wizard
- Now, here we shall be looking at two of its modules – (i) Disk Optimizer and (ii) Disk Doctor
(i) Disk Optimizer
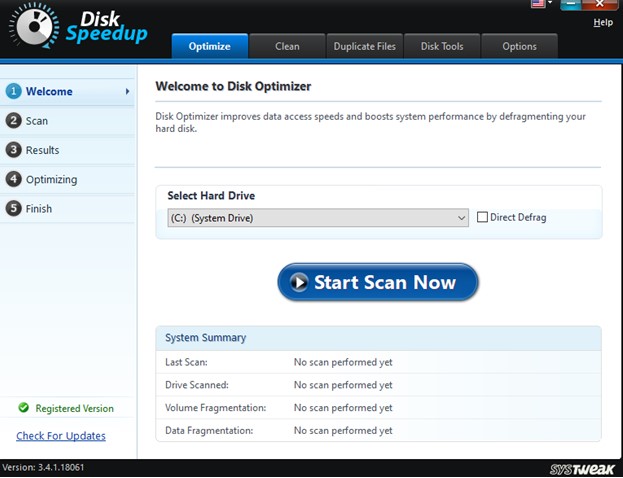
This module defragments your selected hard drive and thereby improves system performance and the disks’ ability to access data.
(ii) Disk Doctor

Now, for any issues in the disk, this module is something you can trust. It automatically scans your drives for issues, lists them and corrects them. You can further select from two analyze options, namely – 1. Normal, and 2. Thorough (This option even checks drives for bad sectors)

2. Using Control Panel
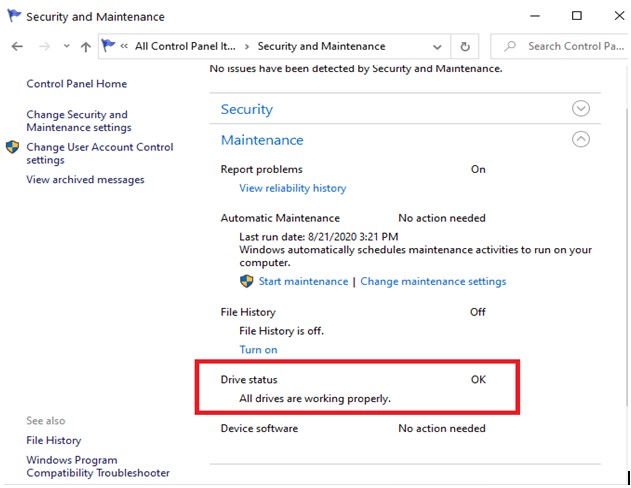
The first method that we are going to talk about is trying to get rid of Windows 10 scanning and repairing drive stuck issues using the Control Panel.
Steps:
- Type Control Panel in the Windows search bar and click on Open from the right-hand side
- Select View by Small icons
- Click on Security and Maintenance
- Under Drive Status, you will be prompted if there is an issue and you will also be able to find the link that will help you resolve the issue
3. Run Error Checking On Each of the Disks
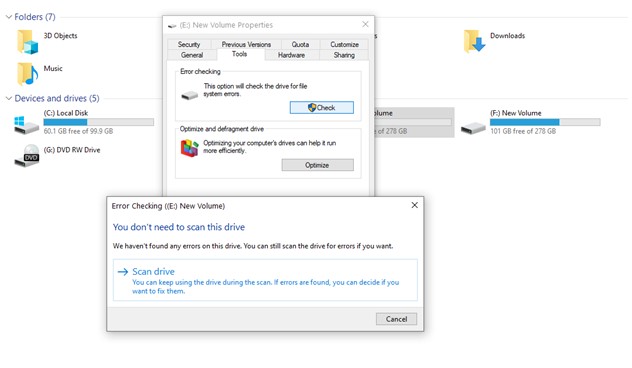
Another way you can fix the “scanning and repairing drive stuck” issue is to check each of the disks for errors.
Steps:
- Open Windows File Explorer by pressing Win + E shortcut
- On any given drive (E.g. C:, D:, E:, etc.) right-click and then select Properties
- Under the Tools tab, click on Check
- Now, click on Scan Drive which will start the scanning process
- If there are errors, Error Checking box will appear
- Click on Scan and repair drive
4. Try Disabling Check Disk On Booting In Safe Mode
Safe Mode boots the Windows system with only basic applications. It, therefore, becomes easier to dive into critical issues such as getting hold of file system errors and bad sectors in a drive.
If you are sure that the hard disk is fine and still you are getting the “scanning and repairing drive is stuck” issue, you can try disabling CHKDSK on booting by modifying the registry. For this, we will highly recommend that you take a backup of your registries to create a safe restore point should something go wrong.
Steps:
- Boot your Windows system in Safe Mode.
- Once the Windows boots into Safe Mode, open the Run dialog box by pressing Windows + R keys.
- Type Regedit and press Enter.
- Navigate to the following path:
HKEY_LOCAL_MACHINE\SYSTEM\CurrentControlSet\Control\Session Manager
- Choose BootExecute.
- Change Value data to autocheck autochk /k: ‘drive name’ (E.g., C)
- Click on OK.
- Restart your computer in normal mode and check if the issue has been resolved.
5. Using The Repair-Volume Command In Windows PowerShell

If your computer can boot properly into the operating system, then you can try using the Repair-Volume command in the Windows PowerShell. Again, this is a step that runs drive – wise. After the completion of this step, check if you “Scanning and repairing drive” is stuck or not.
Steps:
- Type PowerShell in Windows search bar
- Click on Run as administrator from the right-hand panel
- When the PowerShell window opens type or copy-paste the following command
repair-volume -driveletter DRIVE LETTER>
Note: It is important that you follow this syntax properly
6. Run CHKDSK In Safe Mode
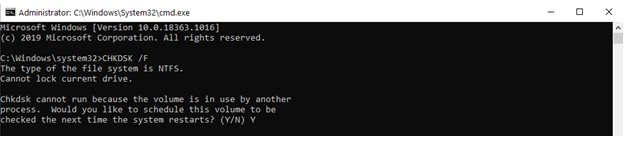
We have already discussed how taking preventive measures in Safe Mode can help you. So you can try running CHKDSK in Command Prompt. It is one way you can get rid of the ‘scanning and repairing drive” issue.
Steps:
- Boot into Windows Safe Mode using the method mentioned in Step No. 4.
- Once the system boots into safe mode, type cmd in the Windows search bar.
- When the Command Prompt window opens, type the below-mentioned command
CHKDSK /drive letter(E.g. CHKDSK /F)
- In case you receive the CHKDSK cannot run because volume is in use by another process message, enter Y and then again, press Enter.
- Reboot your computer in Normal Mode and check if the issue has been resolved.
To Conclude
We hope that the above ways and methods will help you resolve the “scanning and repairing drive (drive name ) stuck at XYZ % utmost ease. For more such content, keep reading and if you liked the blog do upvote it. You can also follow us on Facebook and YouTube.
David Morrison
Now that is what I call informative article. Thanks for sharing.