
Migration Assistant is an amazing tool developed to facilitate the transfer of files between Windows PC and Mac. It makes the process smooth and is a better way of transferring data rather than manually transferring all the files and folders using an external drive. However, as true with all software, users have claimed bugs and glitches with the Windows Migration Assistant tool too. This article focuses on those steps that you can try to fix the Windows Migration Assistant not working on Windows PC.
Also Read: Things to Remember When Switching From Windows To Mac
Why Does Migration Assistant Stop Working?
The Windows Migration Assistant tool is designed to work properly and transfer data between Windows and Mac. However, due to certain glitches, bugs, driver anomalies, etc this app does not provide the desired result. Here are a few reasons why the Migration Assistant gets stuck and might not work on your system.
Conflict with other apps: Although the actual reason is not known, it has been observed that the Migration Assistant not responding occurs if there is a conflict with other apps running in the background. The only possible solution to this is to close all the potential conflicting apps and try the transfer process again.
Disk Issues: Certain hard disk issues can cause the Windows Migration Assistant tool not to work on your PC.
Antivirus and other Security software: Sometimes your antivirus or other security software may identify the transfer process as a false positive and prevent the movement of data.
Administrator Rights: In many PCs, the transfer of data is limited only to the administrator account.So if you are not logged into the admin account then the transfer of data cannot take place.
Network Issues: One of the reasons why the transfer between your Windows and Mac fails is the availability of stable network connectivity between the two.
Also Read: How To Share Files Between Mac And Windows PC
What Steps Do You Need To Imply To Fix Migration Assistant Not Working On Windows PC?
There are several different methods that one can apply to fix this issue. As we are unable to determine the exact cause, We suggest you try the below-mentioned fixes one by one and check if the issue has been resolved after each fix. Once you have fixed the issue, you can ignore the remaining methods and carry on with the transfer of data between Windows and Mac.
Method 1: Disable Microsoft Edge Browser
According to some experts, Microsoft Edge has been known to cause some conflict which may result in Migration Assistant not responding to issues. Hence, it is advised that you disable the Edge browser first and try the transfer again. Here are the steps:
Step 1: Open the Microsoft Edge browser and click on the three horizontal dots located on the top left.
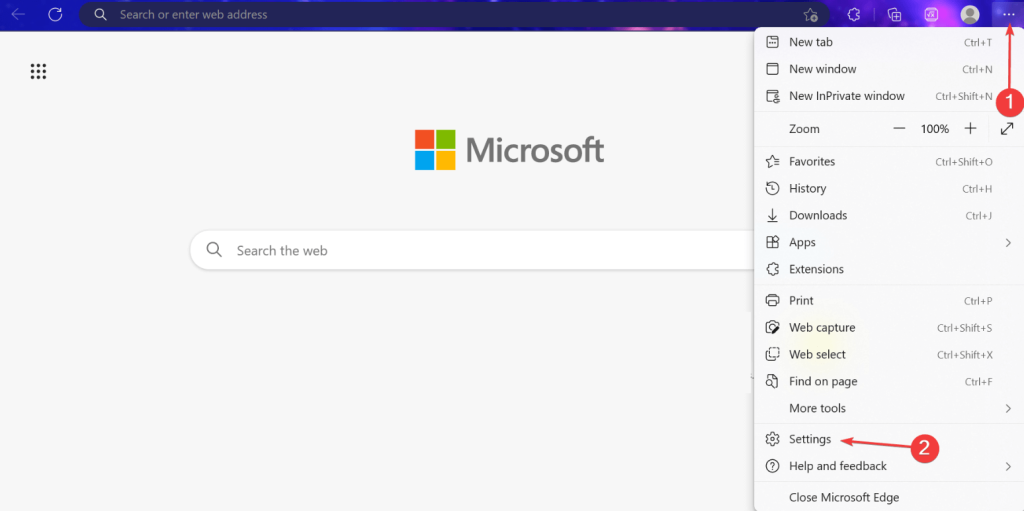
Step 2: Select the Settings option from the dropdown menu.
Step 3: Click on System and performance located in the left panel of the Settings window.
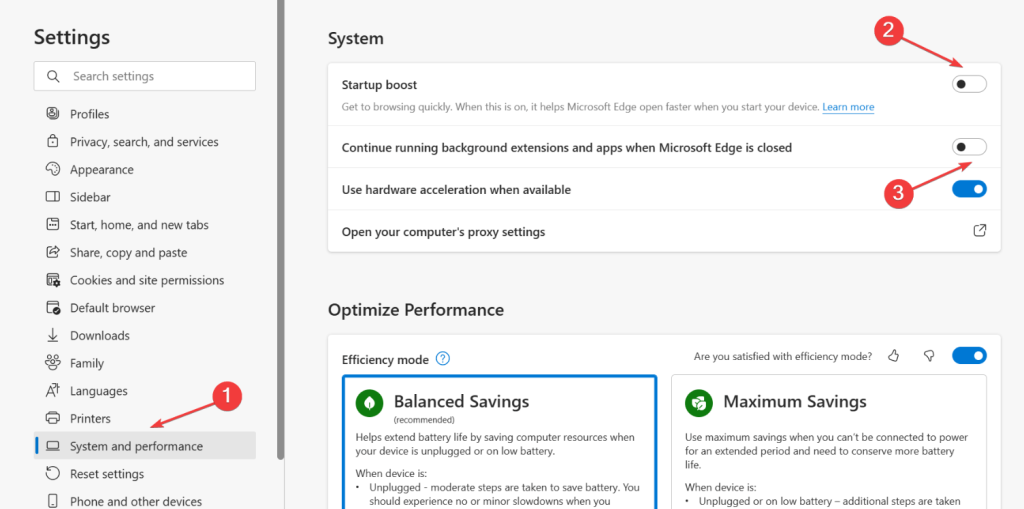
Step 4: Disable the toggle button next to Startup boost by sliding it towards the left.
Step 5: Disable the toggle button next to Continue running background extensions and apps when Microsoft Edge is closed.
Step 6: Exit the Edge browser and reboot your PC. Launch Migration Assistant to check if the issue has been resolved.
Method 2: Turn Off Other Background Apps
The disabling Edge method has worked for many but if the problem persists then we need to turn off other apps that may cause this issue. Here is what we need to do:
Step 1: Open the Task Manager by pressing Ctrl + Shift + Esc and click on the Startup tab.
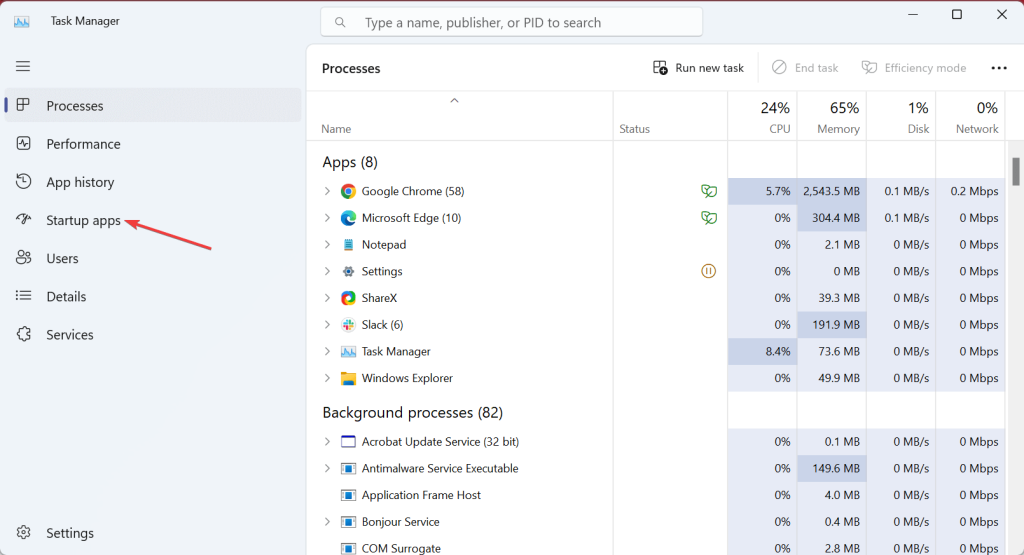
Step 2: Locate the app that says Enabled in the Status column and make right-click on them, choosing Disable from the context menu. This will disable all the apps that launch every time your PC boots up.
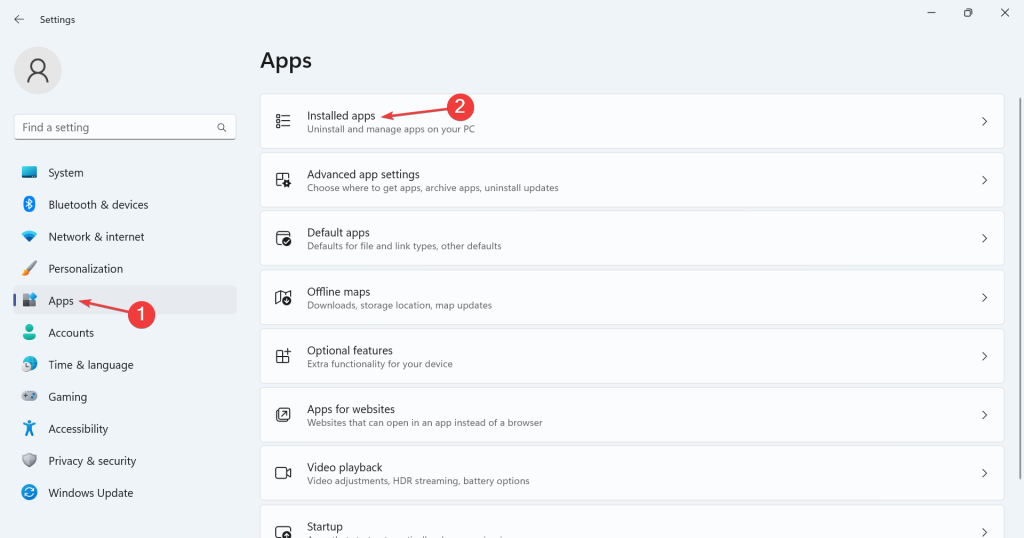
Step 3: Now press Win + I to open Settings and click on the Apps tab in the left panel.
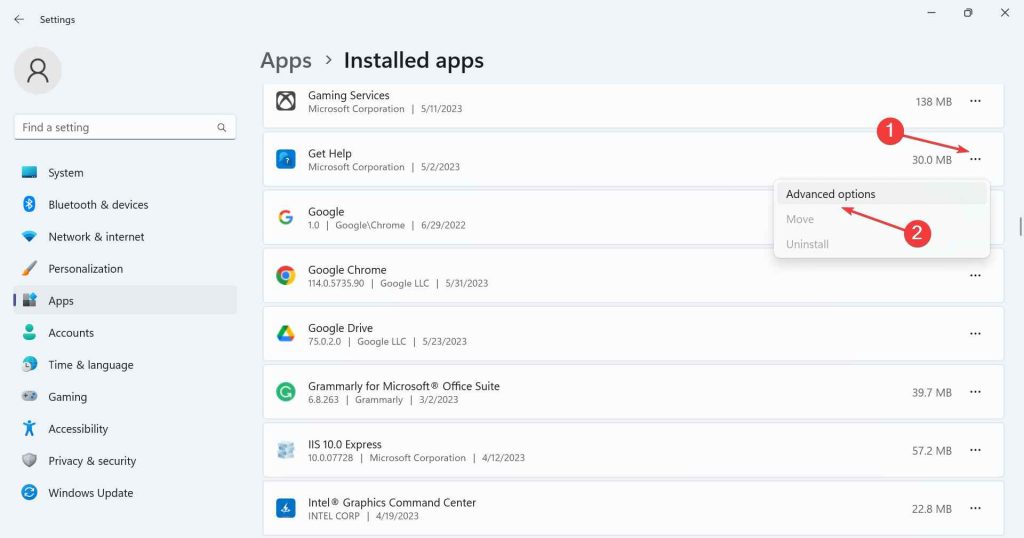
Step 4: Click on the Installed Apps option on the right side.
Step 5: Click the three horizontal dots next to the apps that run on startup and choose Advanced options.
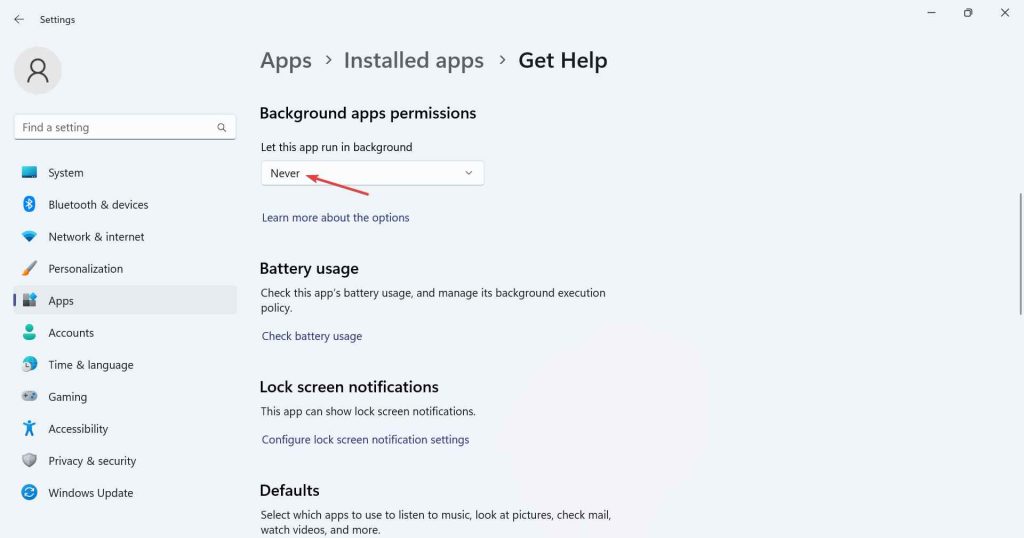
Step 6: Now locate the Background apps permission section and select Never from the dropdown.
Also Read: Startup Programs That You Can Safely Disable To Speed Up Windows 11/10
Method 3: Disable Your Firewall
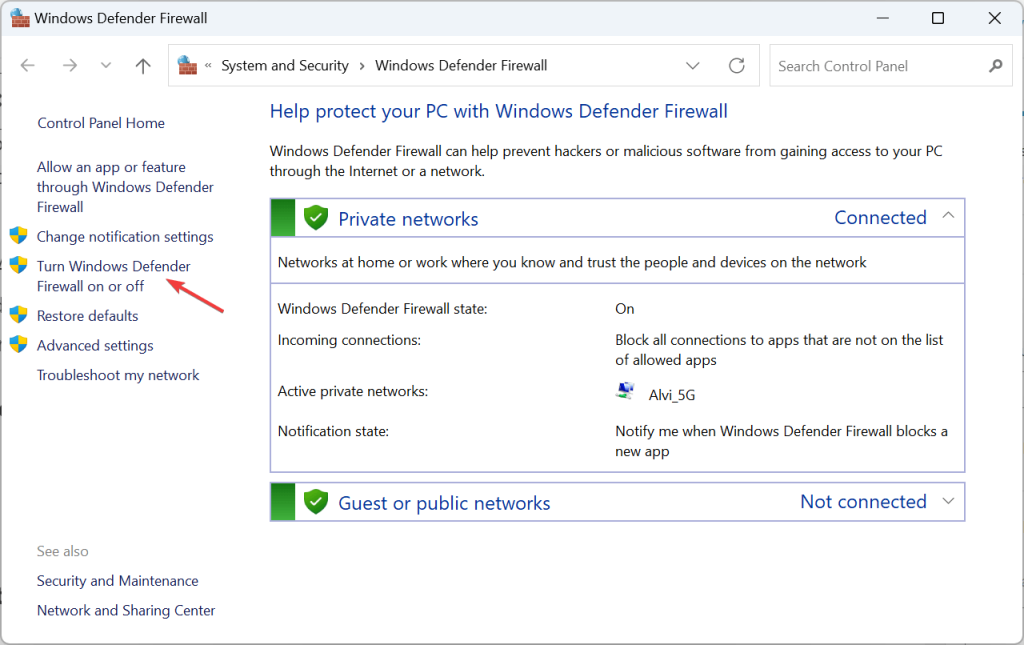
Step 1: Open the Search box by pressing Win + S and type Windows Defender Firewall.
Step 2: Click on the Best Match result.
Step 3: Now, select Turn Windows Defender Firewall on or off option located in the left panel.
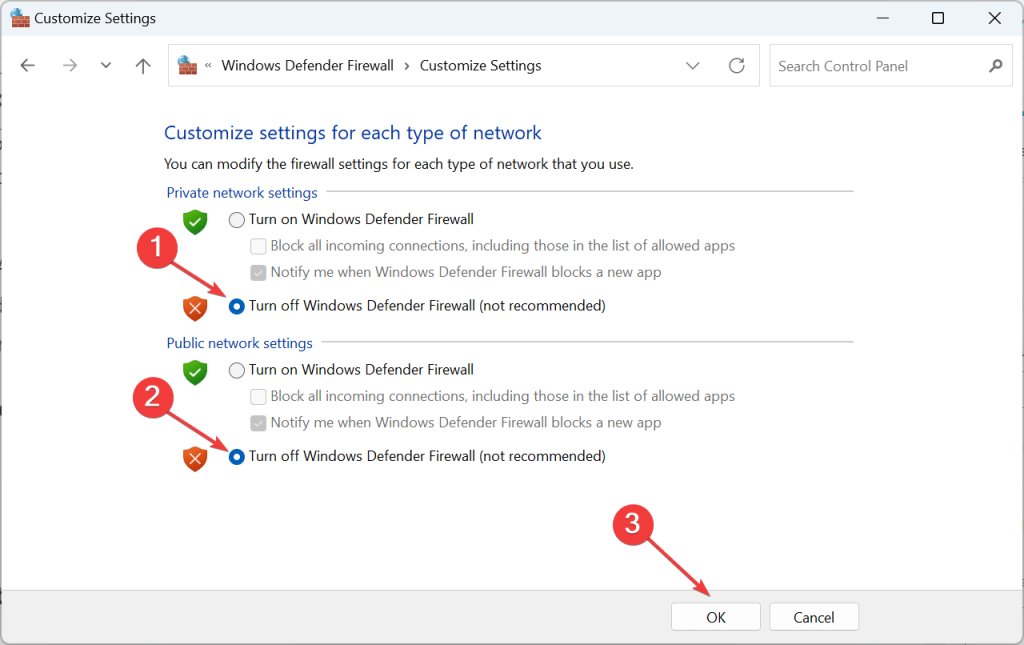
Step 4: Now click on Turn off Windows Defender Firewall under Private Network and under Public Network Settings.
If you have a third-party firewall installed then you can consider disabling it temporarily and check if the Migration Assistant app is working after that.
Also Read: How To Fix “Windows Defender Firewall Has Blocked Some Features Of This App”
Method 4: Repair Your Hard Disk
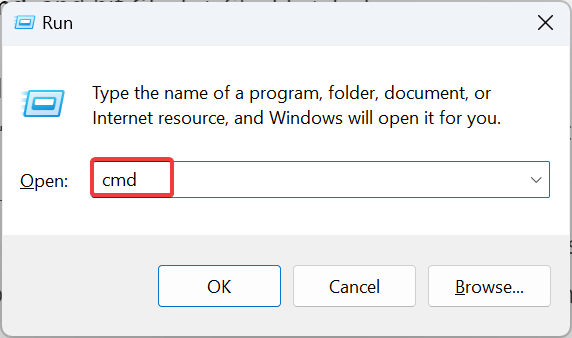
Step 1: Press Win + R to open the RUN box.
Step 2: Type cmd and press Ctrl + Shift + Enter to open the Command Prompt in an elevated mode.
Step 3: Press Yes if you encounter the UAC mode.
Step 4: Then paste the following command followed by Enter.
chkdsk /r

Step 5: You will now be informed that the scan will run the next time you boot your computer. Press Y and hit the Enter key.
Step 6: Now type shutdown /r and your PC will restart and the tool will automatically run and fix disk issues.
Also Read: How To Fix Hard Disk Issues with Disk Speedup?
The Final Word On How To Fix Migration Assistant Not Working On Windows?
We hope that the above methods help you fix the Windows Migration Assistant getting stuck error and ensure that files are now transferred between your Windows and Mac. However, if the issue persists then we recommend a manual transfer of data for the time being until the glitch or bug is fixed by a Windows update. In the most severe of circumstances, you would have to reinstall your Windows OS.
Please let us know in the comments below if you have any questions or recommendations. We would be delighted to provide you with a resolution. We frequently publish advice, tricks, and solutions to common tech-related problems. You can also find us on Facebook, Twitter, YouTube, Instagram, Flipboard, and Pinterest.