
Is your mouse pointer moving on its own? It certainly is not some ghostly phenomenon but some technical glitches because of which your computer mouse cursor keeps moving on its own.
A glitchy mouse can cause a lot of trouble, especially if you are dependent on it for the majority of the tasks. One of the glitches that many users have reported is that their mouse pointer keeps moving on its own, even when they didn’t intend it to.
Here we will talk about some of the easy fixes which will help you get your mouse back on track.
While in this blog, we shall deal with an overactive mouse, how about the mouse’s touchpad is not working at all? Read the fix here!
Ways To Fix Mouse Cursor Moving On Its Own In Windows 10
Short On Time Quickly? Navigate To The Fixes For “Mouse Cursor Moving On Its Own in Windows 10” |
Method No 1: Disable The Touchpad
Disabling the touchpad could help prevent a mouse cursor from moving on its own. This step would first make sure that you don’t accidentally touch your touchpad. So, to disable the touchpad, follow the steps mentioned below.
- At the bottom right of the screen locate the touchpad icon as shown in the screenshot below

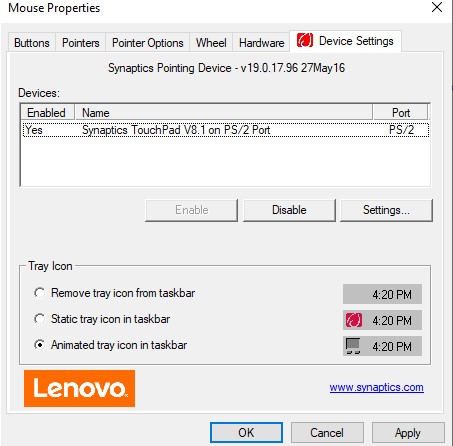
- Right-click on it and click Pointing Device Properties
- Once you are in the Mouse Properties, click on the Disable button
Note: In most cases, you will find the Disable button, as shown in the screenshot below. Though, there could be slight changes depending on your manufacturer.
Method No 2: Update Mouse Driver
If the cursor of your computer’s mouse is moving on its own or even flickering, there is a possibility that you have an outdated mouse driver. Now there are two ways of dealing with the issue. You could either update the driver of your mouse automatically using a driver updater software or do it manually. We are going to discuss both the methods below –
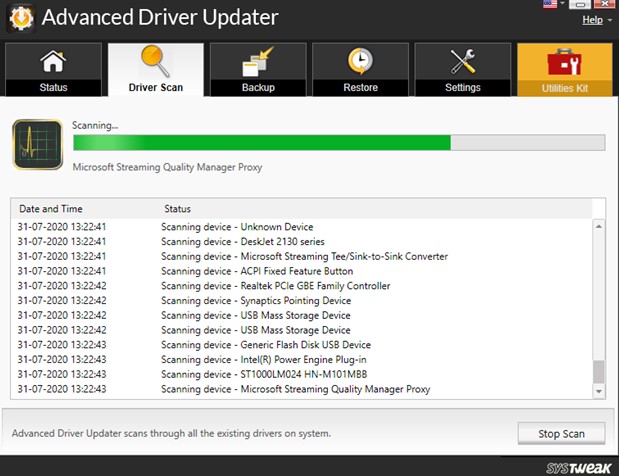
You can install a driver updater software like Advanced Driver Updater which can help update your Mouse’s faulty driver if your laptop’s or computer mouse is moving on its own. Here’s how you can use Advanced Driver Updater to update Mouse Driver –
- Install Advanced Driver Updater and launch Advanced Driver Updater
- Click on the Start Scan Now button

- Advanced Driver Updater will scan your laptop or desktop for outdated drivers
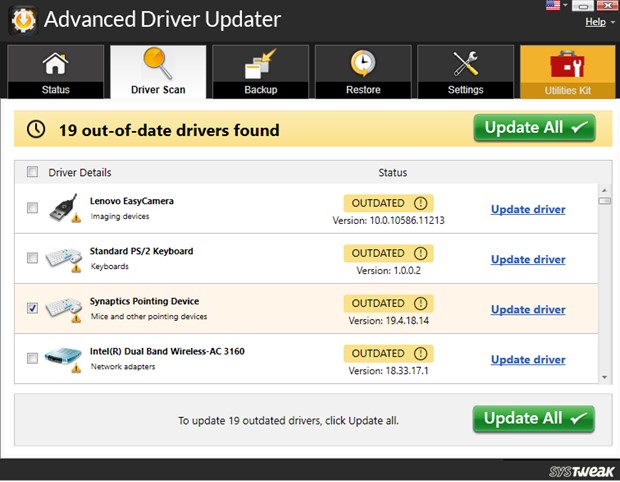
- Update the driver by clicking on the Update Driver button next to the driver
Read the complete review of Advanced Driver Updater here.

- Updating Mouse Driver Manually
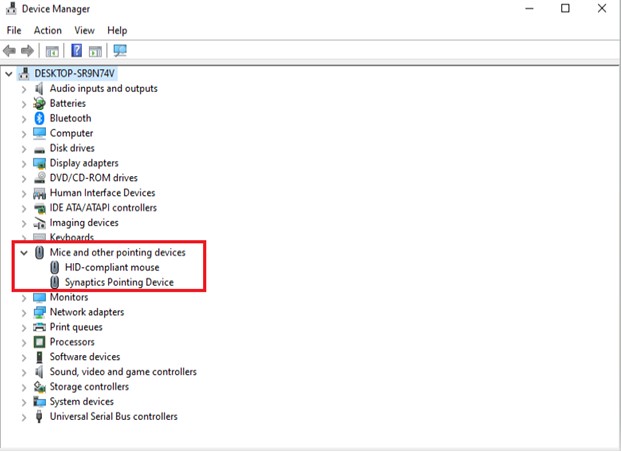
- Press Windows + R keys
- Type devmgmt.msc in the Run dialog box
- When the Device Manager window opens, locate Mice and other pointing devices and click on the dropdown
- Right-click on your mice model and click onUpdate Driver
Method No 3: Try Changing Touchpad Delay
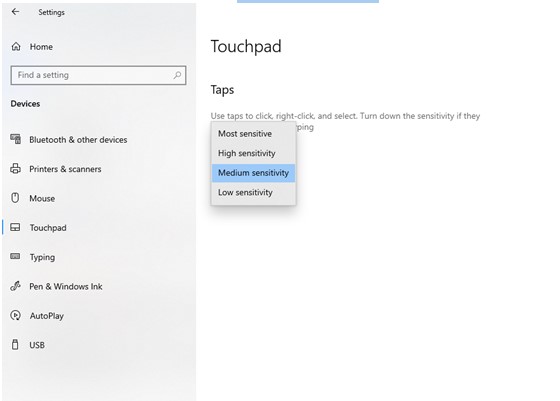
Although very controlled, there is no denying the fact that touchpad is sensitive. Maybe by delaying the touchpad sensitivity, you can prevent the laptop cursor moving on its own.
- Open Settings by pressing Windows + I keys
- Click on Devices
- From the left-hand pane choose Mouse & Touchpad
- Now from the right-hand side choose Touchpad
- Choose Touchpad Sensitivity
Method No 4: Run Troubleshooter
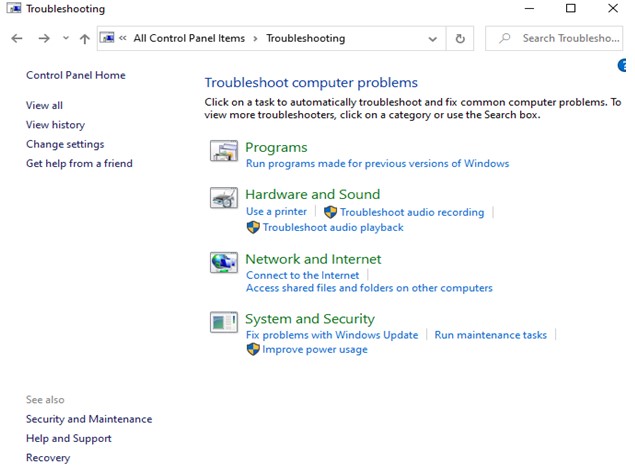
Windows 10’s hardware troubleshooter detects any issues pertaining to the hardware of your device. By running this troubleshooter, you will be able to track any possible issues that might be triggering your desktop’s or laptop’s cursor to move on its own.
- Type Control Panel in the search box next to the Windows icon and click on open
- Click on View by dropdown that you will find on the top right-hand side and click on LargeIcons
- Click on Troubleshooting and click on View all from the left
- Click on Hardware and Sound and then click on Next
- Choose your mouse and click on it
- Click Next
Windows will now start looking for any hardware problems. In case there are any issues Windows will prompt you to apply a fix by flashing a Apply this fix message, and then you can resolve the issue. Also, you may even be required to restart your computer.
Method No 5: Change Mouse Sensitivity
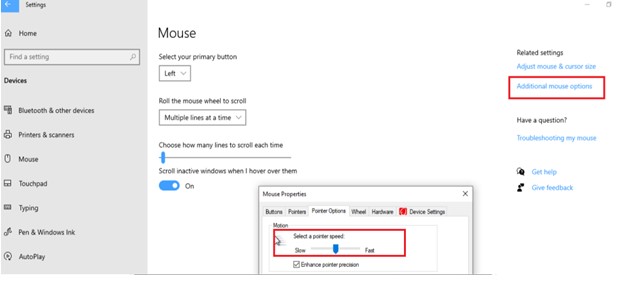
Here is yet another way to change mouse sensitivity which may help stop the cursor from moving on its own in Windows 10 –
- Press Windows + Ito open the Settings
- Choose Devices
- From the left-hand pane chooseMouse
- Now, at the farthest right under Related settings click on Additional mouse options
- Click on Pointers Options tab
- Under Motion slide the pointer speed as per your desire
In The End
Apart from the above fixes that should most certainly help you stop the cursor from moving on its own, you might even want to check if there are no issues with the mouse itself, i.e. the hardware issues. It could be that the mouse of your laptop has undergone some damage. In that case, you can take it to the nearby service center. If you are using a USB mouse, make sure that it is properly plugged and has wires intact.
We sincerely hope that the above fixes were able to resolve your issue. If yes! Do give this blog an upvote and share it with your friends and family. Keep visiting WeTheGeek for more such tech-related content.
MariaV
Super! Danke fùr Ihre Hilfe, ich konnte dadurch mein Problem mit der Maus heben. LGKrishan Vijay
Froh zu hören