
Laptops offer you super comfort and portability. You can use it while on a bed or work while sitting on a bench at the pool side. While it provides you with seamless user experience, like any other device, it isn’t free of its issues. One such issue is laptop trackpad not working. There could be numerous reasons behind that, and there are multiple ways to fix it. You could tweak the device settings or workaround driver updates to fix this problem. Additionally, the hardware fix could also be a solution. So, without further ado, let’s discuss how to fix Windows laptop touchpad not working.
How To Fix Windows Laptop Trackpad Not Working?
1. Touchpad Disable Zone
With many laptop brands, you can find a small square logo at the upper left corner of the Touchpad. Double-tapping it could enable or disable your Touchpad. In case you have disabled it by mistake; it is time to double-tap it to see if the Touchpad starts working again. If you find this feature troublesome as you keep on disabling it accidentally multiple times, then you should consider disabling this feature. To do this, follow these steps:
- Go to Start > Settings > Devices.
- On Devices window, select Touchpad from the left pane.
- Click on Additional Settings in the right pane under Related Settings.
- On the next window, click on touchpad entry and click on Settings.
- Next is to select the Touchpad Disable Zone and Untick “Double Tap to Disable Touchpad” option.


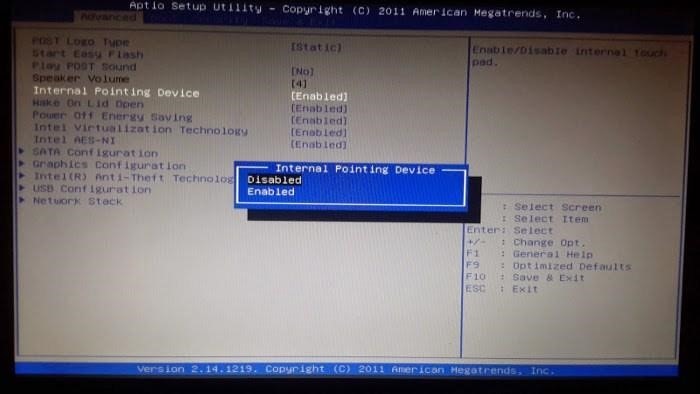
2. Check if Trackpad is Disabled in the BIOS
Another possible reason behind Touchpad not working on your Windows laptop could be, the trackpad is disabled in the BIOS. It could have done due to some unknown reasons during regular operations or the firmware update.
To check this, you need to restart your system. When it is booting press Delete or F2 key multiple times to enter into BIOS mode. (The key you need to press may vary). Now that you are into BIOS mode, you need to search for the option called “Internal Pointing Device” or similar option. Once you find it, you need to ensure it is enabled. You may find it under Advanced heading. Once you have enabled it, save the changes and exit. It will help you fix the issue.
3. Remove other mouse drivers
If you have plugged a lot of mice on your laptop earlier, that has also installed multiple drivers associated with it. Now that if you have numerous mice drivers installed on your laptop, they could be probably the reason for the trouble. These unnecessary drivers may be interfering with touchpad functionality. Some mouse drivers even disable your trackpad automatically. Knowing this problem, it is better to uninstall all such mice device software. To do this, follow these steps:
- Search & select Device Manager from the search box on the taskbar.
- On Device Manager window, select the category ‘Mice and other pointing devices’.
- Right-click on the device and select Uninstall Device option.
Remove all the related devices and check if Touchpad is back to life.

4. Update Touchpad Driver
Another effective way to make your Touchpad working again is to update the Touchpad driver. To do this, go to Device Manager > expand device category called ‘Mice and other pointing devices’ and right-click on your device and select Update Driver. Check if Touchpad is working fine now.
In addition to manually updating the driver, you can try one of the best driver updater tools called Smart Driver Care for instant & effective results. It helps you update outdated, missing, and incompatible drivers in one-click to save time. It backups all your drivers before updating them so that you can restore them if needed.
Download Smart Driver Care Now

5. Rollback Touchpad Driver
If updating driver doesn’t work, you can consider roll back changes. If the device fails after updating the driver, you should roll back to the previously installed driver. To do this, in the Device Manager expand and right-click on the Touchpad driver category. Select Properties. On the next window, select the Driver tab. Click on Roll Back Driver and press OK.

6. Enable Touchpad in Mouse Properties
In case you have found that your Touchpad device is disabled, then you can enable it from device settings. To do this, search Mouse in the search box on the taskbar and select Mouse Settings. On the next window, select ‘Additional Mouse Options’. In the new window, select Device Settings tab or Touchpad tab whichever is at the far right of the window. Select your Touchpad device and click on Enable. Press OK.

Knowing Touchpad plays a vital role to keep your system working fine, it becomes crucial to keep it enabled and performing. Here, we have discussed a few quick ways to fix Touchpad not working on a Windows laptop. Do try these steps and share your experience in the comments below.