It is crucial to confirm that the new hard drive is using the correct partition style when configuring it. The partition style has a significant impact on how the drive is managed and formatted as well as how other system features and applications interact with it. Let’s quickly go over the methods for checking the partition style in Windows 11. You may make sure that the drive is properly configured and ready to use in this manner. Let’s start.
Also Read: How To Delete Hard Drive Partitions In Windows 11/10
4 Ways To Check The Partition Style On Windows 11
Method 1: Verify The Partition Style Using The Device Manager
You can view and manage all the hardware components installed on your computer with the help of the essential Windows utility known as the Device Manager. The Device Manager lets you update drivers, enable or disable devices, and solve hardware-related problems. The Device Manager can also be used to inspect the drive’s partitioning style. This is how:
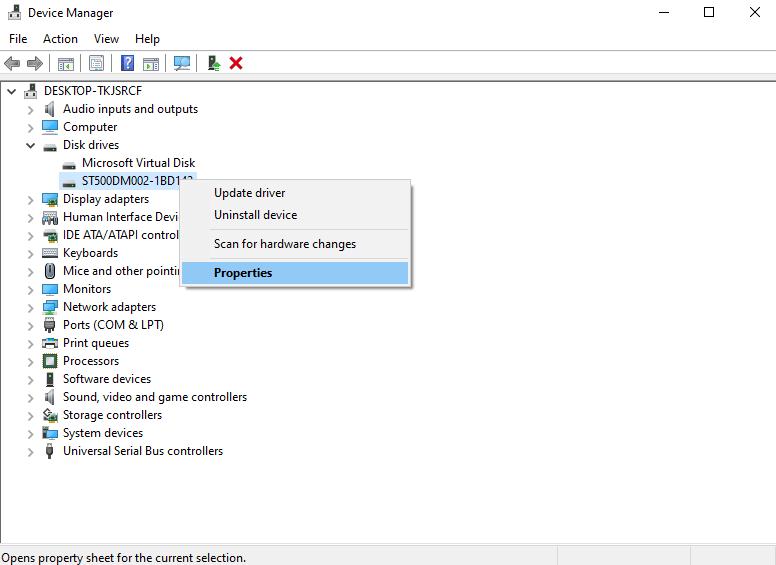
Step 1: Right-click on the Windows Start Button in the Taskbar and choose Device Manager.
Step 2: Locate and expand the Disk drives node, by making a double-click on it.
Step 3: Next, right-click on your disk and select Properties.
Step 4: Click on the Volumes tab.
Step 5: Hit the Populate button.
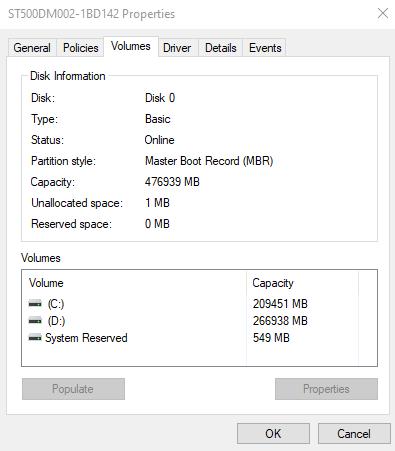
Step 6: Look under the Disk Information section, you can view the partition style.
Also Read: 9 Best Disk Partition/Manager Software For Windows 11, 10 PC (2023)
Method 2: Verify The Partition Style Using The Disk Management Tool
Another integrated tool for controlling hard drives and other storage devices linked to your system is Disk Management. You can use it to create, remove, format, and resize partitions. Follow the steps below to use the Disk Management tool to examine your drive partition style:
Step 1: Select Disk Management from the Power User Menu by pressing Win + X.
Step 2: To examine the partition style of a drive, right-click on it and choose Properties.

Step 3: To view the Partition style, click the Volumes tab.
Also Read: How To Fix Setup Was Unable To Create A New System Partition
Method 3: Verify The Partition Style By Using The Settings App
The preferred method for changing crucial Windows settings is the Settings app. The Windows Settings program lets you do everything from managing your wireless network profiles to obtaining Windows updates. One of the areas where you may examine the disk’s partitioning is the Settings app. This is how:
Step 1: To access the Settings app, press Win + I.
Step 2: Click on Storage in the right pane after selecting System from the left sidebar.
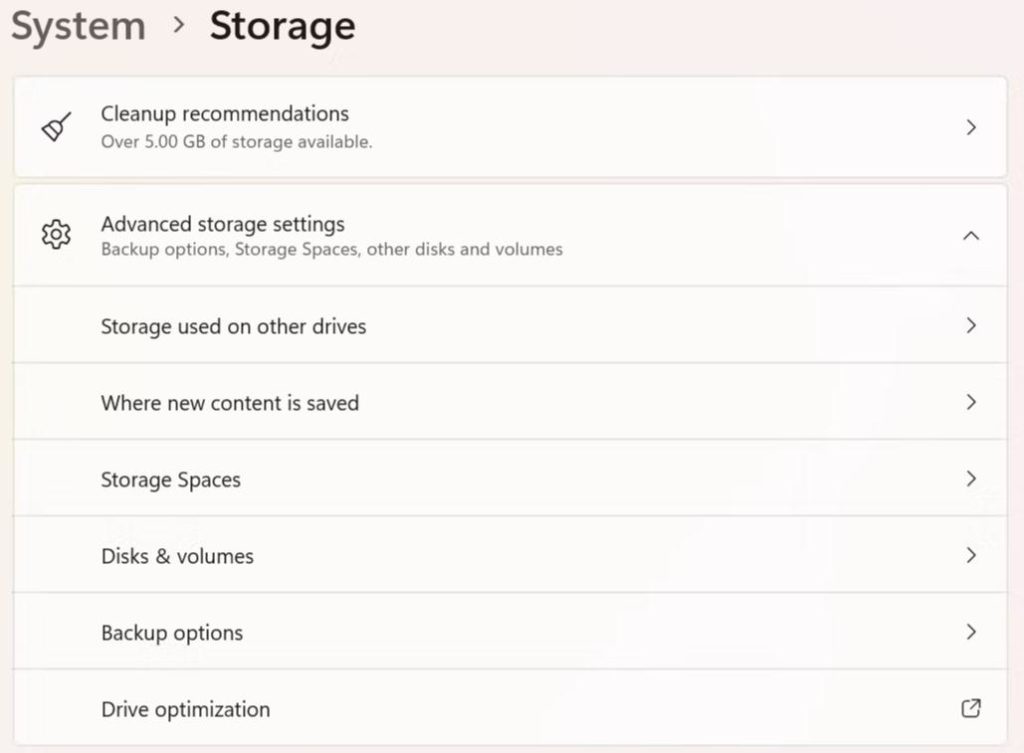
Step 3: In the drop-down menu that appears, select Disks & Volumes by clicking Advanced storage settings.
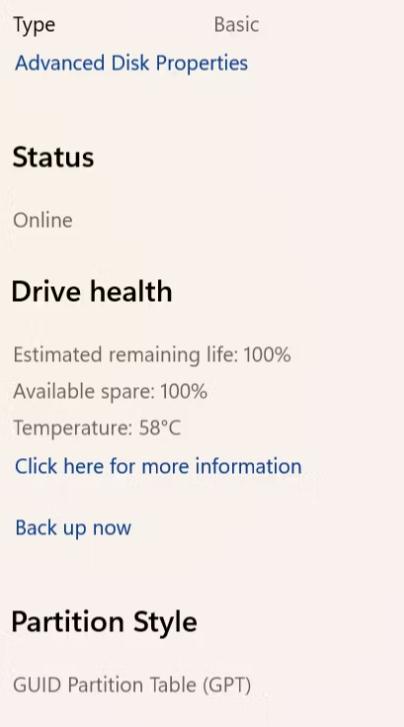
Step 4: To examine the partition style of a drive, click the Properties button next to it.
Step 5: The partition style can then be checked in the window that follows.
Also Read: How To Create A Recovery Partition In Windows 10
Method 4: Verify The Partition Style By Using The Command Prompt
For complex system problems, Command Prompt can prove to be very useful. However, you can also get simple information like the Partition style if you know the right commands.
Step 1: On the Windows Start menu, type Command Prompt, and then select Run as administrator in the right pane.
Step 2: Type “Diskpart” into the elevated Command Prompt window.
Step 3: Enter “list disc” and press the Enter key.
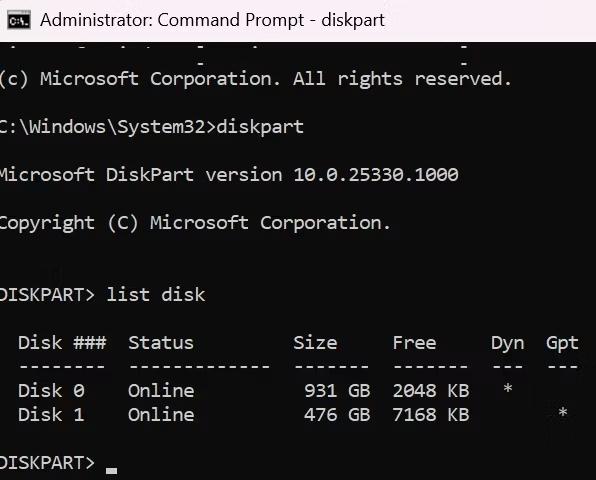
Step 4: Look at the GPT column. If your disk employs a GPT partition, you’ll notice an asterisk. The MBR partition is used by your disk if the asterisk character is absent.
Also Read: Fix “Unable To Reset PC. A Required Drive Partition Is Missing”
Bonus Tool: Use Disk Speedup To Maintain Your Hard Disk
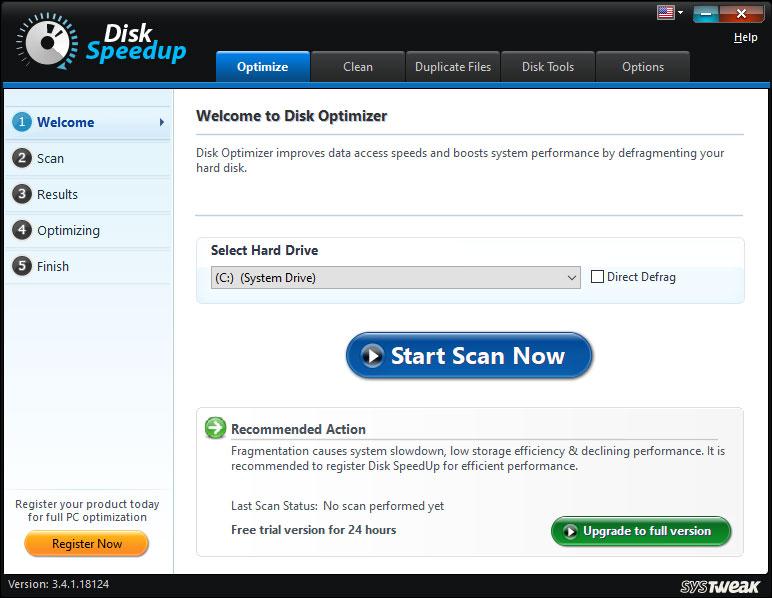

Disk Speedup is an amazing, powerful tool to maintain your hard disk. Here are some of the features of this tool.
Defrag Your Hard Disk. Hard Disk defragmentation can help users to speed up their drives and make their PC response faster. It also helps users to recover space and boost loading time.
Remove Junk and Temp Files. Temporary files are created by all apps to increase their speed and performance. However, most apps do not delete these files after use and they get accumulated over time. Disk Speedup helps to identify and delete all unwanted files.
Remove Duplicate Files. Duplicate files occupy your valuable storage space and create chaos in your collection by repeating similar files. You can finally get rid of all dupes on your PC.
Resolve Hard Disk Issues. Disk Speedup helps users to fix bad sectors, check data for corrupt files and prevent Lags & Crashes.
Also Read: How to Monitor Your Disks and Identify Read/ Write Speed via Disk Speedup?
Your Thoughts On Quick Ways to Check Partition Style on Windows 11.
It’s crucial to understand your disk’s partitioning scheme whether you wish to verify drive compatibility or retrieve some crucial data. Using the techniques listed above, you may determine how your drive is partitioned.
Please let us know in the comments below if you have any questions or recommendations. We would be delighted to provide you with a resolution. We frequently publish advice, tricks, and solutions to common tech-related problems. You can also find us on Facebook, Twitter, YouTube, Instagram, Flipboard, and Pinterest.