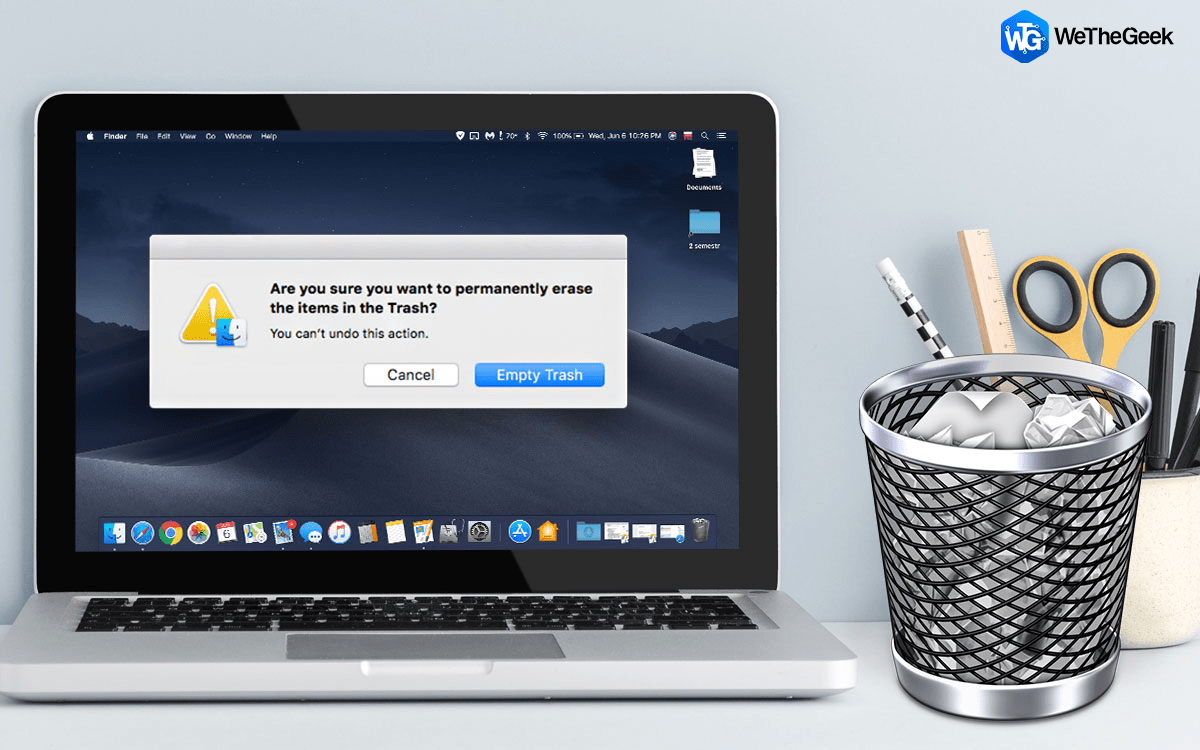
Having trouble emptying the Trash bin on your Mac? Here’s a troubleshooting guide that will help clear trash on Mac.
Generally, deleting trash on Mac is simple. Open the folder and click the Empty button present at the top right corner. That’s all it takes, a single click to get all out from your Mac.
However, there are certain situations when you are unable to empty trash on Mac. This can happen due to different reasons.
And this is when this guide comes to play. Here we cover the reasons why you cannot empty trash on Mac and how to empty trash. In addition to this, we will also discuss a fantastic Mac cleaning utility software that helps optimize Mac.
For advanced users who are comfortable using Terminal, we can use a command to force empty trash on Mac.
Reasons Why You Are Unable To Empty Trash On Mac
- You are running an outdated OS.
- The file you are trying to remove from Trash is in use.
- Installed software or applications are interfering with the functioning of Trash.
- Broken permissions
- Files are locked
How To Empty Trash On Mac
Condition 1: Emptying Trash When The File You Are Trying To Remove Is In Use
A simple restart helps fix various problems. Therefore, when you encounter “The operation can’t be completed because the item is in use,” you need to close the running process. Doing so will help terminate all the running processes that might be interfering with clearing the Trash.
To restart Mac, follow the steps below:
- Click the Apple
- Select Restart from the drop-down list.
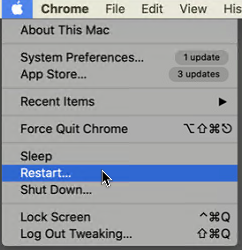
This way, you can force quit all running applications and restart your Mac. Once the machine is rebooted, try clearing trash.
This should help fix the problem.
Additional Information
Fixing certain Mac-related problems might be time-consuming. So, if you are looking for a way to save time and still fix all issues, here you go. Using a problem fixer tool called Disk Clean Pro, you can fix most of the problems.
Not only this, Disk Clean Pro thoroughly scans your Mac in no time, and it helps clean all the junk files. The different Trash folders created by different applications that take unwanted storage are also taken care of by Disk Clean Pro.
To use this excellent tool and get rid of all this cluttered data, follow the steps below:
- Download and install Disk Clean Pro
- Click Start System Scan
- Wait for the process to finish. Once done, click Clear Now.

This will help clean most of the Trash items and boost Mac performance in no time.
Condition 2– Deleting Trash on Mac via Advanced File Usage Troubleshooting
Sometimes a startup or login item might be using the file you wish to remove. Therefore, to fix this problem, you need to boot Mac in Safe Mode. This is done so that only the basic apps run, and all the extras are stopped from running automatically at boot time.
To boot Mac in Safe mode and empty Trash, follow the steps below:
- Shut down Mac
- Afterward, turn it and instantly hold the Shift key.
- You’ll now be in Safe Mode.
- Here, open the Trash > click Empty, and you’re all done.
Since we are running Mac in safe mode, all the startup apps or login items that might be interfering are now stopped. This helps to empty Trash.
If this doesn’t work, then we have an alternate way to do it. For this, we will use Terminal and will check the app that has locked the file.
To do so, follow the steps below:
- Launch Trash bin.
- Next, press Cmd + Space, and this will open Spotlight.
- Type Terminal and press Return.
- Now, type lsof and press Space.
Note: Isof is used to list down files that are open and in use.
- Head back to Trash > drag the file in Terminal that you want to delete and press Return to run the command.
- You’ll now see a list of the apps using the file.
- Close them.
Note: Terminal does not always give full names of apps. This means, if you are unable to guess the right app, you might have to close several apps.
Condition 3: How To Empty Trash When Files Are Locked
Sometimes when the file you are trying to delete is locked, then you are unable to empty Trash. To rectify it, you need to head to Trash and unlock these files. To do so, follow the steps below:
- Open the Trash.
- Select and right-click the file you want to delete.
- Choose Get Info from the context menu and click the Locked checkbox.
This will help unlock the file, and you will be able to delete selected files from Trash. You can either click the Empty button or right-click > Delete Immediately.
Condition 4: How To Force Empty Trash When Disk Repairing Is Required
A hard disk issue can also prevent you from clearing Tash. To see if this is creating problems, open Disk Utility and use the First Aid function.
To do so, follow the steps below:
- Launch Spotlight by pressing Cmd + Space
- Type Disk Utility and press Return.
- Select the hard disk name that has the file you want to delete
- Click First Aid > Run.
The First Aid function will tell if there are any disk errors. Note, it won’t fix the problems. If you want to repair the disk with errors and delete files from Trash, you need to repair it.
As mentioned earlier, Disk Clean Pro is the app that can do wonders. Using this app, you can solve Mac-related problems and can even fix disk errors. Once that is done, you can force empty trash.
So, give it a try.
Condition 5: How To Force Clean Trash Folder
Even after following all the fixes, we explained. If you are unable to empty trash, there’s a way to do it that is via the Dock.
Press Option key and empty the Trash without even launching it.
If a file is locked, you can unlock it and then delete it while holding the Option key. Alternatively, you can try holding Option when you click the Empty button.
Holding the Options key bypasses locks on the file. This is an effective way to unlock files and resolve mac trash won’t be an empty problem.
Another option is to use a Terminal command. This will force empty trash and will override locks. This command also helps override other restrictions.
Note: When you use this step, be cautious.
- Open Spotlight and enter Terminal and press Return.
- You will now see the Terminal windows. Here, type sudo rm -R and press Space. This command will force-delete files.
- Now, head back to the Trash > drag the files you want to delete to the Terminal window.
- Press Return.
- Enter Mac’s administrator password when asked for.
- Press Return to confirm and run the command.
Deleting Files Without Moving them to Trash
Do you have a habit of putting files into Trash? Hold on, this isn’t the only way to delete files. If you want to move pass emptying Trash, use Command + Option + Delete when deleting files. This way, you won’t ever have to clear Trash on Mac.
Caution: Once you use Command + Option + Delete , you cannot get the file back. So, use it when you are sure about completely deleting the file.
This is it. Now you have all the required knowledge to force empty Trash. If you liked the post and found it helpful, share it with others. However, if you think something is missing, let us know.
We’d love to hear from you. Stay connected for more such informational articles.
Frequently Asked Questions
Q1. Does Emptying Trash Permanently Delete Mac?
Yes. Once you clear the trash, the only way to get those files back is to use a recovery tool. But remember, there’s no 100% guarantee that you will be able to recover all files.
Q2. Why Can’t I Empty My Trash On My Mac?
You cannot empty Trash on Mac due to the following reasons:
- The app might be running in the background or use.
- Files are locked.
- Insufficient privileges
- Files moved to Trash were saved on an external drive.
Q3. How To Resolve Unable To Empty Trash On Mac Due To Permissions?
To resolve the problem, you can try following the steps below:
- Restart your Mac
- Log out and log back in.
- Force-quit the Finder by pressing
Option + Command + Escape. Alternatively, you can choose Force Quit from the Apple menu or hold theOption key >right-click the OS X Dock Relaunch.
Q4. How Long Does It Take Empty The Trash On A Mac?
It doesn’t take long to empty trash; however, if you have like over 10,000 items or so, it might take 15-20 minutes.
Q5. Will Emptying Trash Speed Up Mac?
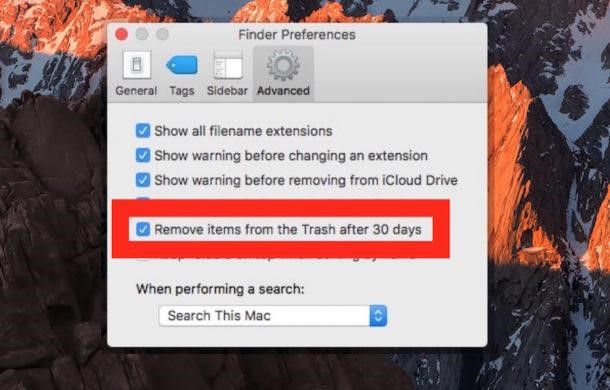
Emptying Trash will free up space, thereby resulting in speeding Mac performance. If you want, you can enable the option to delete items from Trash automatically. To do so, follow the steps below:
Note: Auto-empty Trash feature requires macOS Sierra 10.12 or newer
- Click the Apple logo > About this Mac > Storage > Manage > enable Empty Trash Automatically (this will delete items from the Trash after 30 days)
Q6. How Often Should I Empty The Trash On My Mac?
Those who often delete files should empty trash regularly. However, if you have enabled automatically emptying Trash, it is best. This way, after 30 days, Trash will be cleaned automatically.
Neat and Optimized Mac
Emptying Trash is an excellent way to clean up your Mac and make it run smoothly. This can be done by using the manual steps explained above or can use Disk Clean Pro for that matter.
This best Mac cleaner will do the trick in no time. So, give it a try to give your Mac a boost.
David Morrison
Mac machines are always trouble. but Thanks to you, i can now clean the garbage binMridula
To trash the file in use by force quit method is the most helpful method.Kerin Malloy
I believe I was stuck with condition 1 earlier. Silly me but thanks for reminding.Preeti Seth
Hello Kerin, Really appreciate your feedback. Glad to know you found our article helpful