
Imagine this scenario – you are trying to get some important work done on your computer, and suddenly you find that your Wi-Fi connection is showing “Limited Access”. Frustrating, isn’t it? This problem can be especially problematic for those who rely heavily on internet connectivity for their work or study. It’s a common issue that can leave you feeling helpless and disconnected from the world. But fear not, because there are several solutions you can try to fix this problem and get back online.
In this article, we will guide you through some simple yet effective steps to fix the limited internet connection issue in Windows 11. So grab a cup of coffee, take a deep breath, and let’s get started on resolving this annoying Wi-Fi showing limited access problem together.
6 Ways To Fix WiFi Showing Limited Access In Windows 11
1. Restart Your Wi-Fi Router
In the event that all devices connected to a network are experiencing limited access, restarting the router is the first thing you should try. To do this, simply power off the router and wait for a minute or two before turning it back on again. This simple step can help to resolve any temporary issues with the router and restore full access to the network.
2. Check Your Data Plan
It’s possible that receiving the “Limited access” message when connecting to your Wi-Fi network on Windows 11 doesn’t necessarily indicate any connectivity problems. Your internet service provider (ISP) could play a role here – if you have a limited data plan and exceed the limit, your Wi-Fi network might show “Limited access” when you attempt to connect. It’s important to be mindful of data caps and monitor your usage to avoid encountering this issue.
Read Also: How to Boost Bluetooth/ Wi-fi Signal on Windows 10
3. Disable & Re-enable The Wi-Fi Router
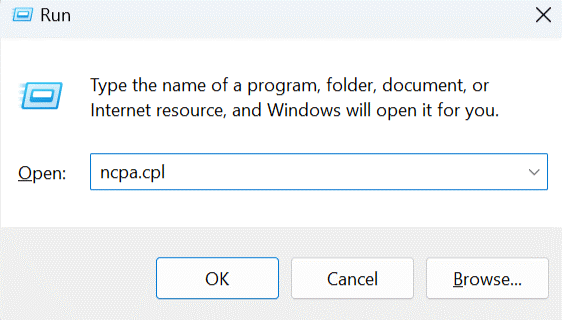
If the above-listed two steps failed to resolve this problem for you then try disabling and enabling your Wi-Fi router. To do this follow the steps below:
- Open the RUN dialog box by pressing the Windows + R keys
- Then type ncpa.cpl and press the Enter key.

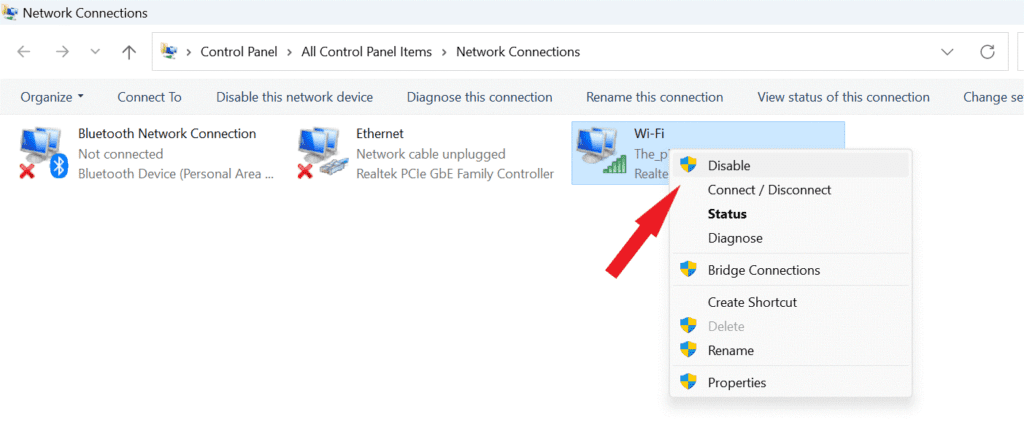
- Now from the Network connections page right-click on the Wi-Fi option and choose Disable
- Then again right click on the same Wi-Fi option and this time choose
Restart your computer to see if the issue has been resolved.
4. Run Wireless Network Adaptor
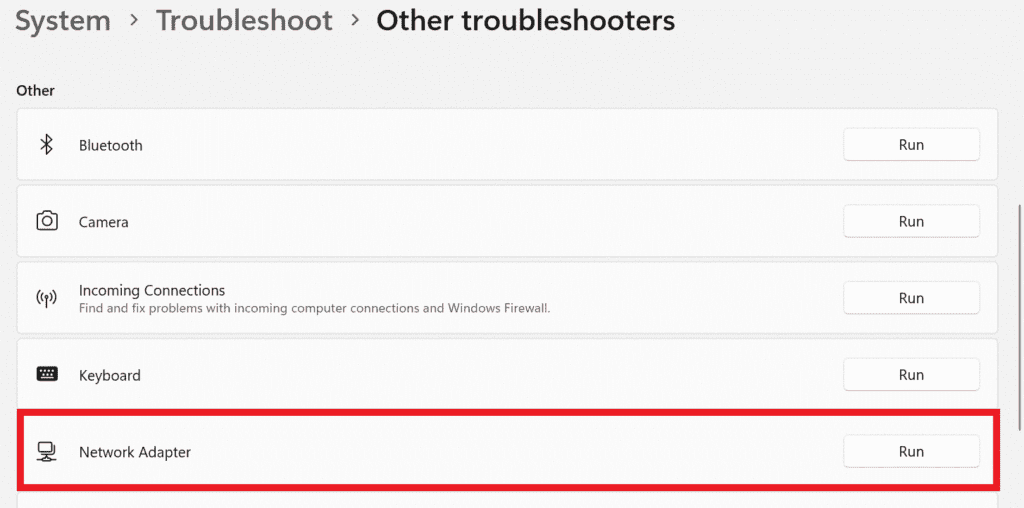
If you’re experiencing Wi-Fi connectivity issues on your Windows 11 computer, there are various built-in troubleshooting tools you can utilize to help diagnose and resolve the problem. One of these tools is the network troubleshooter, which can be accessed through your computer’s settings. To use this tool, follow these simple steps:
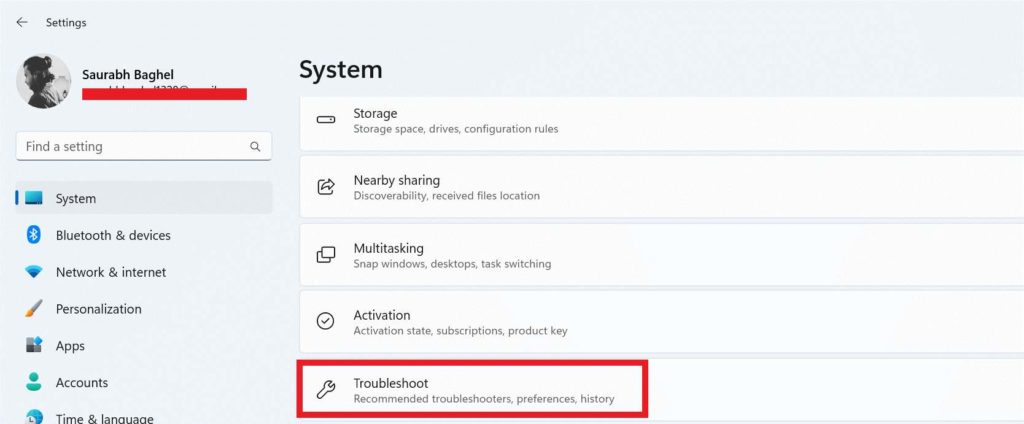
- Open the Windows Settings by pressing the Windows + I keys
- On the right side, scroll down and click on the Troubleshoot Option.
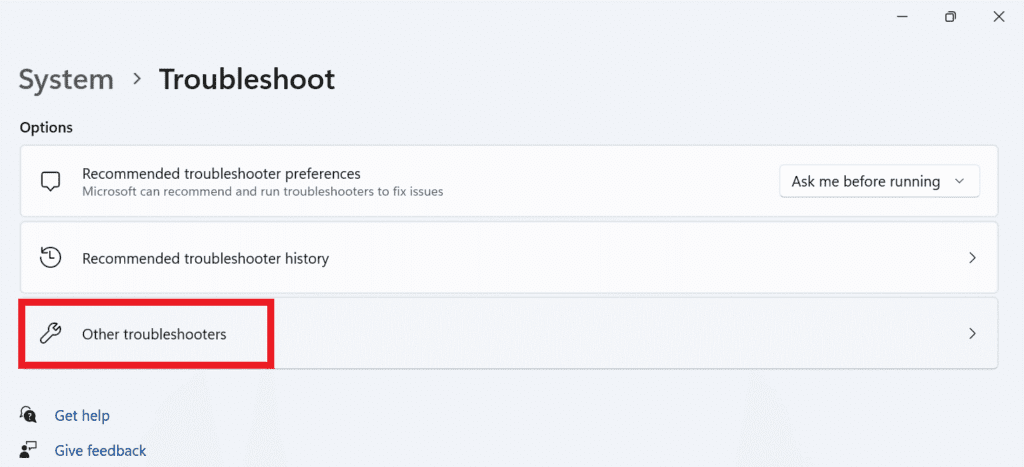
- Now tap on Other troubleshooter.
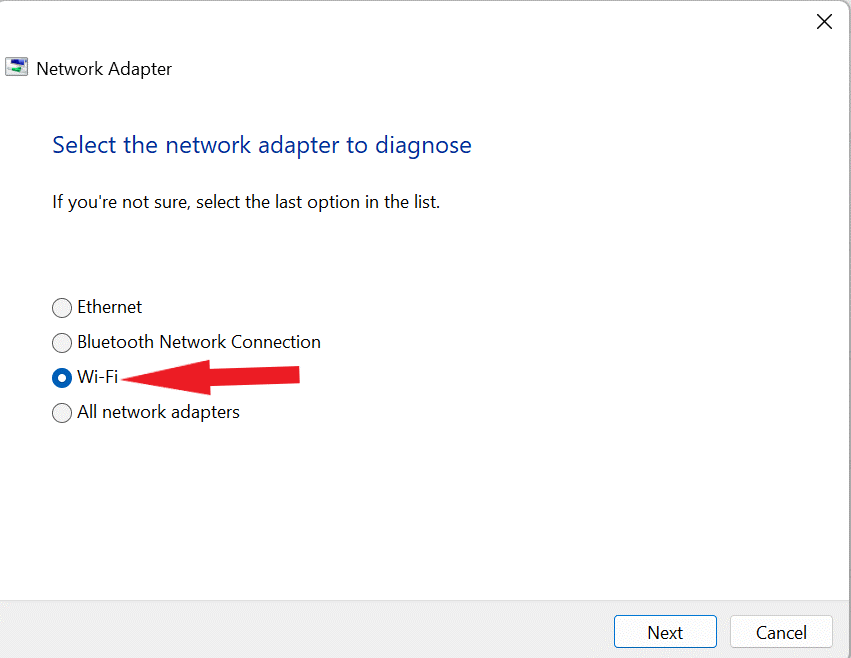
- From the right side, under the Other section look for and press the Run button right in front of the Network Adapter
- On the following page select the Wi-Fi option and click on the Next
Read Also: How To Fix Compatibility Troubleshooter not Working on Windows 11
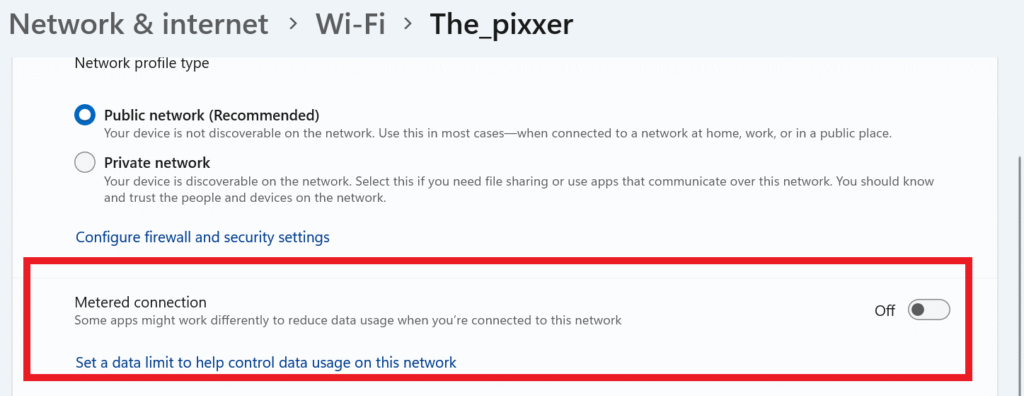
5. Turn Off Metered Connection
If you have configured a metered connection on your Windows 11 computer to help manage your data usage, you may encounter the “Limited Access” error message if you’ve reached your data cap. To resolve this issue, you can disable the metered connection if you no longer need to keep track of your data usage. To do so follow the steps below:
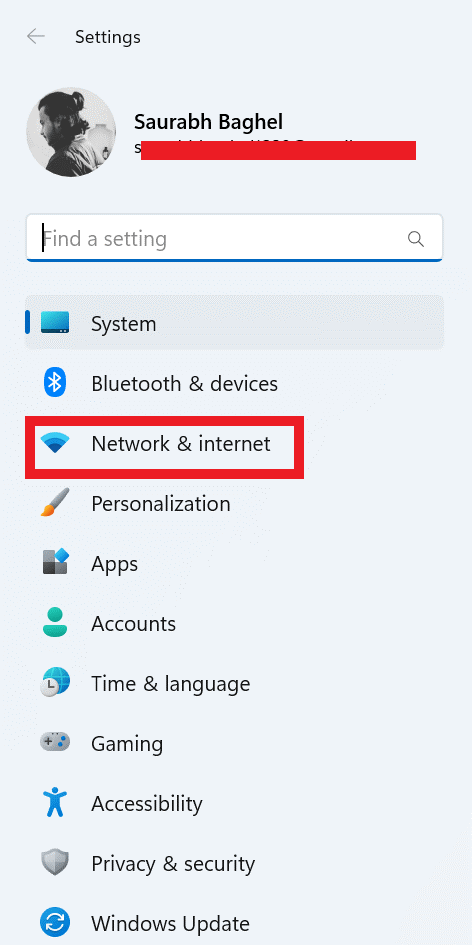
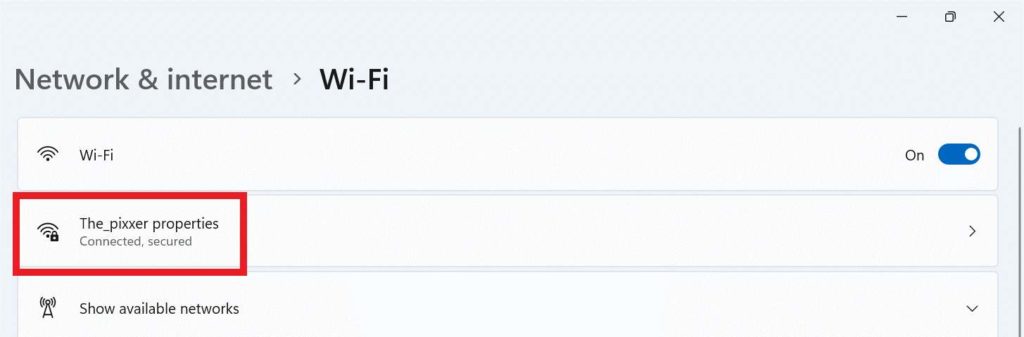
- Open the Windows Settings by pressing the Windows + I keys together > Network & internet > Wi-Fi.
- Click on the network properties of your Wi-Fi connection.
- Disable the choice for Metered connection.
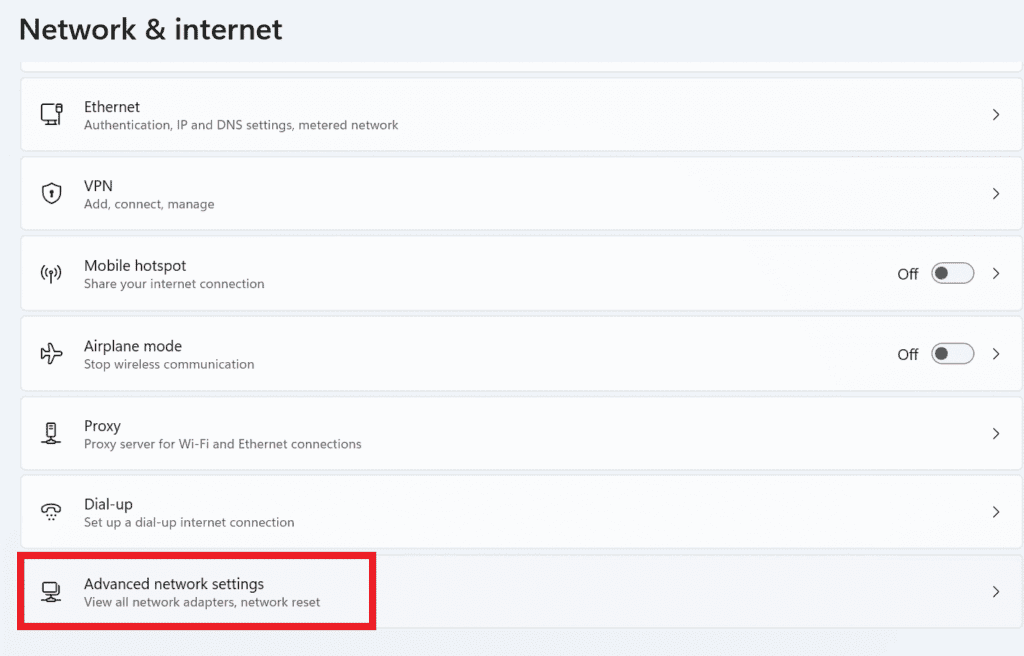
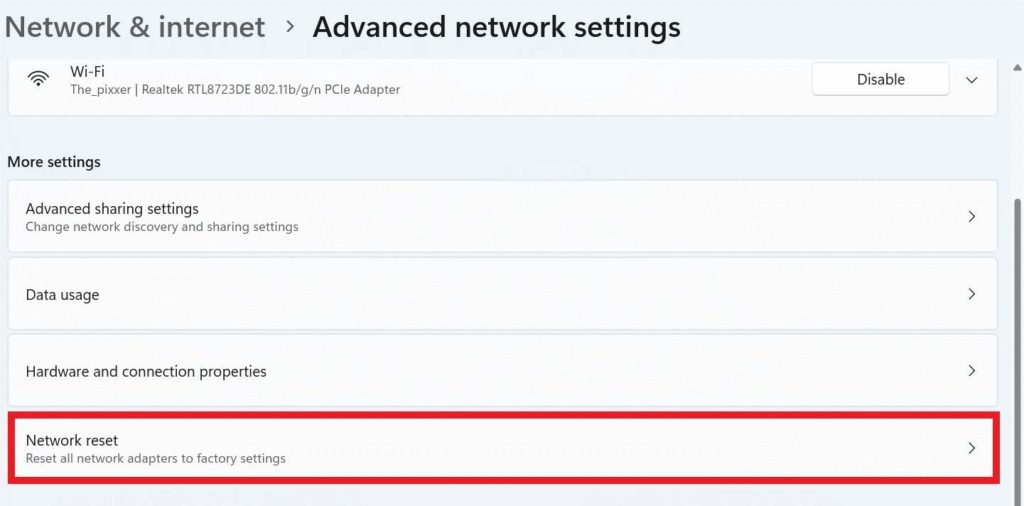
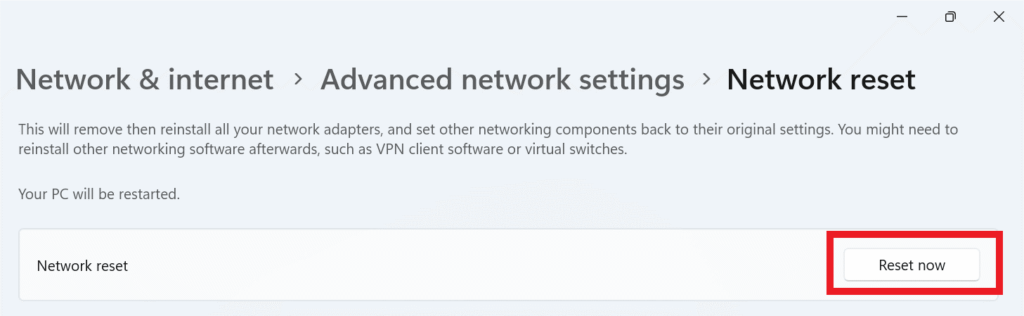
6. Reset Network Connection
If you have tried all the above troubleshooting steps but haven’t found any issues with your system settings, resetting your network may help to resolve the problem. By resetting your network, you can clear any existing settings and configurations that may be causing the limited access error. To reset your network, follow the steps below:
- Open the Windows Settings by pressing the Windows + I keys together > Network & internet > Advance network settings.
- Scroll down a bit, and under More settings, tap on the Network reset Option.
- Click on Reset now.
Read Also: How To Fix A Missing Wi-Fi Option In Windows 11
To Wrap This Up
The Limited Access issue in network connection on your Windows 11 computer’s Wi-Fi network can be frustrating and disruptive, but there are various troubleshooting steps you can take to resolve the issue. By following the instructions outlined in this article, you can eliminate the problem for once and all.
And for more such troubleshooting guides, and tips & tricks related to Windows, Android, iOS, and macOS, follow us on Facebook, Instagram, Twitter, and YouTube
Next Read: Wi-Fi Network Not Showing Up On Windows 11/10, What To Do