
Taking screenshots of several areas on Windows is a great way to demonstrate things. As someone who regularly has to write and create content on Windows software, I often have to take screenshots. But, if you go through some of my other posts, you’ll find that I have also taken screenshots of pop-up menus that disappear as soon as you click elsewhere. For example, the moment I try to open up Snipping Tool to take a screenshot of the Windows search, the latter disappears.
That’s just one example – how on Earth can you take screenshots of multiple activities or pop-ups on your Windows PC? The answer is you can delay screenshots on your Windows PC. Here we will discuss some very effective ways to schedule screenshots at regular intervals.
Also Read: How to Take Scrolling Screenshot
How To Time Screenshots On Windows 11/10 PC
Here we will discuss two ways you take delayed screenshots on Windows. The first is using the inbuilt Snipping Tool, and the second is using a third-party screenshot tool.
1. Windows Inbuilt Snipping Tool
If you have been a Windows user, you probably know what Snipping Tool is, but not many are aware of how to delay screenshots using the Snipping Tool because normal screenshots are often what is most needed. But what if you are in a situation where you have to capture a dropdown of a software menu? Here’s how you can time screenshots using the Snipping Tool –
1. In the Windows search bar, type Snipping Tool
2. Click on Open from the right-hand side of the screen.
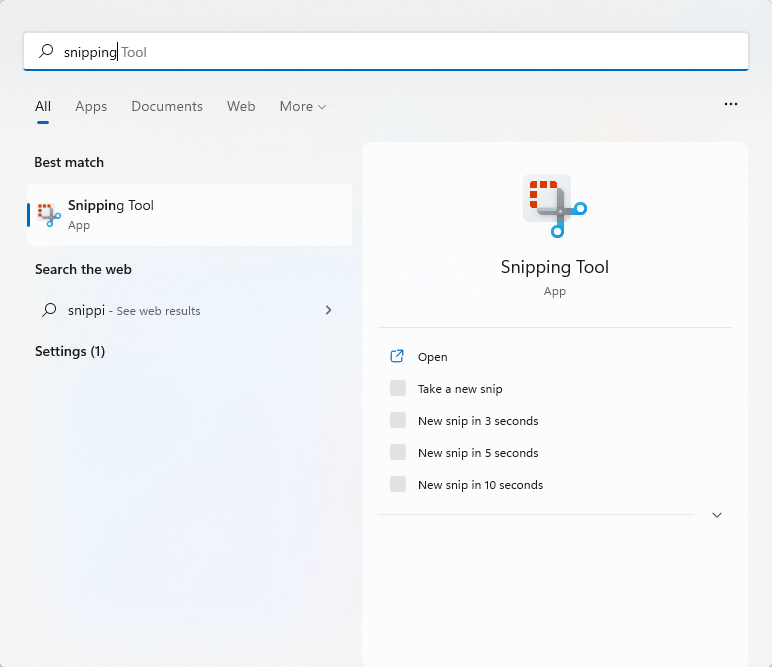
3. There are two ways in which you can delay your screenshots –
- One way is to choose when you want to take the snip right from the options that you can see below Open, as shown in the above screenshot or
- You can click on Open > from the interface, click on the dropdown under No delay and then choose when you want to take a snip or screenshot.
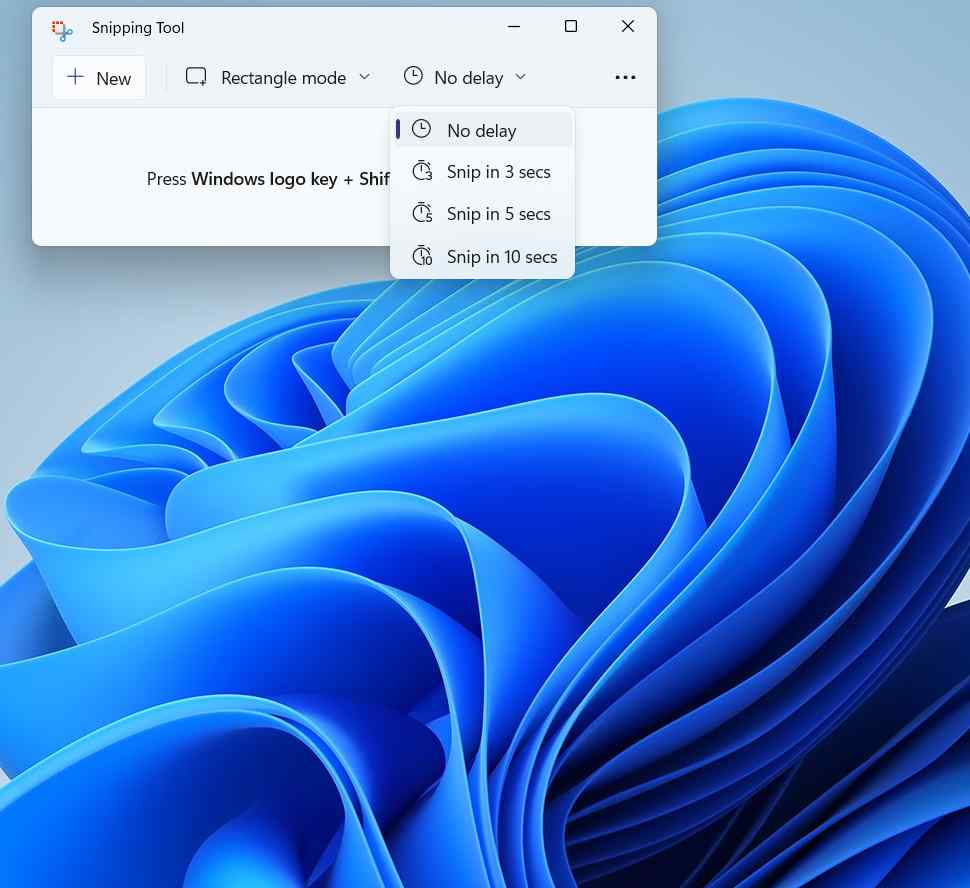
4. As you can see that there are four options in which you can choose a timeframe –
- No delay
- Snip in 3 secs
- Snip in 5 secs
- Snip in 10 secs
After you have selected a timeframe, a snip will be taken depending on the mode you have chosen.
- Windows mode – Screenshot of the active window will be taken.
- Rectangle mode – A rectangular selection will appear.
- Full-screen mode – A screenshot of the complete screen will be taken.
- Free-form mode – You can make a freehand selection on the screen.
For example, if you have chosen to take a Snip in 3 seconds and have chosen Rectangle mode, as soon as you click on the + New button, a rectangular selection will appear after 3 seconds.
To speed things up, you can select a timeframe, press the shift + Windows key + S key combination, and then choose your desired mode and take a screenshot.
Also Read: How to Take Screenshots On Windows 11
2. Use a Third-Party Screenshot Tool
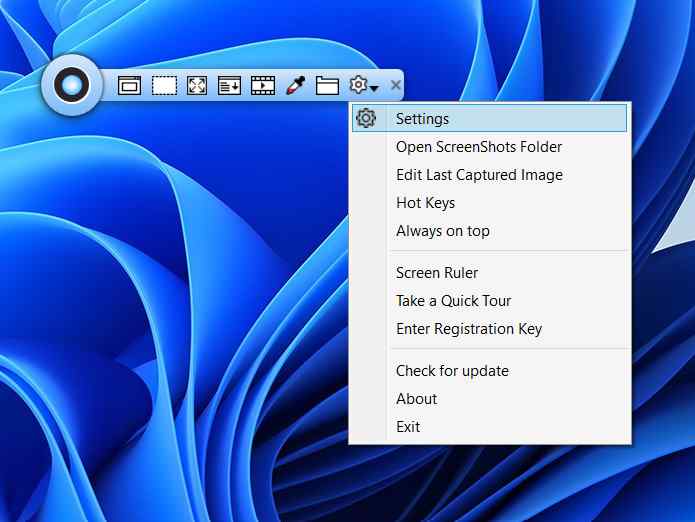
One of the reasons why you might want to pick a third-party screen capture tool like TweakShot Screen capture over the built-in Snipping Tool is because the former offers you tons of options to annotate screenshots. Not just that, TweakShot Screen Capture also lets you record videos while giving you complete control over the audio and the mouse control as well. And, as far as delaying screenshots is concerned, it gives you more options compared to Windows Snipping Tool, as can be seen in the screenshot below –

How To Time Screenshots in TweakShot Screen Capture –
1. Download, install and run TweakShot Screen Capture
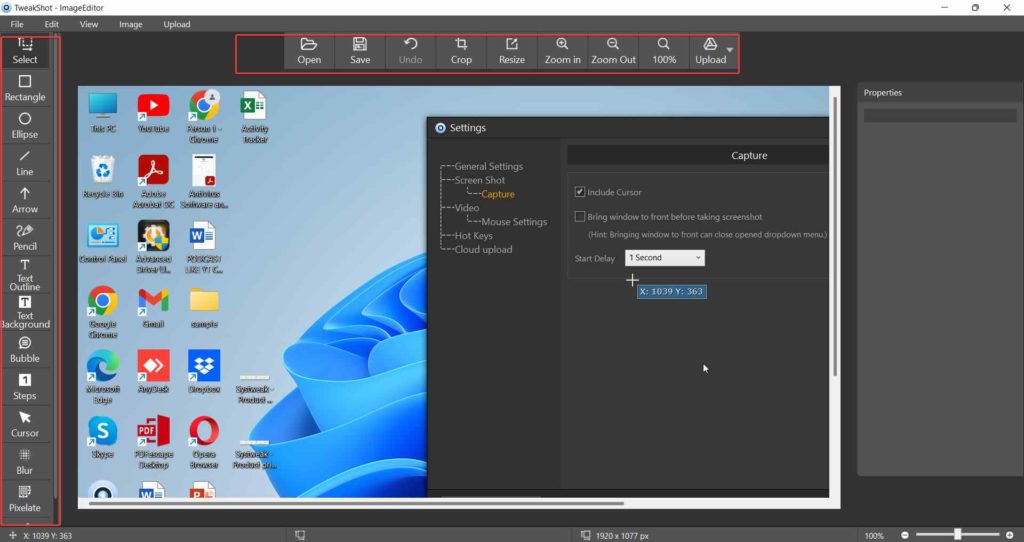
2. From the interface, click on Settings, as shown in the screenshot below.
3. When the Settings window opens, click on Capture under Screen Shot.
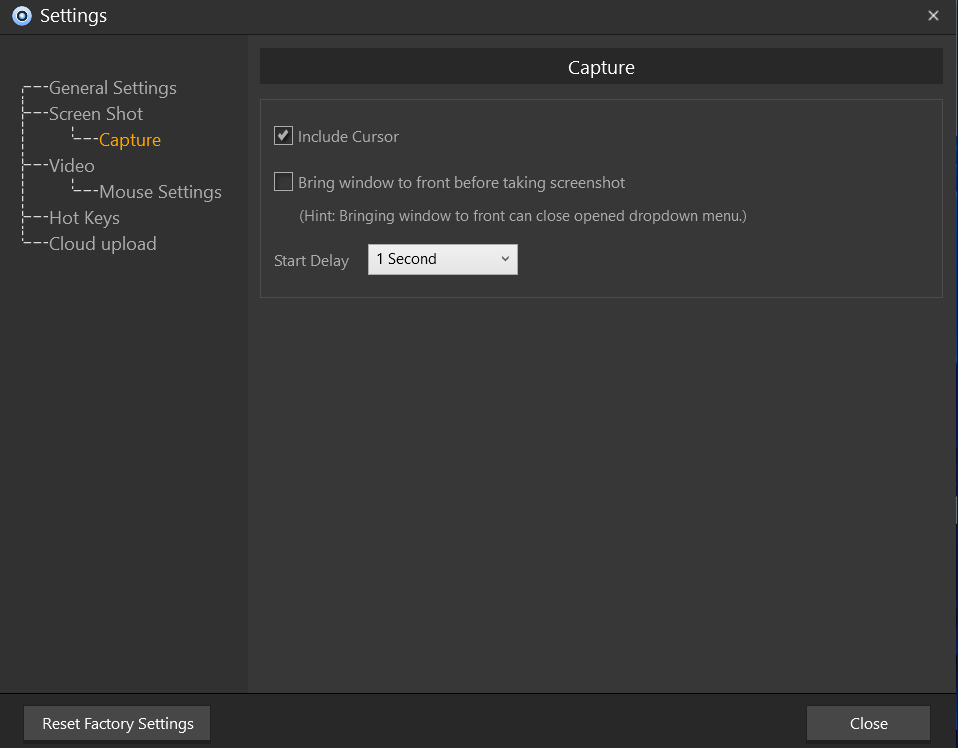
4. From the right-hand side, click on the Start Delay dropdown and choose your desired time frame.
Once you have selected the Start Delay, head back to the main interface and choose the area you want to capture. You can choose to –
- Capture Single Window – To select the active window.
- Capture Region – Take a screenshot of a selected region on the screen.
- Capture Full Screen – To computer the complete screen.
- Capture Scrolling Windows – This mode allows to capture an entire webpage, browser, document, or an area that is otherwise hidden from the viewer.
You can dive deeper into each of these features and get to know TweakShot Screen Capture in this post.
TweakShot Screen Capture’s Image Editor Is A Force To Reckon With
Once you have captured the screenshot, TweakShot Screen Capture gives you tons of options to annotate your screenshot using interactive elements such as rectangular and oval boxes, steps, arrows, etc. It even lets you blur or pixelete confidential information, a feature absent in Windows Snipping Tool. You can get a glimpse of TweakShot Screen Capture’s image editor from the screenshot below –
Also Read: How to Screenshot the Active Window
Wrapping Up
Now that you know how to take timed screenshots in Windows 11/10, take screenshots of all those areas that earlier proved to be impossible. We regularly come up with such engaging, fun, and informative content, so do bookmark this post and others on WeTheGeek.
Next Read: