
If you enjoy games playing via Steam but find that the entire Steam app is running slow or facing any other Steam issues, this guide will help you resolve this issue. Steam games consume many of your PC’s resources, but the app itself is lightweight with an easy to use interface. I have compiled a list of resolutions available on various Steam forums for any issues related to Steam and the games within.
Most Recommended Fixes For Steam Running Slow
Method 1: Reduce Running Applications
The first step you can take to fix Steam issues is to reduce the number of running applications on your computer to allow Steam to use most of your computer’s resources. When you exit out of any application, it may still be running in the background, consuming resources for no reason at all. Follow these steps to close apps running in the background.
Step 1: Make a right-click on the taskbar and click on Task Manager to open it.
Step 2: In the task manager window, click on the Processes tab to view the applications currently open on your computer. Make a right-click on the application that you know about and is secretly running in the background, and then click on End Task.
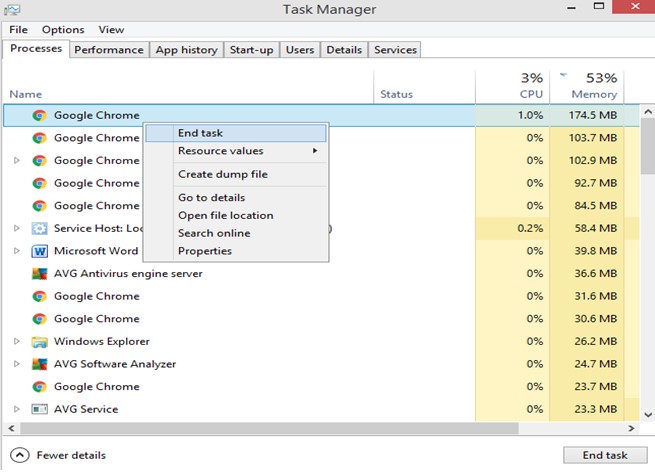
Note: Do not close any background process or service that is required by the system.
Step 3: Once you have closed all the unwanted apps and eased the burden of your PC’s RAM, try and check if all the Steam Issues have been fixed.
Method 2: Clear Cookies and Cache
Every app that runs on your system gathers cache, cookies, and other temporary files that accumulate over time and make Steam function slower than usual. The solution for this Steam issue is quite simple: to clear all the cache and cookies from Steam. Here are the steps to resolve the issue:
Step 1: Make a right-click on the Steam icon and click on Run as Administrator from the context menu.
Step 2: Once the Steam app launches in admin mode, click on Steam on the upper left corner and choose Settings from the dropdown menu.
Step 3: Now click on Web Browser from the left panel of Settings.
Step 4: Next, click on Delete Web Browser Cache and Cookies buttons, one by one, to delete the temp files.
Step 5: Then, click on Downloads in the left panel and click on Clear Download Cache.
Step 6: Finally, restart the Steam app and check if the Steam running slow has been resolved.
Method 3: Repair Steam
Another solution to Steam running slow on your computer is to repair the files. As reinstalling will take a lot of time, and you will lose all the settings, it is recommended to repair the existing files. Here are the steps to repair Steam:
Step 1: Press Windows + R to open the Run window.
Step 2: Type the following command line and then press Enter.
C:\Program Files (x86)\Steam\bin\SteamService.exe /repair
Step 3: You will see a window appear and disappear. This is a part of the Steam repairing process. Once the process is completed, you will be notified. Restart Steam and test if you are facing any Steam issues on your computer.
Note: If repairing the files does not work, you can uninstall Steam and reinstall it from the official link.
Method 4: Update Drivers
Drivers are the key that connects the hardware and the software. If an app is running slow, then it could mean that the drivers installed in your system are outdated, and the app in question cannot use the resources of your PC properly. Thus it is recommended to update your drivers regularly. Drivers can be updated in three different ways that have been explained below:
Option 1: Update Using Official Support Websites
Drivers can be downloaded from their respective OEM websites and installed on the computer. The device manufacturers always maintain their websites and ensure that the users get the latest driver only. However, there are many drivers installed in your system, and download updated drivers for every hardware would be a time and effort consuming process.
Option 2: Update Using Device Manager
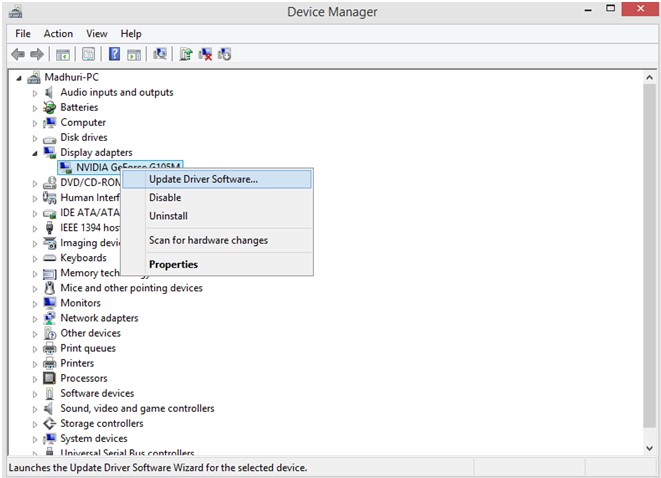
The Device Manager is a tool that was inculcated by Microsoft to ease the driver updating process. This tool displays a list of drivers installed in your system, and then with user intervention can search for the latest driver on the Microsoft Servers and install it. This is an automated process and requires the user to select which driver to be updated. However, the Device Manager’s major drawback is that it does not consider third-party OEM websites and only searches for the Microsoft Server driver, which may take time to receive the latest updates. Here are the steps to use the Device Manager.
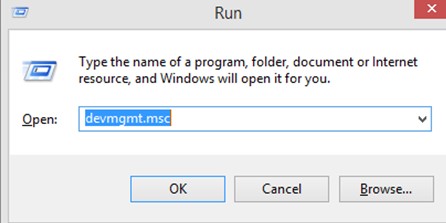
Step 1: Open the RUN box (Windows + R) and type “devmgmt.msc” followed by the Enter key.
Step 2: From the list of drivers displayed, make a right-click on each one, and choose Update Driver from the context menu.
Step 3: Follow the on-screen instructions and let the update process complete.
After you have updated all the drivers in your PC, you will observe that your system will have become faster, smoother, and perform better than before. Check Steam and find out if the same issue persists.
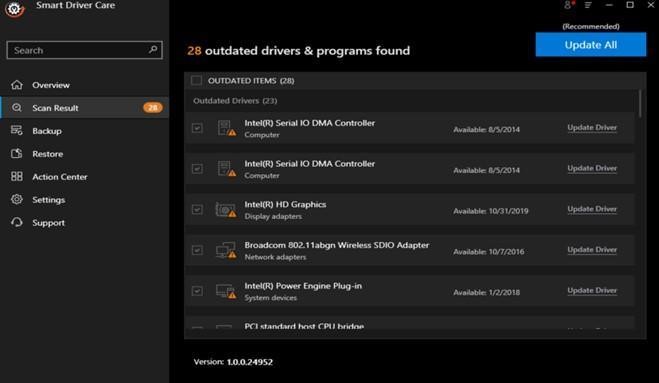
Option 3: Use Smart Driver Care
The final option to update drivers is to use a third-party tool to scan all your hardware and drivers and then search for the latest updates on the internet. It can then update all the drivers automatically based on user selection. One such efficient and amazing tool is Smart Driver Care that can identify outdated, corrupt, and missing drivers from your PC and update them with the latest and most compatible ones. Here are the steps to use Smart Drive Care:
Step 1: Download the installation file from the link provided below.
|
|

Step 2: Install the app by executing the file downloaded and carrying out the onscreen instructions.
Step 3: Once the program has been installed, open it, and press the Scan Now button on the home screen of the app.
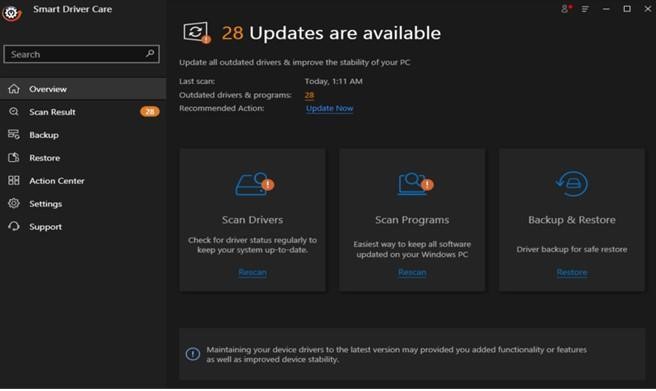
Step 4: The scanning process will take some time and display all the driver issues in your system.
Step 5: Click on Update Driver next to the issues highlighted, and Smart Driver Care will fix it for you.
Note: Smart Driver Care can update only two drivers each day in the basic version, free of cost. If you wish to update all your drivers at once, you will have to purchase the PRO version and register it.
The Final Word On Fixes For Steam Running Slow
Steam is an excellent platform for playing games, making it very important for the Steam app to run properly. If you are facing Steam issues like Steam running slow on your PC, this might also impact the games you are trying to play within Steam. Thus it is important to fix this issue on top priority and be resolved by the methods described above.
Follow us on social media – Facebook, Twitter, and YouTube. For any queries or suggestions, please let us know in the comments section below. We would love to get back to you with a solution. We regularly post on tips and tricks, along with answers to common issues related to technology.
Mansi Vijay
I tried updating drivers, thankfully it fixed the annoying slow running issue on Steam.