
Apps can drain the battery life even when they are not in use as they keep running in the background. Thankfully, Windows has several energy-saving functions, such as the Sleep option. By putting your computer and programs to sleep after a set amount of inactivity, the Sleep feature prolongs the life of your battery and improves the functionality of the entire system. Here, we’ll go over how to put unused apps in Windows 11/10’s Sleep Mode.
Also Read:FIX: Windows Shuts Down Instead of Going into Sleep Mode
How To Put Your Windows 11 Laptop To Sleep?
You can adjust the Sleep settings in Windows 11 to suit your needs.
Step 1: Press Win + I to open the Settings app.
Step 2: Click on System in the left panel.
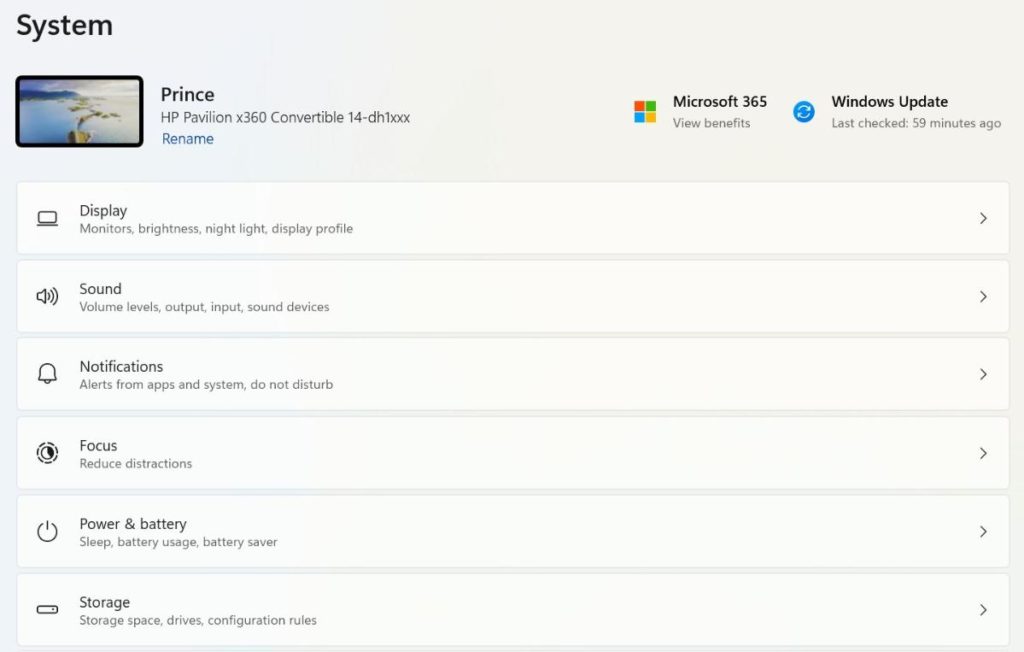
Step 3: Next, click on Power & Battery settings in the right panel.
Step 4: Expand the Screen and sleep drop-down option after which you should configure your sleep settings.
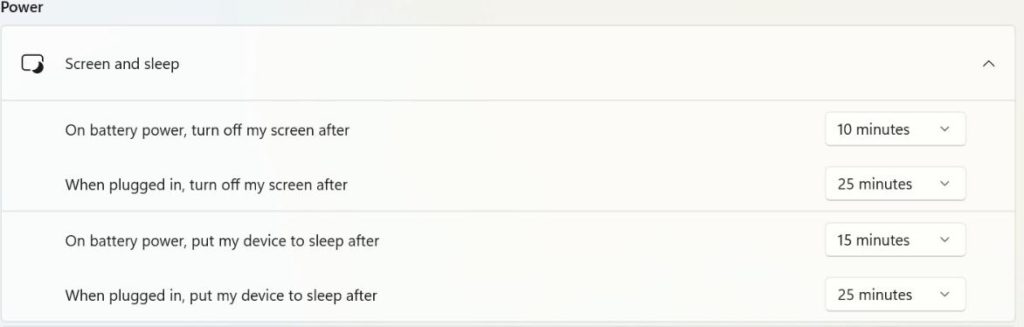
Note: Options for setting the sleep time include When plugged in and When using battery power. Your computer will go to sleep when it is idle according to the chosen sleep time.The aforementioned steps will help you to put your entire computer to sleep. Continue reading forward to learn how to put specific apps to sleep and stop them from running in the background.
Also Read: Windows PC Won’t Go to Sleep Mode? Here’s the Fix!
How To Sleep Apps On Windows 11?
Here are the steps to follow in Windows 11 to put your programs to sleep and stop them from running in the background:
Step 1: Press Win + X to open the Windows power menu and then click on Settings.
Step 2: Click on Apps in the left panel.
Step 3: Then select Installed Applications in the right panel.

Step 4: A list of apps will appear on your screen where the installed apps would be arranged in alphabetical order. Choose the application you want to use for sleep.
Step 5: Press the three-dot menu button.

Step 6: Select the Advanced Choices option.
Step 7: Set Let this app run in the background to Never.

Now that the selected app has been put to sleep, it will no longer operate in the background. You can repeat the instructions above for each additional app to put it to sleep.
Also Read: How To Fix the Windows 10 Sleep Option Missing
How Do I Put Windows 10 Programs To Sleep?
The steps to put an app to sleep on a Windows 10 PC are different but simple to follow.
Step 1: Press Win + I to launch the Settings app.
Step 2: Then select the Privacy tab to put your apps to sleep.
Step 3: After that, click on the Background Apps option on the left-hand side under the App permissions section in the left-side window by scrolling down to it.

Step 4: Turn off the toggle next to the option to Let apps run in the background.

Note: By disabling the toggle for a particular app under the Choose which apps can run in the background section, you can also put that app to sleep.

Also Read: How To Make Your PC Wake From Sleep Automatically
The Final Word On How To Put Apps To Sleep In Windows 11/10
So now you know how to put your computer to sleep or stop certain apps from running in the background. If you prevent apps from running in the background, then you can save your battery consumption. Also, this will free up your CPU resources and you might notice a slight increase in the speed of your PC when performing tasks. However, some apps like antivirus should never be put to sleep because they monitor your PC in real-time.
Please let us know in the comments below if you have any questions or recommendations. We would be delighted to provide you with a resolution. We frequently publish advice, tricks, and solutions to common tech-related problems. You can also find us on Facebook, Twitter, YouTube, Instagram, Flipboard, and Pinterest.
Suggested Reading: