
Recently upgraded to Windows 11? Is the Microsoft.photos.exe process depicting a high CPU and memory usage? Well, this surely can be alarming. Don’t worry. You can easily resolve this issue by making a few quick changes to your device’s settings. In this post, we have listed a bunch of troubleshooting hacks that you can use to your rescue.
So, if you’re stuck with the Microsoft Photos high memory usage issue on Windows 11, we’ve got you covered. Well, if this specific process is taking up a huge portion of memory and CPU usage on your device, it may lead to certain criticalities and you should fix this issue on priority.
Let’s get started and gain some insight into what this process is all about and why this issue triggers on Windows 11.
Also read: Are you Facing Issues with Photos App in Windows 10?
What is Microsoft Photos.exe?
Microsoft.Photos.exe is the executable file of the Windows Photos app. If you’re seeing a high usage percentage of this specific process in the Task Manager, even if the Photos app is not opened at the moment then your system may start performing unusually.
To make sure that the Microsoft.Photos.exe process doesn’t occupy heavy system resource utilization, you can use the below-mentioned solutions to fix this issue.
Also read: How To Use Microsoft Photos App To Edit Videos
How to fix Microsoft Photos High Memory Usage Issue
Solution #1: Disable OneDrive Syncing of the Photos app
By disabling the OneDrive syncing, you can easily fix the “Microsoft Photos high memory usage” issue on Windows 11. Here’s what you need to do.
Launch the Windows Photos app on your device.

Tap on the three-dot icon placed on the top-right corner of the screen, select “Settings”.
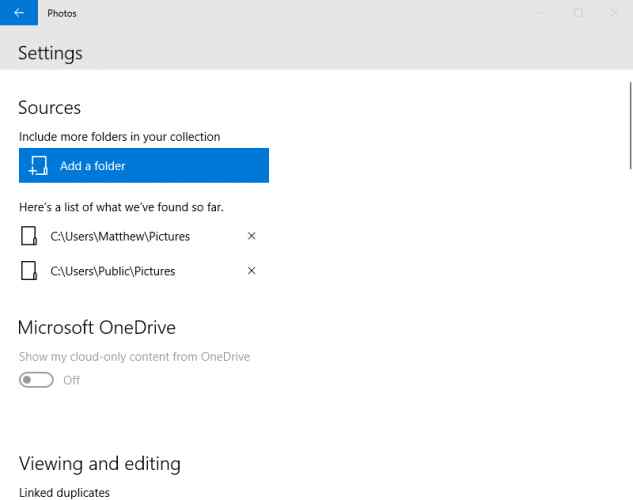
Under the Sources section, tap on the “x” icon to disable OneDrive syncing for every folder that you see on the list.
Also, toggle OFF the “Show my cloud-only content from OneDrive” option.
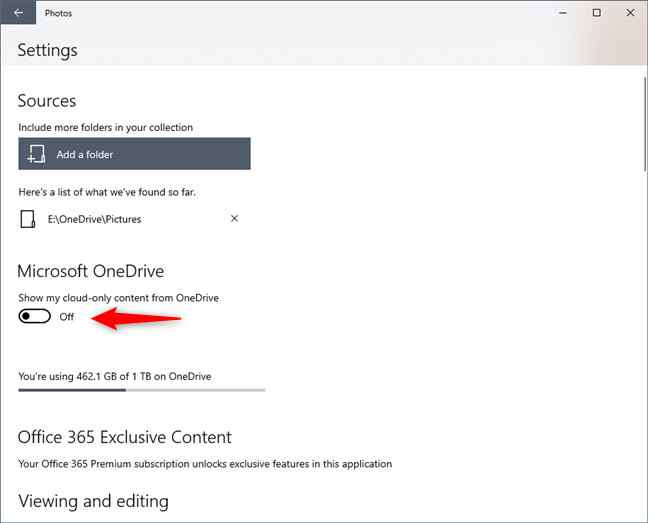
After making the above-listed changes, close the Photos app and then reboot your device. Once your device restarts, launch Task Manager to check whether the issue persists.
Solution #2: Terminate the Runtime Broker Process
Launch the Windows Task Manager on your device. Switch to the “Processes” tab.
Look for the “Runtime Broker” process in the list. Right-click on it and select “End Task” to terminate this process.
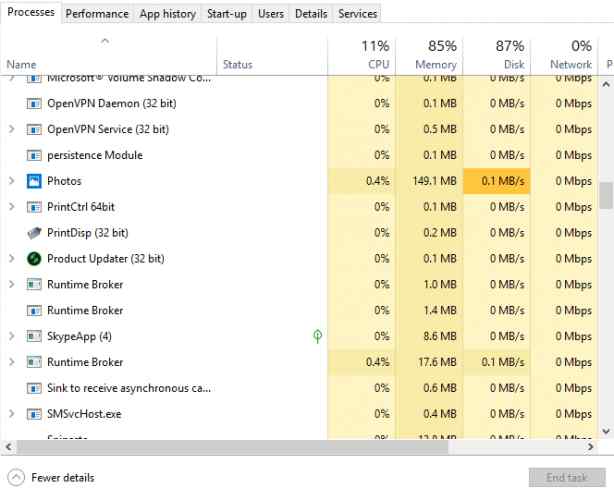
Now, look for the “Photos Background Task Host” process, right-click on it and select “End Task”.
After terminating both these processes, reboot your device.
Solution #3: Turn off Background Apps
Open Windows Settings> Apps> Apps and Features.

Scroll through the list of installed applications and then look for “Microsoft Photos”.
Tap on the three-dot icon placed next to it and then select “Advanced Options”.
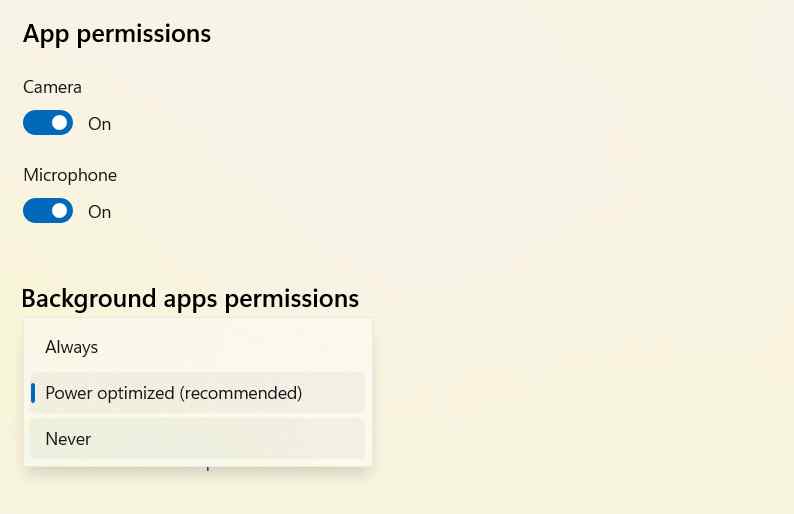
Under the “Background apps Permission” section, tap the drop-down menu and then select “Never”.
Once you disable the background app functioning of the Photos app, it will drastically minimize the CPU and memory utilization.
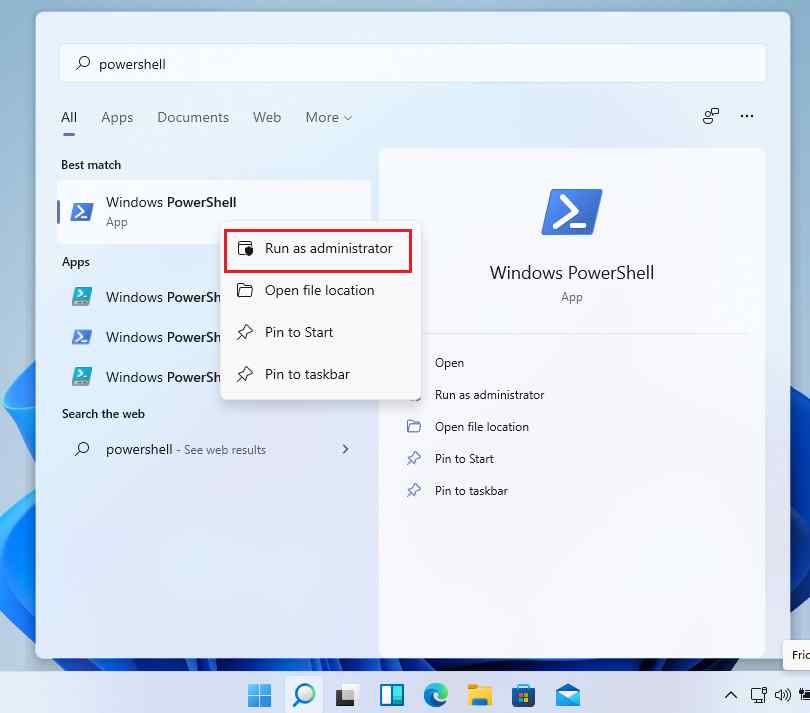
Solution #4: Uninstall the Photos app via PowerShell
Tried the above-mentioned hacks and still no luck? Is the Microsoft.Photos.exe process still consuming a huge portion of system resources? Well, uninstalling and reinstalling the Photos app might help!
Tap on the search icon placed on the Taskbar, type “Power Shell” and run the app in admin mode.
In the PowerShell window, copy and paste the following command and hit Enter to execute it.
Get-AppxPackage *photo* | Remove-AppxPackage
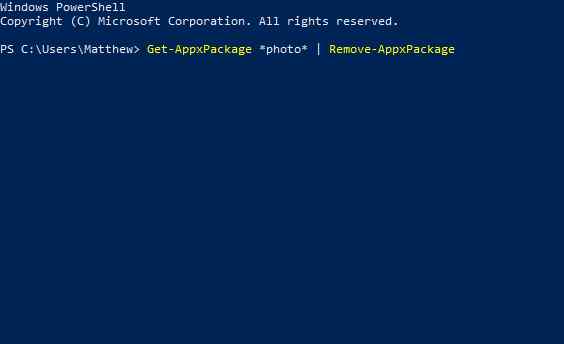
After running this command, exit PowerShell and reboot your machine.
Also read: How To Fix Photos App Not Working in Windows 8 And 10
Conclusion
We hope the above-listed workarounds helped you in fixing the excessive system utilization of the Windows Photos app. If the Microsoft.Photos.exe process is still interfering with your system’s performance, you can also switch to an alternative photos app.
Do let us know which solution worked out the best for you! Feel free to share your thoughts in the comments space.