
Windows 10 is undoubtedly one of the best-operating systems. Sadly, it is not free from issues, and one of the users’ errors is antimalware service executable and high CPU usage issues. The words “Malware” in error doesn’t mean your computer is infected with a virus. Instead, this error is caused by the default Antivirus app of Windows 10, commonly known as Windows Defender, recently rechristened as Windows Security.
Also Read: PC Cleaner free download for Windows 10.
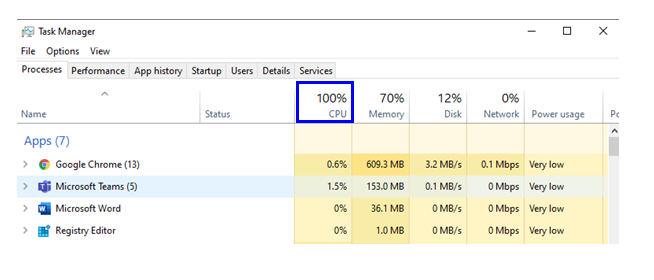
What Exactly Is Antimalware Service Executable And High CPU Usage Issue?
When you face the issue of antimalware service executable in Windows 10, a process known as msmpeng.exe causes spikes in task manager processes resulting in high CPU usage. The msmpeng.exe process is not a malicious process or a virus but a part of the bundle of security services, collectively known as antimalware service executables.

As this is a legit Windows service, the issues caused by antimalware service executable in Windows 10 cannot be resolved by Windows Troubleshooter or any third-party tool. After a lot of research by the global community, the issue has been narrowed down to a particular file by the name of mpenginedb.db, which again is not a virus but one of the system files used by Windows Defender to store certain values. This file contains a database of identifiers, some of which act as False-Positive and forces Windows Defender to keep scanning the computer in a never-ending loop. The continuous scanning results in the system resources being consumed unnecessarily, resulting in high CPU usage.
The only solution identified so far is to delete the mpenginedb.db file, which will fix the issue of both antimalware service executable and high CPU usage.
Also Read: 15 Best CPU Temperature Monitor Software For Windows 10, 7, 8 PC.
Also Read: Fix- Svchost.Exe High CPU Usage On Windows 10.
Steps to Resolve Antimalware Service Executable and High CPU Usage Issue in Windows 10
As mentioned earlier, the only possible solution to fix antimalware service executable and high CPU usage issues is to delete the Mpengine.db file. However, this file is a system file of the Windows 10 operating system; it cannot be deleted in the way other files are deleted. You won’t select the file and press the delete button on the keyboard, and the file moves to the Recycle Bin. To delete this file, follow these steps:
Step 1. Disable the Antivirus process running in your computer by typing Windows Security in the search box on your taskbar’s bottom left.
Step 2. From the search results, open the corresponding app of the same name.
Step 3. Once the App is opened on your desktop, Choose “Virus and threat protection” from the list on the left side.
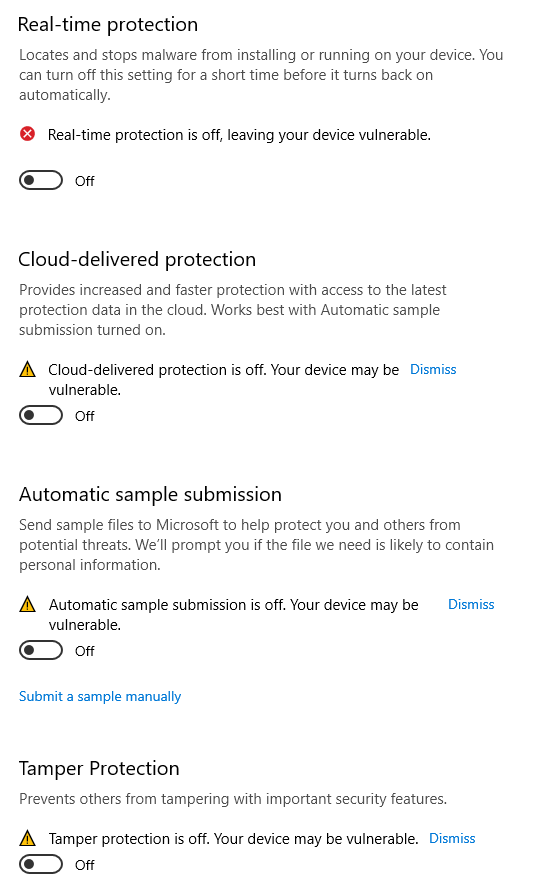
Step 4. Among the options mentioned on the right side of the Windows Security app window, locate “Manage Settings” and click on it.

Step 5. From the new options displayed, turn every option off by disabling the toggle switch under each title.
Also Read: How To Free Up RAM On your Windows 10, 8, 7 PC.
Step 6. Once all the toggles are turned off, close all the open windows, save any pending work, and Restart the computer. Remember to press and hold the Shift key before restart, and hold it until the computer boots to Advanced Recovery Window.
Step 7. Now that the computer has rebooted in Recovery mode, choose Troubleshoot -> Advanced Options -> Startup Settings -> Restart. Remember to press and hold the number “4” key to boot in safe mode.
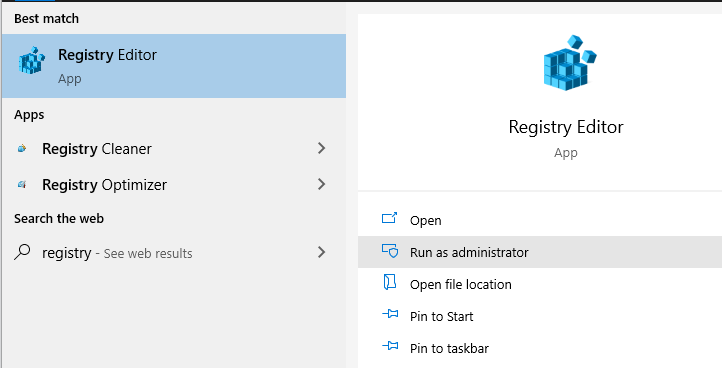
Step 8. Wait for the computer to boot in Safe Mode and type Registry in the toolbar’s search box. The search results will display the Registry Editor App in the search results.
Step 9. Right-click on the result, and then click “Run as Administrator.”
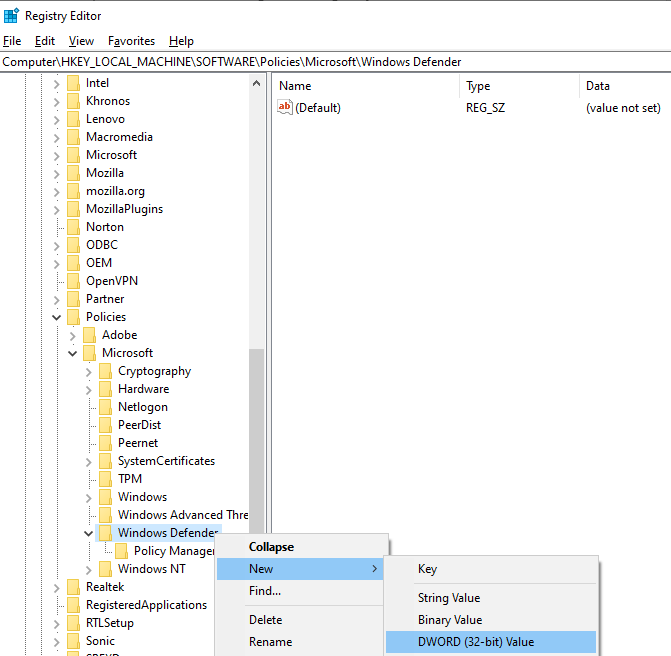
Step 10. In the registry window, copy the path mentioned below and paste it into the File tab’s address bar. Press Enter to reach the correct path required.
HKEY_LOCAL_MACHINE\SOFTWARE\Policies\Microsoft\Windows Defender
Step 11. Now, right-click on the folder labeled as Windows Defender. From the list of options that appear, select New and choose DWORD (32-bit) value. A file will be created and rename the file as “DisableAntiSpyware,” and click on “OK” button.
Step 12. Once the file is created, you need to double-click on the file and locate the option to change the value from 0 to 1. Click the Ok button, and restart the computer.
Step 13. Once your computer is restarted, type PowerShell in the search box located on the taskbar’s bottom left. From the search result, open the PowerShell app as an Administrator to enable full power and access.
Step 14. The PowerShell window resembles the command prompt window but is Blue and white compared to black and white. Type the command below, paste it in PowerShell, and hit the keyboard’s enter key.
Remove-Item ‘C:\ProgramData\Microsoft\Windows Defender\Scans\mpenginedb.db’
Step 15. The Mpengine.db system file will now be deleted from your system.
Step 16. Reopen the Registry app again by following steps 8 to 11. You don’t need to boot in Safe mode this time. Once you locate the file, you created a few minutes ago and renamed it “DisableAntiSpyware,” right-click on that file and delete it.
That was the final step, and the antimalware service executable and high CPU usage issues have finally been resolved. Restart your computer, and the Windows Security will reactivate without Mpengine.db or msmpeng.exe process, causing any father issues.
Also Read: 10 Best CPU Benchmark Software For Windows 2020.
If you still find issues with CPU spikes, then you should disable the Windows Security permanently and install third-party total security software like Advanced System optimizer, which can not only protect your system from all types of malicious software but also optimize your system and delete all the unnecessary files, and help to enhance your computer’s performance.
Download Advanced System Optimizer now.

Also Read: 5 Tips to Fix 100% Disk Usage on Windows 10.
Frequently asked questions-
Q1. Can I End The Antimalware Service Executable?
Windows 10 disable antimalware service executable will work to get rid of the msmpeng high CPU usage. But we suggest that as a Windows defender plays a crucial part in keeping your PC safe, you keep it working or get another third party anti-malware application.
Q2. How do I reduce antimalware service executable RAM usage?
When antimalware service executable high disk usage is visible on the Task Manager, one should check for the solution. If you wish to reduce the antimalware service executable RAM usage, you must try the above method.
Q3. How do I stop Windows Defender from scanning itself?
If you are stuck with the Windows Defender process scanning itself, it’s better to use the Task Manager to kill the task. You can open the Task Manager and select the process and then click on the End Task.
Q4. How do I get rid of MsMpEng EXE?
Msmpeng high CPU usage can be fixed by making changes in the registry editor and creating a new value. This is not harmful as it is not a virus, but the high usage, in general, should be avoided to keep your PC safe.
The final word on Antimalware Service Executable and High CPU Usage Issue.
Those were the steps to resolve the error of antimalware service executable in Windows 10 and the msmpeng high CPU usage issue that occurs side by side. Although the steps to follow for Windows antimalware service executable are lengthier than using the process seems complicated. You can complete it successfully provided you read it all first and then follow each step without skipping anyone in between. If you still face issues and cannot resolve the issue, then mention in the comments section below, and we would respond with the best possible solution.
Scott
In power shell I am getting an error “Cannot remove item, the process cannot access the file because it is being used by another process.nguyen duc thai
Thank you so much, i only fied that after i saw your tutorial, after 20 videos on youtubeMridula Nimawat
Glad it worked!