Are you experiencing any issues after upgrading to Windows 11? Looking for ways on how to repair Windows 11? You’ve come to the right place!
If you’re encountering any issues like system crashes, unresponsive apps, or if your device is performing slower than usual, you can use a few troubleshooting hacks to repair your PC and get your machine up and running again in action within no time.
In this post, we have listed 6 different methods that you can use to repair Windows 11 to optimize your device’s performance and get past any errors or bugs.
Let’s get started.
How to Repair Windows 11
Method 1: Update your Device
First things first! To resolve common errors and bugs, or any other kind of issues, updating your device is the first thing you can try. Just make sure that you regularly check for recent updates to ensure that your device is up-to-date.
Microsoft keeps rolling regular updates for Windows that offer performance improvements, bug fixes that can allow you to easily repair Windows 11 in just a few clicks. Here’s what you need to do.
Launch the Start menu search, tap on Settings> Windows Update.
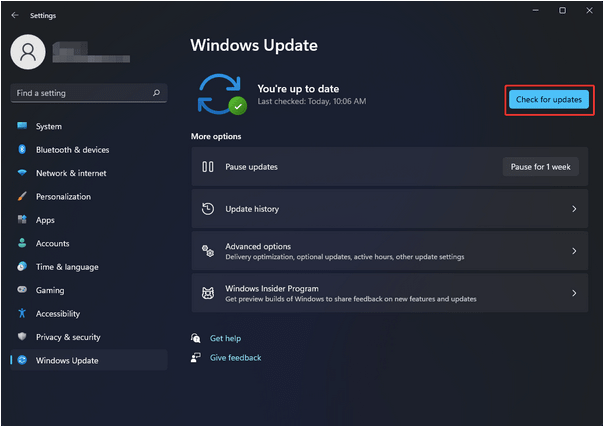
Hit the “Check for Updates” button to see if any latest update is available for your device. If yes, then upgrade your device right away!
Also read: Windows 11 Installation Stuck at 100%? How to fix
Method 2: Uninstall Update
If your device is troubling or encountering any issues after installing a certain update, then you can deal with this problem by uninstalling the latest update and switching to an earlier version. There may be a few instances when your device won’t be compatible with the recent update, due to which your system may start responding weirdly. To uninstall the Windows update to repair Windows 11, follow these quick steps:
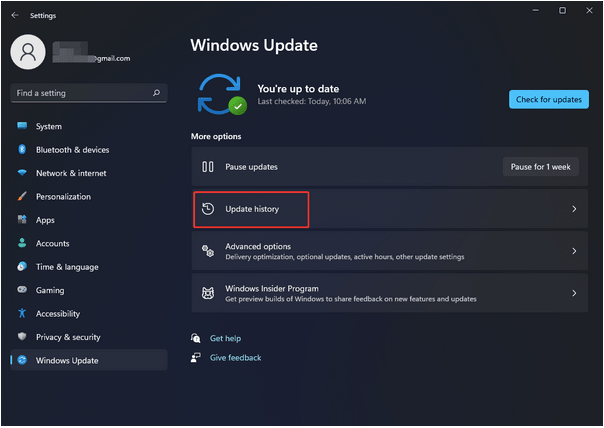
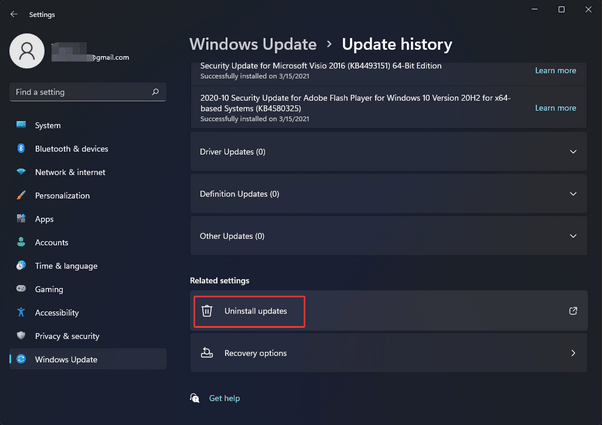
Navigate to Start> Settings> Windows update. Tap on the “Update History” button.
Scroll down and then hit the “Uninstall Updates” button.
You will now be redirected to the Control Panel window. Switch to the “Uninstall” tab and then select the latest update from the list. After selecting the Windows update that you need to uninstall, hit on the “Uninstall Update” button.
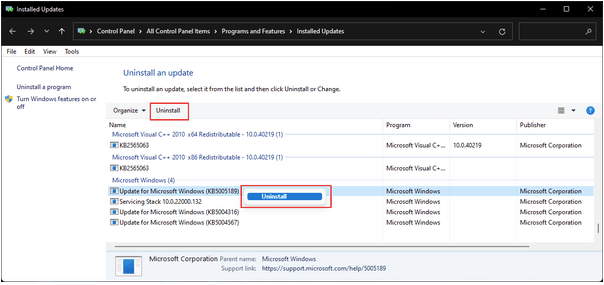
Windows will pop up a confirmation message whether you want to revert to an earlier version. Tap on YES to confirm.
Follow the on-screen instructions to complete the uninstallation process. Once the recent Windows update has been uninstalled successfully, browse through a few apps and services to check whether your device is still facing performance issues.
Also read: How to Enable Hibernate Mode on Windows 11
Method 3: Use Windows Troubleshooter
The third method to repair Windows 11 is by using the Windows Troubleshooter to scan and fix underlying issues. Windows Troubleshooter is an in-built utility that allows you to solve problems with your PC. Here’s what you need to do.
Navigate to Start> Settings> System> Troubleshoot.
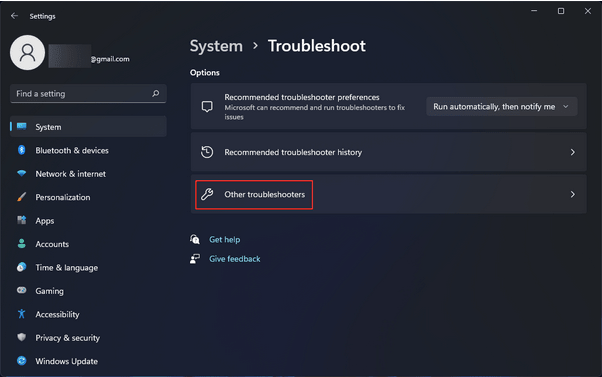
Tap on the “Other Troubleshooters” button.
Scroll down through the list of components. Tap on the category on which you are currently facing issues. Hit the “Run the Troubleshooter” button.
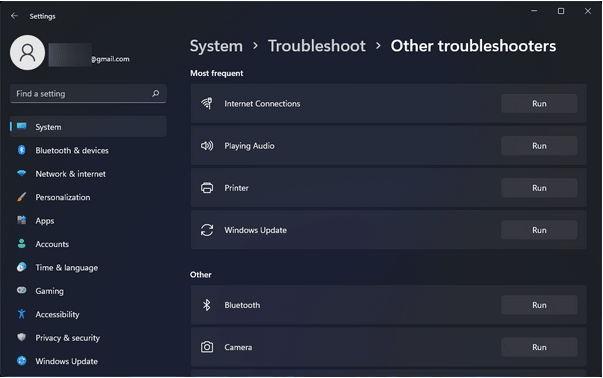
Windows Troubleshooter will now get to work and will start diagnosing underlying issues on your system.
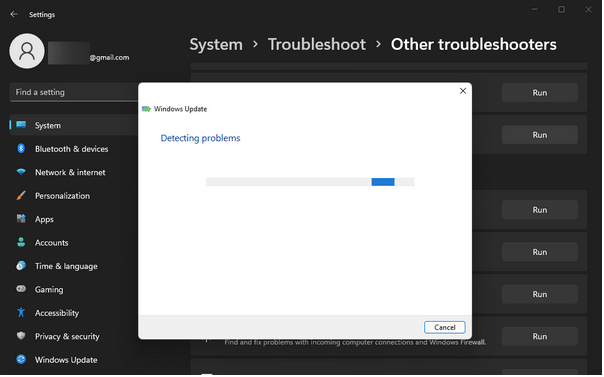
Wait for the process to finish and see if it helped in fixing your device.
Also read: How to Fix Windows 11 High Disk Usage
Method 4: System Restore
System Restore can work like wonders to repair Windows 11 or any other version. System Restore is a utility feature that allows you to roll back your device to a previous checkpoint and undo all the recent changes that lead to causing troubles. To use the System Restore feature on Windows 11, follow these quick steps:
How to Restore Windows 11 from a Previously Created Checkpoint?
Launch the Start menu search, type “Create a Restore Point” and hit Enter.
Now switch to the “System Protection” tab. Tap on the “System Restore” button.

Pick the latest restore point from the list and then hit on “Next” to proceed.
Confirm the restore point in the next window and tap on “Finish”.
Also read: How to Use System Restore on Windows 11
Method 5: Run the CHKDSK Command
CHKDSK (Check Disk) is another Windows utility that you can use to repair Windows 11. CHKDSK is a system command that is used for fixing file system errors and resolving any kind of system discrepancies. To run the CHKDSK command on Windows 11, follow these steps:
Launch Command Prompt in Admin mode.
Type the following command and hit Enter to execute it:
Chkdsk E: /f /r /x
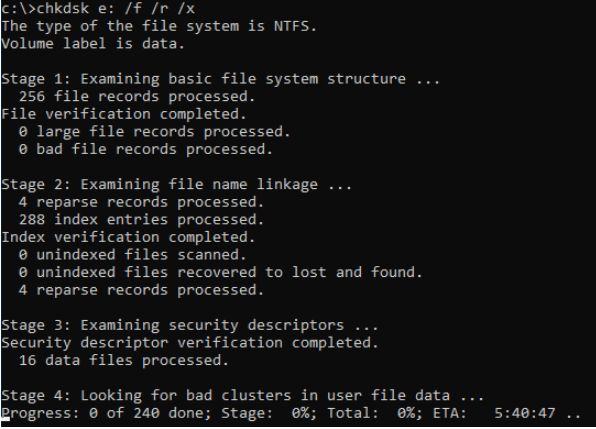
The CHKDSK command is followed the drive letter and you can also replace it with any other disk drive initial.
Wait for the process to finish until all file system errors are scanned, diagnosed, and resolved.
Method 6: Reset Windows
Tried the above-mentioned solutions to repair Windows 11 and still no luck? Well, maybe resetting your device to its original default settings might help. Wondering how to reset Windows 11? Read ahead.
Navigate to Start> Settings> Recovery. Tap on the “Reset this PC” button.
Now Windows will offer you two different choices: You can either keep all personal files and data or erase everything to start afresh. Make your selection to proceed.
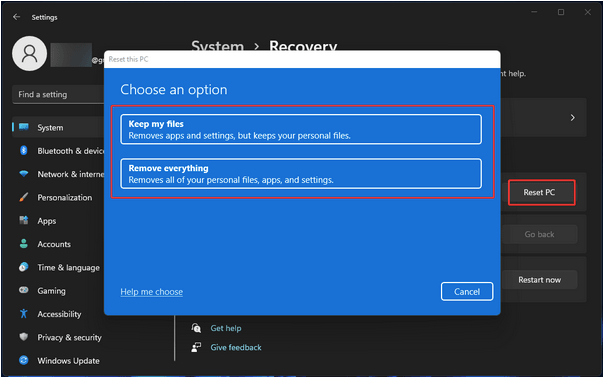
On the next Window, you will be prompted to pick between Cloud download or Local Reinstall. Pick the desired option and then hit the “Continue” button to reset your device.

Follow the on-screen instructions listed on the screen to complete the reset process.
Can I reset Windows 11?
Yes, resetting Windows 11 can help you in getting past any common errors or bugs. You can use the above-listed Method #6 to reset your device to repair Windows 11. And don’t worry about losing your data. If you don’t wish to erase all your files and data, you can choose the “Keep my Files” option that will allow you to keep all personal stuff in place.
How can I repair my Windows 11?
There are a myriad of ways to repair Windows 11. In this post, we have listed 6 useful methods that will allow you to repair your device or to solve any common errors or bugs. Apart from the ones that are listed above, you can also try booting your device into Safe Mode, use the SFC command, update outdated system drivers, or use Windows 11’s Startup Repair option.
Was this post helpful? Did the above-mentioned troubleshooting solutions help in optimizing your PC’s performance? Feel free to share your thoughts in the comments section!