
Since Apple offers FaceTime, many Mac users think having Skype is a waste of storage space. So, if you are amongst them and looking for ways to uninstall Skype, you are in the right place.
This article will discuss how to uninstall Skype and Skype Business, the edition designed for large establishments.
How To Uninstall Skype On Mac?
For years, Skype has been a popular messaging and calling app. Using it, you can VOIP calls to anyone across the world who is also using Skype. But recently, when using Skype, users have reported facing several problems like:
- Skype keeping crashing
- Skype freezes often
- Skype does not load and works properly
So, to avoid all these problems, the best solution they think is to uninstall Skype. Hence, here we explain how to remove Skype.
Read More: Best Mac Cleaner Apps & Optimization Software
Note: Skype installs different files on Mac that take unnecessary space, so if you are not using it and are looking for a simple way to recover space, try uninstalling it.
Quickest Way to Remove Skype From Mac
Before explaining how to uninstall Skype manually, I would like to discuss the most effective and easiest way. Using it in a single click, you can uninstall Skype and get rid of all its associated files. For this, we recommend using the Uninstaller module provided in the CleanMyMac X app. This handy and easy to use module knows exactly which associated program files to remove and from where.
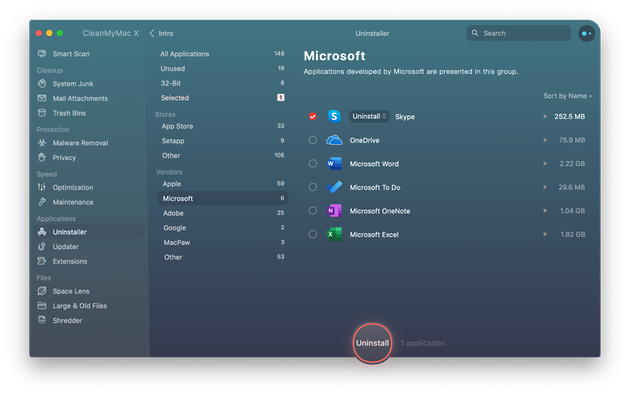
To use CleanMyMac X, follow the steps below:
1. Download and install CleanMyMac X

2. Launch the application
3. Click Uninstaller module from the left pane
4. Select Microsoft in the Vendors category
5. Check the box next to Skype > click Uninstall
6. This will altogether remove Skype from Mac.
But if you are wondering why use CleanMyMac X when you can simply select Skype > Move to Trash. The reason is, doing so will leave cache files, log files, and other data related to Skype on your Mac. So, if you don’t want that redundant data to sit on your Mac and occupy space, use CleanMyMac X.
In addition to this, if you have changed your mind and would just like to fix Skype, we suggest resetting the app. For this again, you can use CleanMyMac X. To reset an app, click the Uninstaller module, look for Skype under apps, check the box next to it > click the arrow, and hit the Reset button. To confirm, press the Reset button again. This will help run Skype smoothly.
However, if you don’t want to use a third-party app, no worries, you use the manual steps explained below:
Manual Ways to Uninstall Skype from Mac
1. If Skype is running, close it and quit all the processes.
2. Head to the Applications folder, search for Skype > select > right-click Move to Trash.
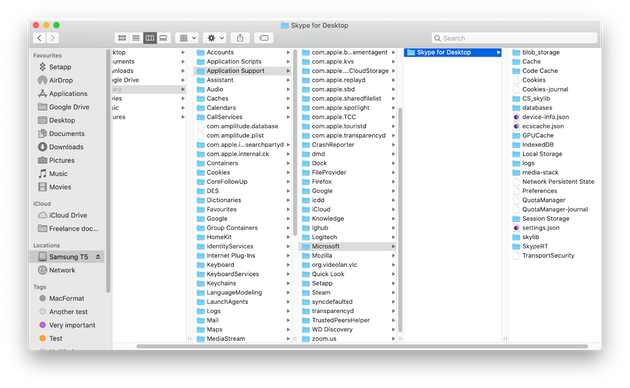
3. Next, to remove additional files launch Finder > Finder > Go > Go to Folder
4. In the box, type ~/Library/Application Support/Microsoft
5. Navigate to Skype for the Desktop folder and drag it to the Trash.
6. After this, go to ~/Library/Preferences.
7. Look for com.skype.skype.plist and com.skype.skype.Helper.plist files. Select them > right-click Move to Trash.
8. Empty Trash. This will completely uninstall Skype from Mac.
Now, let’s learn how to delete Skype for Business.
How to Uninstall Skype for Business
To get rid of Skype for Business, you need first to exit it and drag and drop Skype for Business app to Trash. To remove the remaining files, we will need to run certain commands using Terminal. To do so, follow the steps below:
1. Head to Applications > Utilities > Terminal.
2. Type sudo rm -rf /Library/Internet\ Plug-Ins/MeetingJoinPlugin.plugin > Return
3. Enter defaults delete com.microsoft.SkypeForBusiness || true > Return
4. Copy-paste each command make sure you press the Return key after pasting each command:
rm -rf ~/Library/Containers/com.microsoft.SkypeForBusiness
rm -rf ~/Library/Logs/DiagnosticReports/Skype\ for\ Business_*
rm -rf ~/Library/Saved\ Application\ State/com.microsoft.SkypeForBusiness.savedState
rm -rf ~/Library/Preferences/com.microsoft.SkypeForBusiness.plist
rm -rf ~/Library/Application\ Support/CrashReporter/Skype\ for\ Business_*
rm -rf ~/Library/Application\ Support/com.apple.sharedfilelist/com.apple.LSSharedFileList.ApplicationRecentDocuments/com.microsoft.skypeforbusiness*
rm -rf ~/Library/Cookies/com.microsoft.SkypeForBusiness*
sudo rm -rf /private/var/db/receipts/com.microsoft.SkypeForBusiness*
rmdir ~/Library/Application\ Scripts/com.microsoft.SkypeForBusiness
find -f /private/var/db/BootCaches/* -name "app.com.microsoft.SkypeForBusiness*" -exec sudo rm -rf {} +
5. Afterwards, head to Applications > Utilities and launch Keychain Access. Delete Skype for Business login from here.
6. That’s it. This will completely uninstall Skype for Business.
Tip: The easier and quickest way to uninstall either Skype or Skype for Business is to use the dedicated and best uninstaller for Mac, i.e., CleanMyMac X.
This uses either the manual ways or the Uninstaller module of CleanMyMac X; you can remove Skype entirely from your Mac. Do let us know which method you picked and why in the comments section.
FAQ
What to do if I can’t uninstall Skype
If you have followed every step explained above and still see Skype on Mac, we suggest restarting Mac. Sometimes to bring change into effect, you need to reboot the system. However, if the above steps fail, make sure Skype is not running. If any of its processes are running, you will not be able to uninstall it completely.
Once confirmed, retry; you will be able to delete Skype from Mac.
Even after doing all this, if you still face problems, try restarting Mac in Safe Mode. This will prevent other processes from launching and will help uninstall Skype. To boot in safe mode, restart Mac > hold down the Shift key > release it when you see the Apple logo. That’s it now uninstall, Skype. When you are done, reboot Mac normally.
Gajendra singh
This way is really helpful for me