
The ‘permission denied’ error is a common obstacle encountered by Mac users. It’s a signal that your system is safeguarding sensitive files and functions from unauthorized access or modification. Whether you’re trying to edit a system file, launch an application, or perform a routine task, encountering this error can be frustrating. However, it’s crucial to recognize that this protective measure is in place to maintain the integrity and security of your Mac system.
This error typically arises when attempting to access a file or make system changes without the necessary authorization. Whether you’ve seen the straightforward “permission denied” notification or variations like “zsh: permission denied” in Terminal, it all boils down to a permissions issue. However, fear not! Today, we will explore five proven methods to resolve the ‘Permission Denied’ error on your Mac effectively.
So, without further ado, let’s get started.
Understanding the “Mac Permission Denied” Error: A Matter of Access Control
macOS, like other operating systems, relies on a robust permission system to ensure data security and system integrity. This system dictates which users (or accounts) have the right to access, modify, or delete files and folders. Permissions are typically assigned in a hierarchical structure:
1. Owner: The user who created the file or folder has the highest level of access (Read & Write).
2. Group: A group of users can be assigned specific permissions (Read Only, Write Only, or Read & Write) to a file or folder.
3. Everyone: This category encompasses all users on the Mac, and their access level is usually limited (Read-only or No Access).
When you encounter the “Mac Permission Denied” error, it simply means your user account lacks the necessary permission to perform the desired action. This could be due to:
- Incorrect Ownership: You might not be the owner of the file or folder, and the owner hasn’t granted you the required permissions.
- Inherited Permissions: A file or folder might inherit restrictive permissions from its parent folder.
- Corrupted Permissions: Occasionally, permissions can become corrupted due to software issues or unexpected shutdowns.
5 Effective Methods to Fix the “Mac Permission Denied” Error
Now that you understand the culprit behind the error message, let’s delve into the solutions! Here are five methods you can employ to regain control of your files:
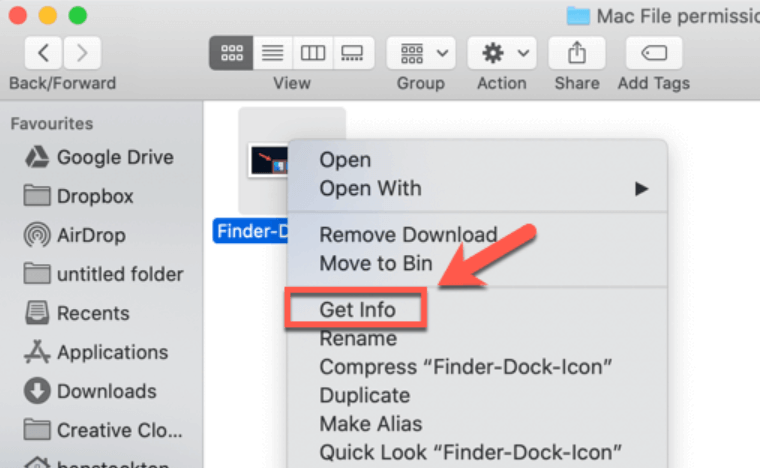
Method 1: Grant Yourself Permissions Using the Get Info Panel
This is the simplest and most common method for fixing permission issues. Here’s how it works:
Step 1: Right-click on the problematic file or folder and select Get Info.
Step 2: Click the lock icon in the bottom right corner to unlock the panel. You’ll need administrator privileges to do this. Enter your administrator password when prompted.
Step 3: Under the Sharing & Permissions section, you’ll see a list of users and groups with their designated permission levels.
Step 4: Click the plus sign (+) icon at the bottom left corner to add your user account if it’s not already listed.
Step 5: From the dropdown menu, select your user account and choose the appropriate permission level (Read and Write or for full access).
Step 6: Click the lock icon again to save the changes.
Pro Tip: You can also adjust permissions for existing users or groups in this section. Simply click on their name, then select the desired permission level from the dropdown menu.
Read Also: Fixing Mac Error Code 8072: A Step-by-Step Guide
Method 2: Verify Your Permissions (For Advanced Users)
If the above method doesn’t work, you can delve deeper using the Terminal app. This is recommended for more advanced users comfortable with command-line interfaces. Follow the steps below:
Step 1: Launch Terminal (located in Applications > Utilities).
Step 2: Use the ls -l command followed by a space and the path to the file/folder. This displays detailed permission information.
Step 3: Analyze the output. The first section represents file type and permissions.
- The first character indicates the file type (d- for directory, – for regular file, etc.).
- The next three sets of three characters represent permissions for owner, group, and others. Each set consists of r (read), w (write), and x (execute) permissions (or – if the permission is denied).
Step 4: Based on the displayed permissions, you can use the chmod command to modify them. However, exercise caution as incorrect usage can lead to security vulnerabilities. It’s recommended to consult Apple documentation or seek help from an experienced user if unsure about specific chmod commands.
Method 3: Change File/Folder Ownership
To rectify the ownership of a specific folder or file, the solution lies in executing a Chown command within the Terminal. Simply type the command and press the Enter key to start the ownership modification process.
Chown -R $USER:$USER /path/to/directory
To write to a different path, replace /path/to/directory with that path.
Method 4: Utilize ‘Sudo’ Commands (For Advanced Users)
The sudo command acts like a magic key in your Terminal. It grants you temporary administrator privileges, allowing you to tackle tasks requiring elevated permissions. This temporary access lasts for around five minutes.
Here’s the beauty: If you need to perform multiple admin-level commands within that time frame, you don’t have to keep re-entering sudo. Simply prefix each subsequent command with sudo, and your administrator powers remain active for the next five minutes (unless your Mac goes to sleep or you close the Terminal window).
For instance, if the command chmod coding.py displays a permission denial, use: coding.py sudo chmod
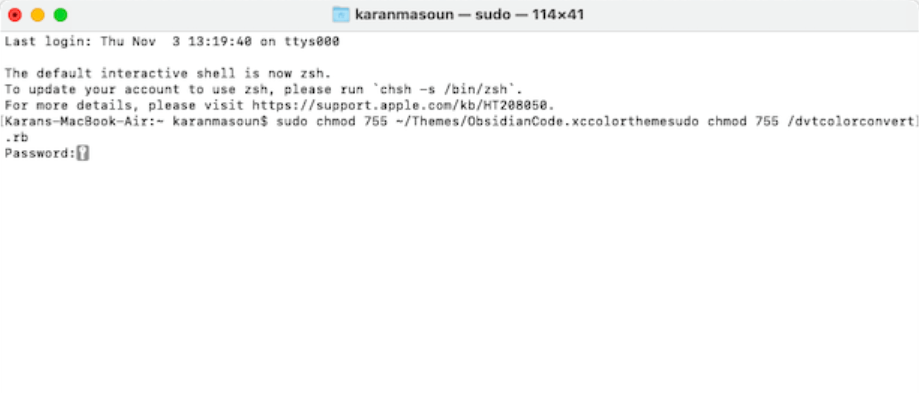
After temporarily elevating your user privileges with sudo, executing the command should proceed smoothly without any pesky permission barriers obstructing your access. However, it’s crucial to exercise caution when utilizing sudo since it grants extensive privileges. Therefore, carefully verify the command syntax before proceeding to ensure seamless execution.
Read Also: How to Fix Zsh: Permission Denied in the Terminal on Mac
Method 5: Give Permission to Third-Party Applications
In the typical scenario, when installing an application on your Mac, you’ll receive a notification prompting you to grant all required permissions. However, there may be rare instances where you’ll need to manually authorize third-party applications. Here is how to do it:
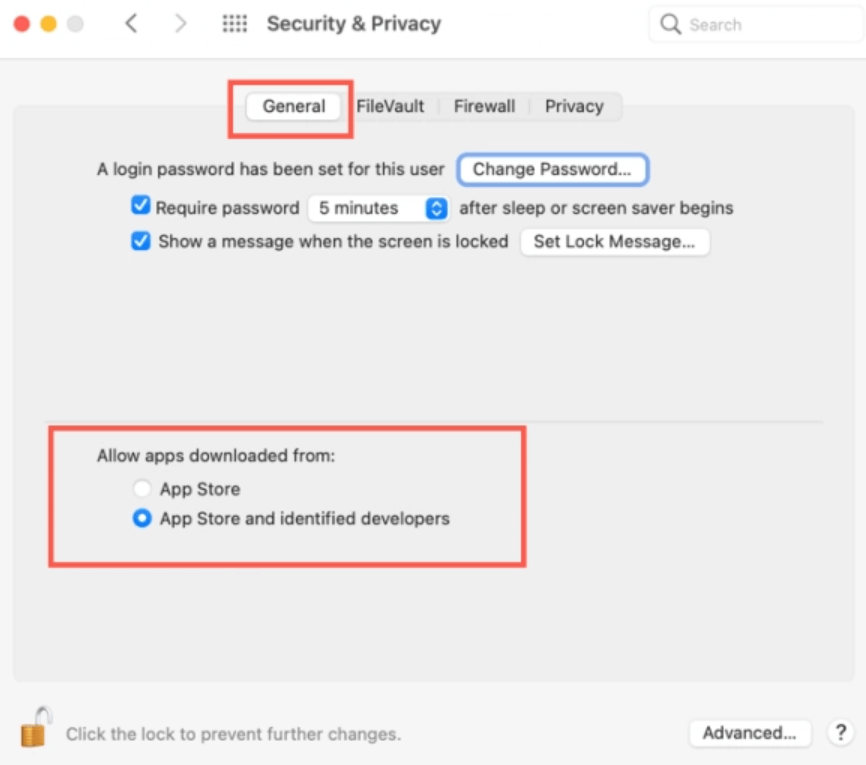
Step 1: Head over to the Security and privacy settings page. Tap on General.
Step 2: Enter your login credentials to open the editing screen.
Step 3: Select every radio button that displays the App Store and the names of the developers.
Step 4: To save the modified settings, tap on the Lock icon.
Fixed: The ‘Permission Denied’ Error on Mac
Don’t let permission errors on your Mac hold you back any longer! The “permission denied” roadblock might seem difficult, but with the knowledge you’ve gained here, you’re well-equipped to tackle it. Armed with these five effective methods, you can regain control of your files and folders, perform essential tasks, and keep your Mac running smoothly. Remember, a little understanding of permissions goes a long way in keeping your Mac secure and efficient.
For more such troubleshooting guides, listicles, and tips & tricks related to Windows, Android, iOS, and macOS, follow us on Facebook, Twitter, YouTube, Instagram, Flipboard, and Pinterest.