
External hard disks are a boon for people who have a lot of digital files with them. The usual internal hard drive does not meet many people’s requirements, and that is where they can store the less important data on a different hard drive that can be connected externally by using a USB port. But what if your External hard drive keeps disconnecting after being connected to your PC? This issue would not let the user transfer any data from and to the drive. This guide will help you navigate through a few steps that will work to resolve this issue on your computer.
Steps On How To Fix External Hard Drive Keeps Disconnecting Issue In Windows 10?
There are a few ways to resolve this issue by tweaking certain settings or updating drivers. You can try any of the methods listed below and move to the next one only if the previous one does not work.
Method 1: Try A Different USB Port
One of the simplest troubleshooting steps in external hard drive cases keeps disconnecting the issue of changing the USB port on your system. This issue can be caused due to an issue in the physical port or due to corrupt drivers. In any case, you can always try to use another USB port as there is more than one available on any system nowadays. If you are using a USB 3.0 device and have connected it to USB port 3.0, try to connect it to USB port 2.0 if you have any. This will result in a slow transfer of data but will maintain a stable connection.
Method 2: Disable USB Selective Suspend
This option is related to your computer’s power settings. The USB port maintains a primary function of providing power to the device connected and facilitates data transfer. If your computer is in a power-saving mode, it will cut off the USB port’s power after some time, resulting in hard drive disconnecting every few minutes. Here are the steps to turn of USB power suspend:
Step 1: Press Windows + S and type Control Panel in the search box.
Step 2: Choose the relevant search from the results labelled as Control Panel Desktop App.
Step 3: A new window will open where you will have to search Power Options and click on it.
Step 4: Check your current power plan and click on Change Plan Settings beneath it.
Step 5: In the new window that opens, click on “Change Advanced Power Settings” to open the Power Options window.
Step 6: Scroll down the list till you locate USB Settings. Click on it to reveal USB Selective Suspend Settings, and a further click will reveal the enable/disable option.
Step 7: Set this option to Disabled and then click on Apply and OK button at the bottom.
Once this option is disabled, Windows OS will not turn off the USB port’s power after a short while.
Method 3: Enable Mass Storage Device
If the above power option did not work for you, and you are still facing the external hard drive keeps disconnecting, you will have to enable the Mass storage device option on your computer. Here are the relevant steps to accomplish this:
Step 1: Connect your external hard disk to your PC.
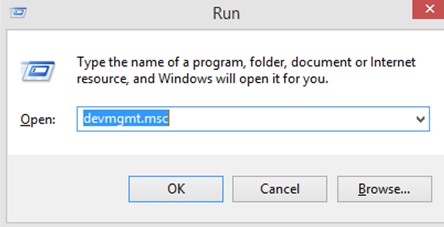
Step 2: Press Windows + R on your keyboard to open the Run Box.
Step 3: Type “devmgmt.msc” in the text space and press OK.
Step 4: A new window labelled as Device Manager will open where you have to scroll to the bottom and locate Universal Serial Bus Controllers.
Step 5: Click on USB Controls to reveal the dropdown options and make a right-click on USB Mass Storage Device from the list.

Step 6: A contextual menu will open where you have to choose Properties, and a new window will open.
Step 7: Click on the last tab labelled as Power management and uncheck the box next to Allow the computer to turn off this device to save power.
Step 8: Click on the OK button to save changes and exit the box.
Unchecking this option will not help you save power, but it will resolve the hard disk that keeps disconnecting issues in Windows 10.
Method 4: Turn Off USB Legacy Support In BIOS
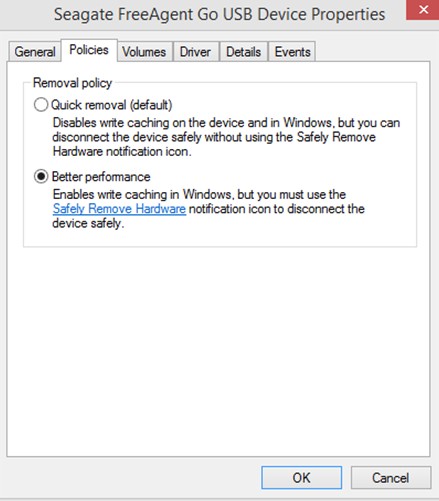
Another option that can be taken care of is the hard disk removal policies. By default, all the external hard drives connect with a Quick Removal Policy, which means it can be easily unplugged without using the Safely Remove Hardware. You need to change it to a Better Performance option that enables the Windows OS to write cache files on the external drive, and this assures that the disk will not get disconnected unless the user does so. Here are the steps to do this:
Step 1: Open Run box by pressing Windows + R and type “devmgmt.msc” in the text space.
Step 2: Once the device manager opens, locate your External hard drive entry in the list of drivers.
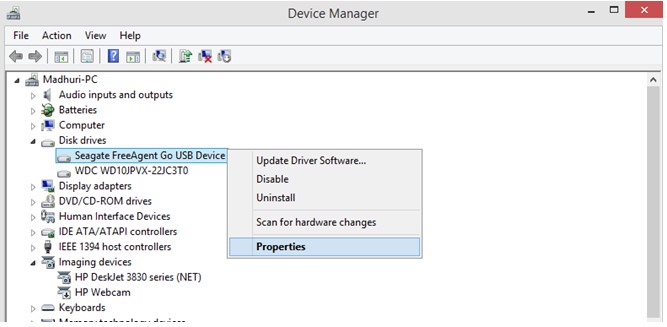
Note: You must look for a driver entry under disk drivers and not under USB controllers or USB Mass Storage drive.
Step 3: Double click on your hard drive driver, and a new box will open where you have to click on the Policies tab.
Step 4: Now click on the checkbox next to Better Performance and click on OK button.
Method 5: Try KeepAliveHD App
Many users have identified that the hard drive keeps disconnecting because the device disconnects due to inactivity. This tendency to disconnect infrequent in hard disks that are not used for a long time. If the above methods have not resolved the issue, you can use an application to help you. This application is free of cost and works by writing a small file on your external hard drive to prevent it from going to sleep. The timer feature in this app allows the users to set a time-frequency.
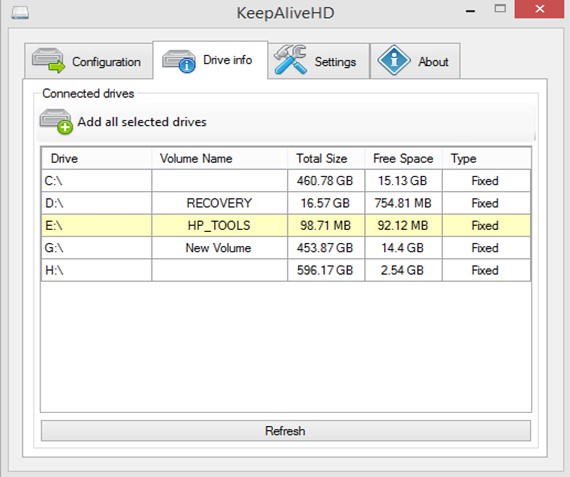
Download Now: KeepAliveHD
Method 6: Update USB Drivers
There are three ways to update your hard disk and USB drivers on your computer. All the methods are guaranteed 100% to work, but each method has certain benefits and limitations. You can choose any one of them depending on the time and effort you are willing to invest in.
Option 1: Use The Official Website
Every Hardware component not manufactured by Microsoft is considered an Original Equipment Manufacturer device and has an official website where device manufacturers upload all the updated drivers. You can visit the official website, search for the model/version number of the hardware, and download the updated drivers.
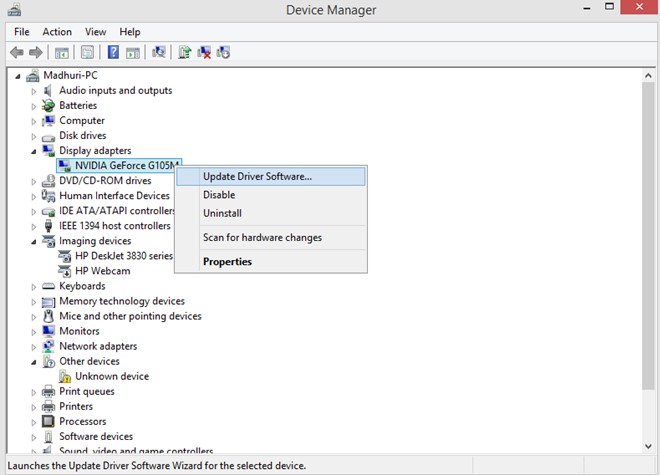
Option 2: Use The Device Manager
Microsoft has inculcated an inbuilt tool known as device manager to auto scan all the hardware and check for the MicrosoftServers’ latest drivers. It is free of cost to use and can not require the user to download and install any driver manually. To use the device manager, follow these steps:
Step 1: Press the Windows and R keys on your keyboard and type “devmgmt.msc” in the Run Box.
Step 2: Press OK, and in the new window that opens, look for the USB and Hard disk driver entries and make a right-click on them one by one.
Step 3: From the contextual menu, choose Update Drivers and follow the onscreen instructions to complete the process.
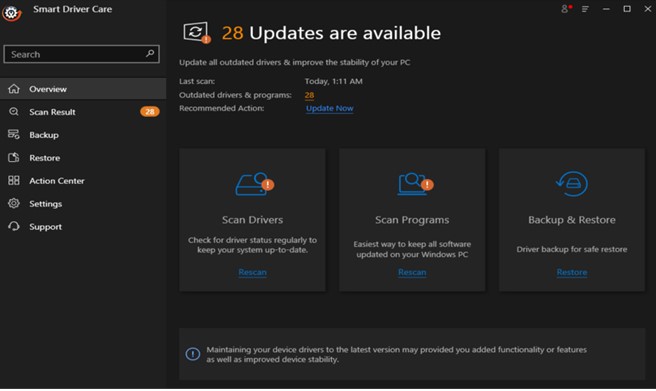
Option 3: Use Driver Updater Software Like Smart Driver Care
One of the easiest methods to update drivers is using driver updater software like Smart Driver Care. This software is one of the most efficient and reliable applications which takes a backup of old drivers before replacing them. The steps to use this program are listed below:
Step 1: Download and Install Smart Driver Care from the official website or the link below.
|
|

Step 2: Launch the application and begin the registration process.
Step 3: Now, click on Scan Now to start the scan and identify driver issues in your system.
Step 4: Next, click on the Update All button to resolve the driver issues and update all the drivers in your system.
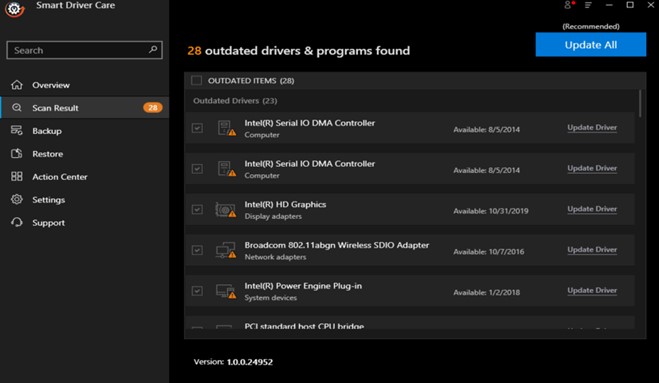
Note: Once you have installed and registered the app for the first time, you will only need to carry out steps 3 & 4 every time.
Smart Driver Care is a remarkable program that will update all your drivers in one go.
The Final Word On How To Fix External Hard Drive Keeps Disconnecting Issue In Windows 10?
To use an external hard drive, it mustn’t disconnect from your Windows 10 PC quite frequently. This can result in damaging the hard drive physical and also facilitate the loss of data. If you are troubled by this error, then follow the steps listed above to resolve this issue. If you cannot find a satisfying solution, you can consult a local technician for the same.
Follow us on social media – Facebook, Twitter, and YouTube. For any queries or suggestions, please let us know in the comments section below. We would love to get back to you with a solution. We regularly post tips and tricks, along with answers to common issues related to technology.
Mridula
Check for driver updates and the Power Management settings, as it will be the reason mostly.