Every file on your computer must have an extension to work. It is a type of identity which helps the user to know which category does a file belong and which software will be able to open it. It also acts as a guide for the operating system to assign the correct application to open a particular file when the user double clicks on it. When you choose a default program to open video files or images, the Windows OS checks the extension and stores the settings for next time.

| No | Extension | Type | Application |
|---|---|---|---|
| 1 | .MP4 .AVI .WMV .MKV .MPG | Video | Any Video Player with codecs, like VLC Player, BS Player, Windows Media Player |
| 2 | .MP3 .MIDI .WAV .FLAC .WMA | Audio | Any Multimedia Player like VLC, AIMP, Groove Music Player |
| 3 | .DOC .TXT .LOG .RTF, XML | Document | Any Word Processing Software like MS Word, Notepad, Apache Office |
| 4 | .EPUB .PDF .MOBI .AZW .IBA | eBook | Any eBook Reader or Browser or Adobe PDF Reader |
| 5 | .JPG .BMP .PNG .TIF .GIF | Images | Any Image Viewer program like Ms Paint, Photos, Windows Photo Viewer. |
Changing the extension of one type to a different kind can leave the file corrupted, and it will not open. But if you want to pull a prank, then you try to change an image file’s extension to a document extension and send it to your friend and ask him to open it. And, then tell him how to change the extension back to an image file and try opening it. However, always use a copy for this type of fun so that in case the file gets corrupted, you still have the original. I have played that joke many times with a 0% corruption, but I have always used a copy image instead of original and first you have to make those extensions visible to you.
Also read: What Is A Log File & How To Access It
How Do I Show File Extensions in Windows 10 Using Windows File Explorer?
The easiest way to show file extensions in Windows 10 is altering the File Explorer settings and here are the steps to do that:
Step 1. Press Windows + E to open File Explorer.
Step 2. Locate the first ribbon and click on the View tab.
Step 3. Move toward the right and follow the ribbon until you locate File Name Extensions and place a tick in the checkbox next to it.

This will make all the extensions appear preceding the file name separated by a dot.
Also Read: How To Run Batch File As Administrator On Windows 10
How Do I Show File Extensions in Windows 10 Using Control Panel?
If you are not able to use the File Explorer method due to some restrictions, then you can try to show file extensions in Windows 10 using the control panel:
Step 1. Press Windows + R on your keyboard to open the Run box.
Step 2. Type Control Panel in the text box and press OK.
Step 3. Click on Appearance and Personalization and then click on File Explorer Options. A new window will open.

Step 4. In the new window, click on the second tab labelled as View.
Step 5. Under Advanced Settings, scroll down until you see “Hide Extensions for Known File Types” and remove the tick in the checkbox preceding it.
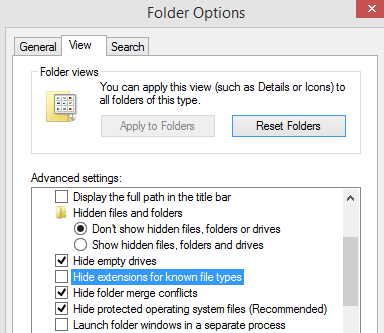
Step 6. Click the Apply Button first and then, click on the OK button.
Close all the windows and open File Explorer, and you will be able to see the extensions for every file you have on your computer.
Also Read: Look Through These 7 Best Ways To Send Large Files To Other People
How Do I Show File Extensions in Windows 10 Using the Registry Editor?
The next option to show file extensions in Windows 10 in case the simpler ones are disabled in your system is to use the Windows Registry.
Step 1. Press the Windows + R to open the RUN box and type in Regedit to open the Windows 10 Registry.
Step 2. Navigate to the following path:
Computer\HKEY_CURRENT_USER\Software\Microsoft\Windows\CurrentVersion\Explorer\Advanced
Step 3. Locate “HideFileExt” on the right pane of the registry and make a right-click and select Modify from the contextual menu.
Step 4. Under the value data, remove 1 and type 0. Then click on OK and exit the registry editor.
Check the file names on your computer and see if they display the extensions.
Also Read: How To Show Hidden Files and Folders On Windows 10.
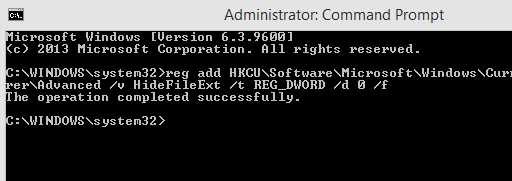
How Do I Show File Extensions in Windows 10 Using the Command Prompt?
This method is quite similar to the above method, and it involves changing the registry values but with a command rather than navigating to the exact value.
Step 1. Open Command Prompt in Administrator Mode. This can be achieved by typing Command Prompt in the search box on the far left of the taskbar and choosing Run as Administrator.
Step 2. Type the following command or copy it and paste it in the black and white window to show file extensions in Windows 10.
reg add HKCU\Software\Microsoft\Windows\CurrentVersion\Explorer\Advanced /v HideFileExt /t REG_DWORD /d 0 /f
Note: Copy this command from here by selecting it all and press CTRL + C. However, CTRL + V will not work in Command Prompt. Instead, place your mouse cursor anywhere on the black portion of the window and make a right-click to call upon the contextual menu. Select Paste and the entire will be pasted at the position of the blinking cursor of MS-DOS and save you time and effort to type in manually.
To hide the extension, you can type the same command with a small difference:
reg add HKCU\Software\Microsoft\Windows\CurrentVersion\Explorer\Advanced /v HideFileExt /t REG_DWORD /d 1 /f
This command toggles the registry value from 0 to 1 as we did earlier manually.
Also Read: Steps To View Shared Files & Folders in Windows 10
How Do I Show File Extensions in Windows 10 Using the Group Policy Editor?
The final method to show file extensions in Windows 10 is by using one of the most powerful tools in Windows 10 – The Group Policy Editor.
Step 1. Open the Group Policy Editor by typing GPEDIT.MSC in the Run Box.
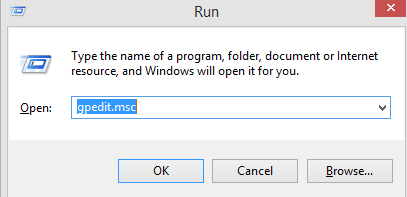
Step 2. Navigate to the following path.
User Configuration > Preferences > Control Panel Settings > Folder Options.
Step 3. Set the option labelled as “Show Hidden files and folders” and remove the tick mark next to “Hide Extensions for known file types.”
The Final Word on How Do I Show File Extensions in Windows 10?
The objective of this guide is to enable the user to view the file extensions and understand the concept of file extensions and change the extension if necessary. All the method described help to achieve the same goal, but there are a few methods that might not work in some computers due to certain restrictions placed. You can start with the first two methods that are quick and simple, and if you are not able to show file extensions in Windows 10, then you may shift to alternate methods.
Follow us on social media – Facebook, Twitter, LinkedIn, and YouTube. For any queries or suggestions, please let us know in the comments section below. We would love to get back to you with a solution. We post regularly on the tips and tricks along with answers to common issues related to technology. Subscribe to our newsletter to get regular updates on the tech world.
Suggested Reading:
How To Fix Corrupt Files In Windows 10 And Access Them?
How To Recover Files Deleted By PowerShell On Windows Computer
Automatically Move Files From One Folder To Another On Windows 10