
Important files when deleted by mistake can cause a lot of trouble. Especially when you delete a file using PowerShell, it seems to be a permanent thing. PowerShell is a task-based command-line shell used by system administrators to make changes in the tasks and processes.
Using PowerShell can be an effective way to get rid of files in batch for good. If you have deleted a file using PowerShell accidentally and looking for a way to recover it, then you must have a third-party tool to recover these files.
One of the best tools to retrieve your deleted files by PowerShell on Windows is Advanced Disk Recovery. It will quickly recover deleted files on your Windows computer provided, you haven’t overwritten the data.
Before moving forward, there are two things that you need to keep in mind. First, perform minimal operation after deleting files, as the more you perform operations, the less would be chances to retrieve the data.
Also, after the scan, once you get the details of deleted files, recover those files in different destination instead of the original one.
Let’s know more about the tool.
Advanced Disk Recovery
Advanced Disk Recovery is a nifty tool that can recover your lost data quickly and efficiently. Be it a small text file or a large video, Advanced Disk Recovery can restore it for you. It provides two options – Quick Scan and Deep Scan depending on how much time you have to run the software.
A quick scan can be used for looking up files by submitting a name to search, it takes less time to scan for information. Whereas, Deep scan is used to dig much deeper in the storage for recovering the lost data and will take more time in finishing the scan. You can select which drives or partitions do you wish to scan on your computer. You can choose from the drive options, or you can go for Partitions.
One of the advanced features of Advanced Disk Recovery is that you can pause the scan and it saves up the session for future use.
Let’s discuss how to recover deleted files by PowerShell on Windows computer using Advanced Disk Recovery
How To Recover Files Deleted By PowerShell Using Advanced Disk Recovery?
Step 1: First download Advanced Disk Recovery by clicking the button below. And install the software.

Step 2: After its successful installation, it will show you two tabs in the window Scan and Settings.
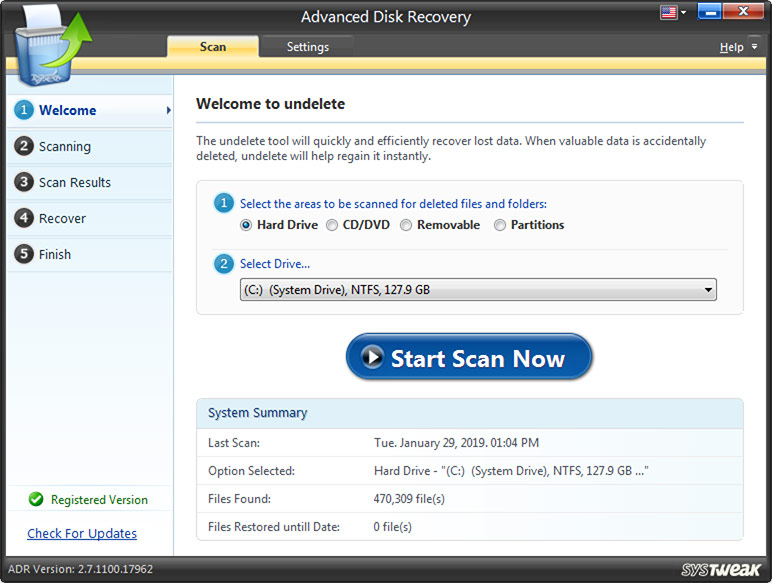
Under Scan section, you can choose the area to be selected for the scan.
The first option is to choose from Hard drive, CD/DVD, Removable device or Partitions.
You are to choose the Hard drive as we are trying to look up for a lost file from the computer. Further, we can choose a drive to scan, which was used to store the data previously.
Step 3: Go to the Settings section and choose Filter options to show only deleted files to make your search easier.
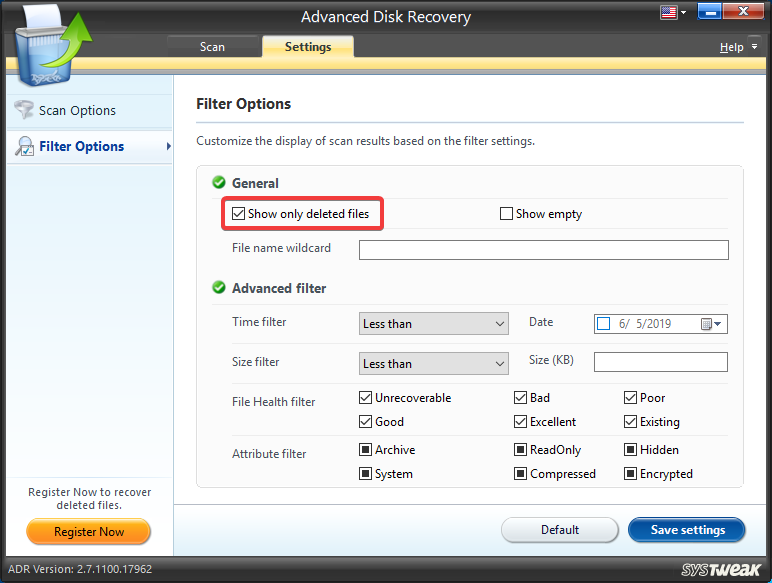
Remember to click on Save settings.
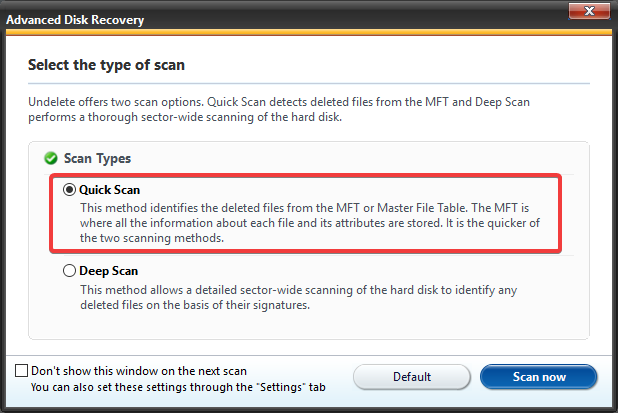
Step 4: Now click on Start Scan Now.
It will show a pop-up to choose between the type of scan you want to run. You need to select a quick scan to save time.
As you see the scan progresses.
Step 5: Once done, scan Results show the deleted files found, category wise. You can locate the files you want to retrieve.
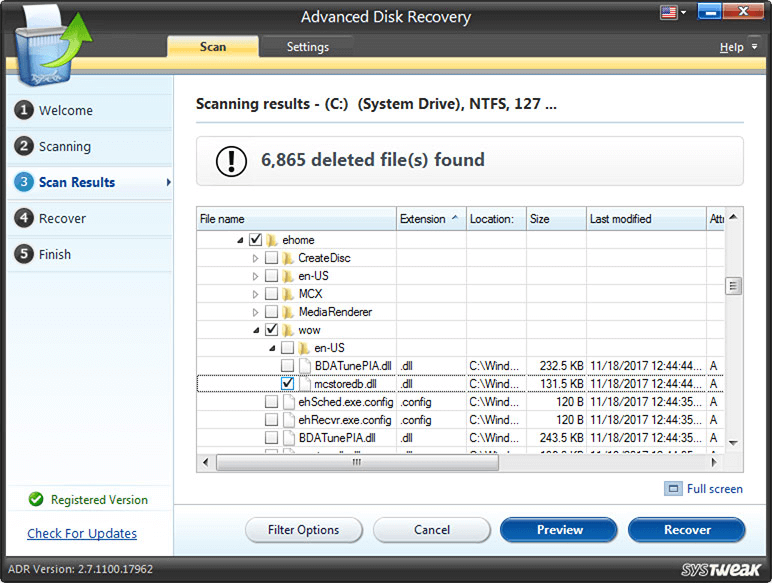
Select them and click on Recover.
You will be prompted to select a location.

Note: Make sure you recover the files on a different location than the previous one.
In case, you are unable to locate your files using Quick Scan, don’t get disheartened, try Deep Scan and retrieve your deleted files. The scan will take time, so be patient.
Conclusion:
With the help of Advanced Disk Recovery, we can retrieve all the deleted files once considered as permanently lost. So now you know how to recover the files deleted by PowerShell on Windows computer. Download the tool now to keep your data safe within your system. While you perform the action of deleting certain files by giving commands on PowerShell.
Download Advanced Disk Recovery: