
When I try to open pictures or view files on Windows 10 PC, I receive the ‘”Element Not Found” error.
How can I get rid of this annoying error?
– An upset Windows PC user
Encountering the Windows 10 Error “Element Not Found” can affect the overall functionality of the system. It can prevent you from accessing Settings, and pre-installed applications and can even occur while you are trying to access images or modifying settings in the Windows menu.
As you saw, this can be a huge problem for users to work properly, but we have learned how to fix the issue easily. No matter if you are a computer novice, these solutions are easy to implement and can help you fix ‘Element Not Found’ errors on Windows 10 in no time. So, let’s start some troubleshooting!
Preliminary Solutions To Fix Windows 10 Error “Element Not Found” (2023)
There are plenty of workarounds mentioned below, which are uniquely suited to what may cause the problem on your Windows 10 computer.
BEFORE THAT, TRY THIS QUICK FIX:
- Navigate to System Settings > Updates & Security.
- Go to the Troubleshoot menu and select the Windows Update Troubleshooter.
- Windows Troubleshooter will fix all the potential issues automatically.
- Still, getting the error message “Element Not Found?” Try the following methods below!
METHOD 1 – Undo Recent Changes
You certainly don’t have to accept every notification that pops up on your PC to update something. In some scenarios, upgrading computers frequently can cause more harm than good. Check if you’ve recently updated an application or OS on your system before the issue occurred. Follow the steps to reverse it:
STEP 1 – Hit the Windows Start button and navigate to System Settings.
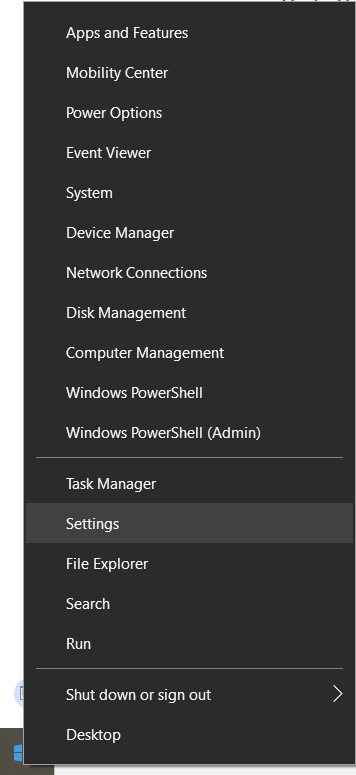
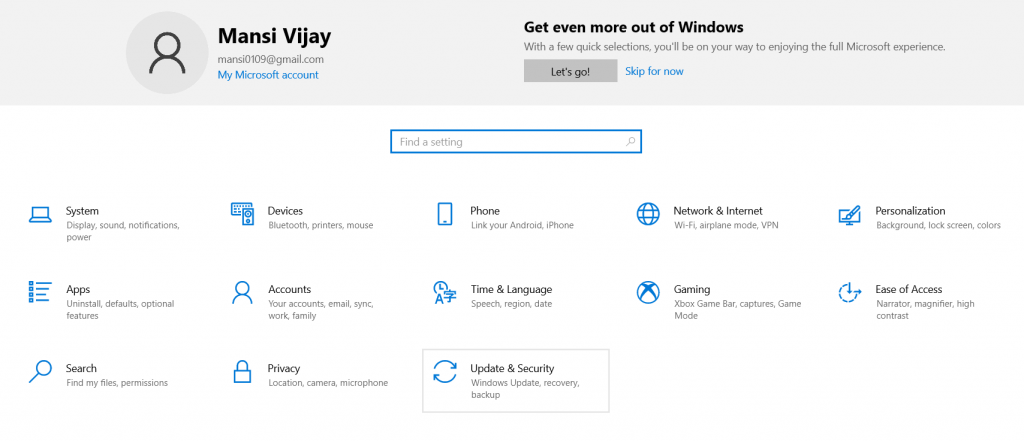
STEP 2 – From the Settings, head towards Updates and Security.
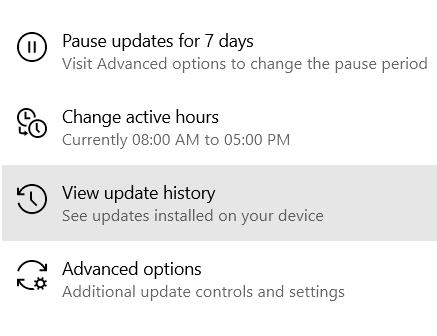
STEP 3 – Scroll down a bit and click on the option – View update history.
STEP 4 – From the next page, find the recent updates and Uninstall them you think could be responsible for the “Element Not Found” error on Windows 10.
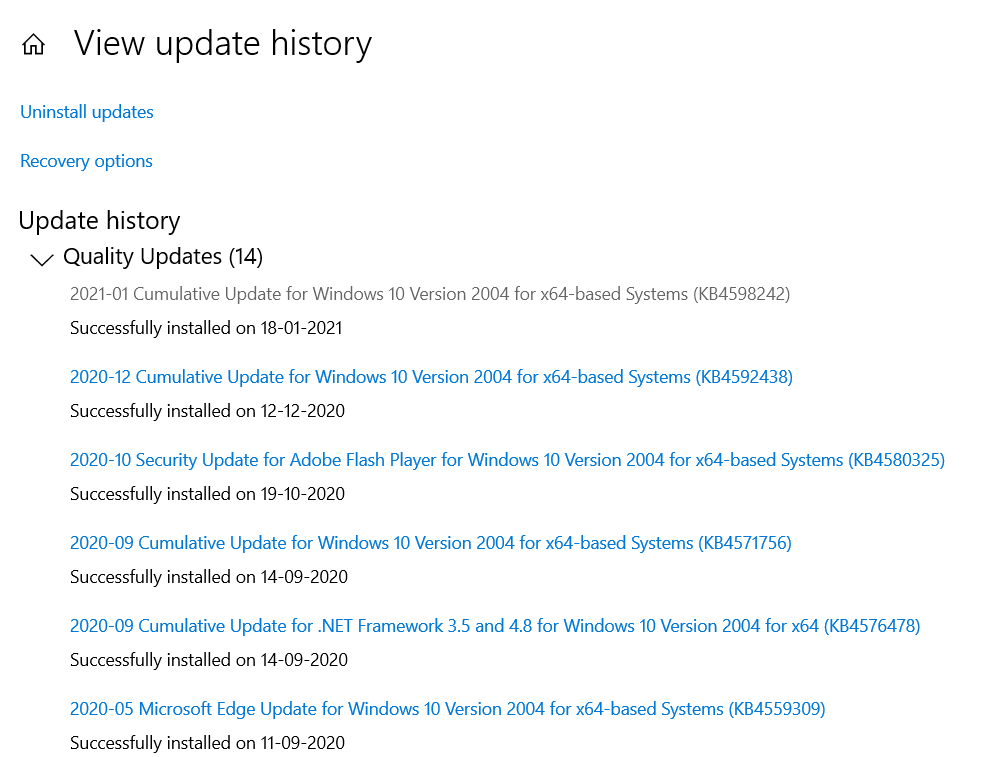
NOTE: Be careful while deleting or uninstalling the update. Since some upgrades are quintessential for the smooth running of your PC.
Undoing the recent changes should hopefully fix the Windows stop code ‘Element Not Found’. If the problem persists, you can try the next workaround.
Also Read: How To Fix Windows 10 Undoing Changes Made To Your Computer?
METHOD 2 – Update Latest Drivers
Running outdated or faulty drivers can be responsible for receiving the error message ‘Element Not Found’. If that’s the case, you should consider installing the latest drivers for all your devices. This method is highly effective if you are receiving the error while accessing images or any other graphics files. There are multiple ways to update drivers on Windows 10, the safest and easiest way is through Smart Driver Care, a dedicated driver updater tool.
STEP 1 – Install Smart Driver Care.

STEP 2 – Launch the program and click on Start Scan Now button.
(Using the Registered version, you can update an unlimited number of drivers in one go. However, with the free version, you can only update two drivers in a day.)
STEP 3 – Once the list of old, corrupted, missing, and damaged drivers appear on the screen. Quickly go through it and click on the Update All button to install the latest updates in bulk. Alternatively, you can click on the Update button next to each faulty driver to update devices individually.
Smart Driver Care is an excellent driver updater utility to find and install the most compatible and latest versions from trustworthy sources. Hence, you can be assured of the safety of your device.
Why Use Smart Driver Care?
Smart Driver Care is a top-notch solution to fix multiple kinds of BSOD errors and driver-related problems without any hassles. It offers tons of features, which makes it one of the best tools to get the latest drivers and boost system performance efficiently.
HIGHLIGHTS: Smart Driver Care
- One-click driver updater tool
- Straightforward interface
- Update outdated drivers
- Backup system drivers before updating
- Restore driver versions in a click
- Scheduled scans to keep drivers up-to-date
- Exclusion lists to avoid specific drivers from downloading
METHOD 3 – Deactivate Antivirus Program Temporarily
Sometimes a corrupted or unstable antivirus solution can be responsible for the Element Not Found error. The problem can occur when an application interacts with the file systems to locate viruses and other malicious codes. To prevent it from doing further damage, here’s what you need to do to disable the faulty antivirus program on your Windows 10 PC.
STEP 1 – Navigate to the right end of the Taskbar and find the antivirus icon you have installed on your computer.
STEP 2 – Find the Disable option. A dialog box may appear on the screen to ask for your confirmation. Complete it to disable the antivirus program temporarily.
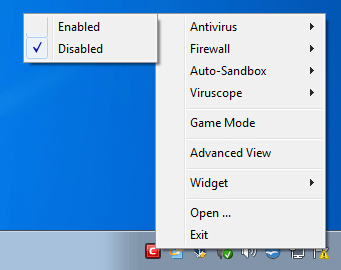
STEP 3 – You can relaunch the application later to see if it was the culprit for causing the ‘Element Not Found’ error or not.
You might need to uninstall the program if the issue persists for a long. We recommend using Trustworthy PC Security Software for your Windows.
METHOD 4 – Run SFC Scan
System File Checker is an inbuilt Windows utility that allows you to scan for corrupted system files and restore them to a working state. It can quickly repair the missing and corrupted files that might be causing common PC errors, including the “Element Not Found” error on Windows 10. To run the SFC command, follow the steps below:
STEP 1 – Launch Command Prompt and Run as Administrator.
STEP 2 – From the Command Prompt window, type SFC/scannow command line and press the Enter button. System File Checker will start scanning your PC for potentially corrupted files and repair them automatically.
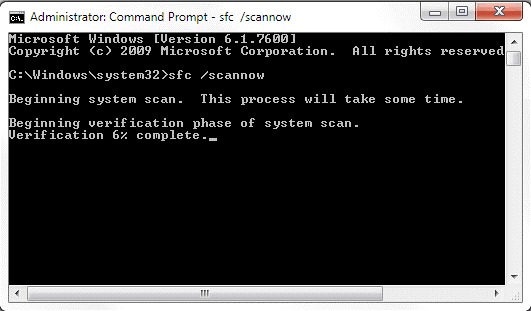
Keep patience, since the scanning can take time depending on the amount of data it needs to scan and repair. Hopefully, it resolves the Element Not Found error on your Windows 10 PC.
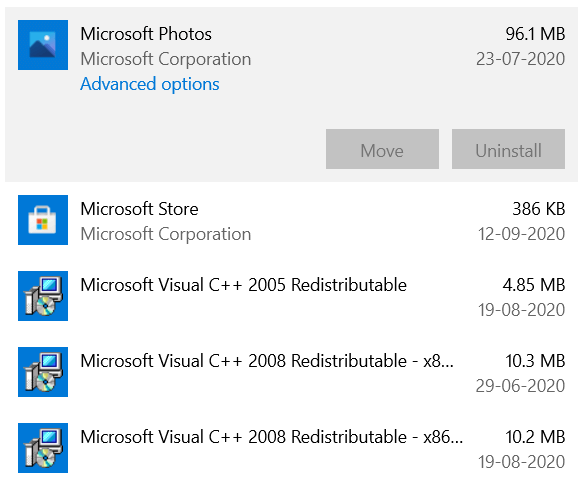
METHOD 5 – Reset The Application
If you are receiving a Windows error while opening a specific application or using an app to run the files, try to reset it and see if it resolves the issue. To do so, follow the instructions below:
STEP 1 – Go to the Settings menu and navigate to the Apps section.

STEP 2 – From Apps & features section, scroll down to find the problematic app, causing the Element Not Found error on Windows 10.
STEP 3 – You need to click on the Advanced options here.
STEP 4 – From the Advanced options window, locate and click the Reset button.
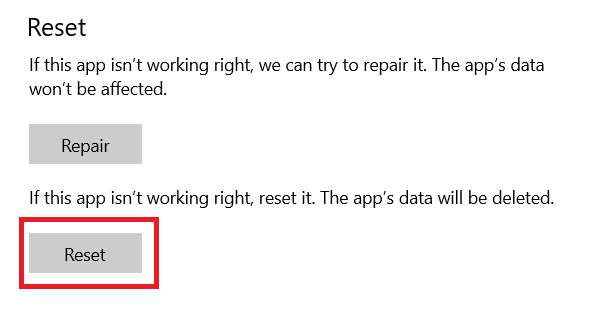
This should successfully resolve the Element Not Found error while using a specific app on Windows 10 PC.
Also Read: Multiple Ways To Factory Reset Windows 10: PC Formatting Guide
We hope you were able to get rid of the annoying Windows 10 Elements Not Found error. If you are facing any other issue or need help with Mac, Android, or iOS troubleshooting, feel free to reach out to us for detailed solutions.
Do Upvote this article if it helped you!
Related Articles: