
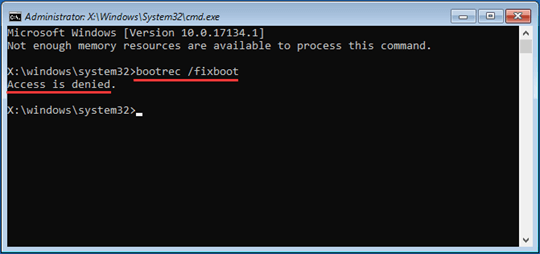
For people unaware, Bootrec/Fixboot is a command line, that helps users fix common system problems, including BSOD issues as well. However, the same utility carries its own share of problems, one of which is when you aren’t allowed to access it.
This error usually appears when you already have problems with PC or while altering Startup Settings via bootrec/fixboot command line. You can also witness this bootrec fixboot access denied error when certain Windows files get corrupted or damaged.
Since several users are reporting the ‘Fixboot Access Denied’ error on their Windows 10,we’ve tried to jot down all the possible solutions to get rid of the problem as soon as possible!
Reminder = Make sure you have full system disk backup; in case something affects the hard drive data. Read this guide to create quick system backup on Windows 10,8 & 7.
How To Fix “Bootrec Fixboot Access Denied” Error In Windows 10?
You may not have to try all the below-mentioned fixes, just work your way down the list until you locate the one that works for you to repair ‘bootrec fixboot access denied’ error.
QUICK NAVIGATION: Best Fixes To Repair Bootrec Fixboot Access Denied Error
METHOD 1- Get A New ISO For Windows 10
Probably there are some issues with your installation media files. If it’s true, then maybe you need a new ISO image file & create a new USB Bootable device.
Step 1. Get a USB stick (at least 8GB in size).
Step 2. Attach it to your Windows PC, right-click on the Start icon > Disk Management.
Step 3. When you get redirected to the Disk Management Page, find your USB > right-click on it > select Mark Partition as Active.
Step 4. Now, download and install the latest Windows 10 ISO or Disk Image Files.
Step 5. After the installation, just copy all the downloaded files to your USB Drive.
Once done, you can run bootrec commands & see you won’t get access denied message anymore.
METHOD 2- Try Startup Repair
Running a startup repair helped a plethora of Windows 10 users to solve the bootrec fixboot access denied error.
Follow the below-mentioned steps:
Step 1: First of all, you need to boot your PC using the installation disc.
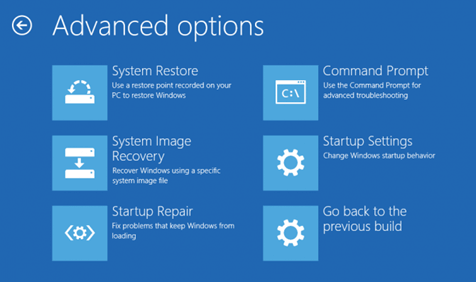
Step 2: When done, you can see a list appearing on the screen. Click on Repair your computer section & click on the Troubleshoot tab. From the list, choose Advanced options > Startup Repair!
Step 3: The Startup Repair process will begin in a few moments. Keep patience & let it get completed.
Simply Restart your system & check if the error message ‘bootrec fixboot access denied’ is still appearing on your Windows 10 PC.
METHOD 3- Run CHKDSK
Running a simple command-line ‘chkdsk’ can also help in getting rid of this Windows 10 error. All you need to do is:
Step 1: After booting your device from Windows Installation Disk, select the Troubleshoot option, followed by Command Prompt.
Step 2: Type in: chkdsk c: /r & hit the Enter button.

Step 3: Once the process gets completed, just reboot your Windows 10 system.
This method should probably fix the irksome bootrec fixboot access denied error on your Windows 10 PC.
METHOD 4- Repair Bootloader
By repairing the Bootloader, you can easily fix the ‘bootrec fixboot access denied’ issue on your Windows 10 PC.
Follow the steps below to start repairing the bootloader:
Step 1: Boot from Windows 10 installation disc & press any key to continue.
Step 2: Navigate to the following path, Repair your computer > Troubleshoot > Advanced options > Command Prompt.
Step 3: Type ‘Diskpart’ in the Command Prompt & execute the following command lines. Just remember to press Enter key after each command line.
– List disk
– Sel disk 0 (Here 0 stands for the boot drive)
– List vol (Note which volume on your OC is the EFI partition, our is 4)
– Sel vol 4
– Assign letter -N:
– Exit
Step 4: Now type N (The assigned drive letter) & hit Enter!
Now that you have assigned a new drive letter, you can format the EFI partition using the below-mentioned command line
– Format N: /FS:FAT32
Step 5- Type ‘bcdboot C:\windows /s N: /f UEFI & hit the Enter button.
As soon as you run this command line, your Bootloader will automatically be repaired. After this, you can try executing the bootrec/fixboot command to see you are not getting the ‘Access Denied’.
READ SIMILAR ARTICLES:
1. How To Fix Windows Explorer has Stopped Working – Windows 10
2. How To Fix 100 Disk Usage Windows 10 Error
3. How to Fix 0xe06d7363 Run-Time Error On Windows 10
4. How To Fix ‘One Or More Network Protocols Are Missing On This Computer’ Error?
5. How To Fix “No Audio Output Device Is Installed” Error On Windows 10 PC