
Do you wish to remove bloatware from Windows 10? Read the blog to get to know all about the bloatware and process to remove it from your computer. Bloatware is a software that is preinstalled in the system by the computer manufacturers or included with the operating system. These apps include tools and utilities otherwise not included in the system and are manufactured later by the operating system develops or their partners. Although Bloatware poses no harm to us, there are a few reasons why they must be removed:
- This software subjugates unnecessary space that can be freed and utilized for storing our data.
- They may launch at a startup making your computer boot slower than usual.
- They will occupy memory while running in the background and make your computer slower.
- They can collect user data, history, and other information and pass it to the system manufacturers.
- Bloatware is generally the basic version of the software, and there is other software that provides advanced features.
Note: You can remove bloatware from Windows 10 in a few steps, but there is a possibility that you may find some of them back on your computer after Windows Updates are installed.

List of Pre-Installed Apps that cannot be Removed.
The four methods to remove Bloatware in Windows 10 described below cannot remove the following four default apps from Windows 10 namely:
- Contact Support
- Cortana
- Microsoft Edge
- Windows Feedback
It is impossible to remove these apps from Windows 10 computers as they’re an integral part of the operating system. The only solution is to install a third-party app of your choice, which has the same function and make it a default app. For Example, I have installed Google Chrome Browser and made it my default browser while Microsoft Edge is resting somewhere in my system.
How to Remove Bloatware in Windows 10?
The traditional way to remove a program is to uninstall it. However, it is not simple to remove most of these software as they have the uninstall option disabled, which makes it difficult to get rid of them. One of the main reasons for this is that Microsoft and its Software partners tend to lose money if these software are not installed on your system. Here are four quick methods to get rid of Windows 10 bloatware.
Method One. Use the Basic Method to Uninstall.
Most of the preinstalled software available on your Windows 10 computer cannot be uninstalled by this method but there are some that can be removed. This is the traditional method of removing any software in any Windows operating system. I personally have tried removing Microsoft Money, Sports, and News, and they have been successfully removed from my system. Here are the steps to remove bloatware from Windows 10:
Step 1. In the search box located on the bottom left corner of the taskbar, type Add or Remove Programs.

Step 2. From the search results displayed in the Windows 10 Start menu, choose Add or Remove programs as system settings.
Step 3. A new window will open, displaying a list of all the apps installed in your system.
Step 4. Click on any app, and it will display a button labeled as uninstall. Click on the Uninstall button and the app will be removed from your system.

Note: The uninstall button is highlighted for the Mail and Calendar app, which means that it can be removed using this method. However, notice that the uninstall button is disabled for the Messaging app which means this app cannot be uninstalled. You need to follow one of the advanced methods described below to remove this bloatware from Windows 10.
Method Two. Use the PowerShell as Windows 10 Debloater.
Windows PowerShell is a very powerful app that helps to configure all the setting options in Windows 10. Although it is mainly used for automating tasks and managing configurations, we can use PowerShell to remove Bloatware, which cannot be uninstalled in the traditional way. Here are the steps to remove the preinstalled apps using PowerShell:
Step 1. In the search box located on the taskbar, type in PowerShell.
Step 2. From the search results displayed, right-click on the search that displays the PowerShell app, and choose Run as administrator. Click on yes if you receive a prompt to confirm
Step 3. A text window will open, which looks like the Command Prompt with a difference of blue background as compared to black.
Step 4. Type in the following command and replace the appname with the name of the app that you wish to uninstall
Get-AppxPackage *appName* | Remove-AppxPackage
For example, if you want to remove the default weather app, then you would have to mention the actual name of the weather app between the Asterix. The actual name of the weather app is “Bingweather” which means the command would now look like:
Get-AppxPackage * Bingweather * | Remove-AppxPackage
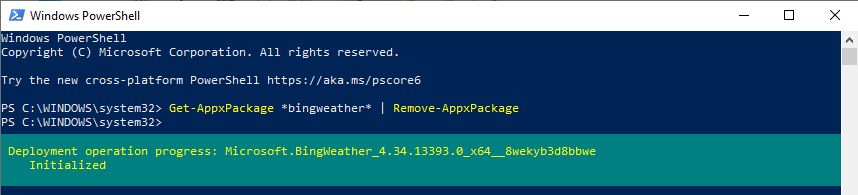
Note: Only the name has been mentioned between the two asterisks, and nothing else has been changed.
Step 5. Press Enter to execute the command.
Step 6. This will remove bloatware from Windows 10. You will have to repeat this command every time you wish to uninstall a software specifying the actual name of the software and not the name visible on the shortcut or user interface.
Here is a list of the preinstalled apps on Windows 10 and their actual names. Copy the command from above and replace the word between the asterisk with the corresponding actual name in the table, and you will be able to uninstall it.
| S.N. | Name | Actual Name |
| 1 | 3D Builder | 3dbuilder |
| 2 | Alarms and Clock | windowsalarms |
| 3 | Calculator | windowscalculator |
| 4 | Calendar and Mail | windowscommunicationsapps |
| 5 | Camera | windowscamera |
| 6 | Get Office | officehub |
| 7 | Get Skype | Skypeapp |
| 8 | Get Started | getstarted |
| 9 | Groove Music | zunemusic |
| 10 | Maps | windowsmaps |
| 11 | Microsoft Solitaire Collection | solitairecollection |
| 12 | Money | bingfinance |
| 13 | Movies & TV | zunevideo |
| 14 | News | bingnews |
| 15 | OneNote | onenote |
| 16 | People | people |
| 17 | Phone Companion | windowsphone |
| 18 | Photos | Photos |
| 19 | Store | windowsstore |
| 20 | Sports | bingsports |
| 21 | Voice Recorder | soundrecorder |
| 22 | Weather | Bingweather |
| 23 | Xbox | xboxapp |
Method Three. Use DISM to Remove Bloatware in Windows 10.
The above method of removing Bloatware is very easy but as I mentioned earlier, there is a chance that it might be reinstalled on your computer after major Windows updates. To eliminate all the traces of the software from your computer, you can use the Deployment Imaging Service and Management or DISM. Here are the steps to use DISM to remove Bloatware in Windows 10:
Step 1. Press the Windows button on your keyboard to initiate the start menu and then type PowerShell.
Step 2. Right-click on the search result displayed as PowerShell, and choose Run as Administrator.
Step 3. First, type in the following command to get a complete list of Bloatware installed on your system with their package IDs.
DISM /Online /Get-ProvisionedAppxPackages | select-string Packagename

Step 4. Locate the app from the list displayed by using step 3 and highlight the package name with the help of the mouse and copy it by pressing CTRL+C on the keyboard.
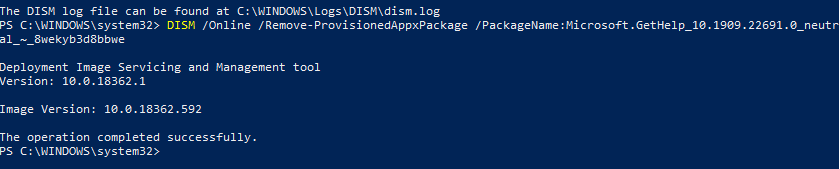
Step 5. To remove this Windows 10 Bloatware entirely from your system, type the following command.
DISM /Online /Remove-ProvisionedAppxPackage /PackageName:YOURAPPID
Step 6. Replace the last word YOURAPPID after the colon with the Package ID copied earlier in Step 4.
For Example, I would like to remove Get Started as highlighted in the above image. I would then copy the command from step 5 and add the Package ID in place of YOURAPPID.
DISM /Online /Remove-ProvisionedAppxPackage /PackageName:YOURAPPID
Get Help App ID: GetHelp_10.1909.22691.0_neutral_~_8wekyb3d8bbwe
Final command would look like:
DISM /Online /Remove-ProvisionedAppxPackage /PackageName: GetHelp_10.1909.22691.0_neutral_~_8wekyb3d8bbwe
 Step 7. Repeat these steps until you have removed Windows 10 bloatware.
Step 8. Restart your Machine.
Method Four. Windows 10 Debloater App
The final method to remove all Windows 10 bloatware and that too in one go, you will have to install a third-party Windows 10 debloater app. Although some of you might not feel secure to download a third-party app, as this was on the GITHUB website, I decided to take my chances and found nothing wrong with it.
Step 1. Open the Windows 10 Debloater website.
Step 2. Locate the green button on the right labeled as Clone or Download.

Step 3. Next, click on Download ZIP, and it will automatically download to your browser’s default location for downloads.

Step 4. Extract the zip file and open the folder.
Step 5. Locate the file Windows10DebloaterGUI in the folder and make a right-click on it. Choose Run with PowerShell. Click yes or Ok if you receive any promotion to confirm.

Step 6. A window for Windows 10 Debloater will open.
Step 7. Click the button, which is labeled as “Remove All Bloatware.”

Step 8. The process of removing bloatware from Windows 10 will initiate through PowerShell in the background. You can either watch all the bloatware disappear from your system or minimize the window and continue with some other work.
The final word on How to Remove Bloatware from Windows 10.
The above four methods will help you to remove Windows 10 Bloatware from your system and free up space and resources that were being consumed unnecessarily. For every default app preinstalled on our system, there is already a better and more convenient with advanced features third party app present on the internet. Some of them might be paid while others are free with open source licenses. You may choose the method that suits you and bookmark this page in case the bloatware returns to your system after a major Windows update.
Keep watching this space for WeTheGeek Blogs and our YouTube Channel for interesting Tech updates and issue resolutions.
windows 10 s mode
Me gusto mucho tu web Gracias, Un saludoMridula Nimawat
Gracias.