Many people have reported issues after upgrading from Windows 8.1 to Windows 10 Pro. When asked, they claim to shut down their computer appropriately; but when they restart it, they get the message: “it looks like Windows didn’t load correctly.” The message indicates something went wrong with your computer, making it appear that Windows did load successfully. It disrupts the Windows loading process.
Don’t be concerned! In this article, we will offer a fundamental understanding of this error and show you how to solve it quickly.

What are the primary sources of this Error?
The following are the most prevalent reasons for this error in Windows PCs.
Cause 1: When the BCD gets corrupted or absent.
One of the most prevalent reasons for this problem is corrupted or missing Boot Configuration Data. This might be due to disk write problems, boot sector viruses, power outages, or mistakes while manually setting the BCD.
Cause 2: The integrity of the file system has been violated.
The file system itself can become corrupted or damaged for the same reasons. This occurs far more frequently if a computer is turned off while it is in the process of writing critical data to the boot sector.
Cause 3: System files have been corrupted.
Windows cannot load normally if vital system files are corrupted due to incorrect operations, viruses, and other factors.
How to fix ‘it looks like Windows didn’t load correctly’ error?
Method 1: Boot into Safe Mode and uninstall any recently installed programs
Safe Mode launches Windows with reduced capability, allowing you to perform diagnostics and troubleshooting. Using Safe Mode will help you to resolve the issue. You should remove any applications or drivers that you have recently installed as they could be behind the error. You can reinstall them later, but only if you do it correctly and from the official source. You must enter Safe Mode since the system cannot be booted owing to the “Windows won’t load correctly” problem. Let’s see the steps that you need to follow:
Step 1: Restart your PC and hit F8 or Shift + F8 quickly while it is starting. (Note: This method only works if you have enabled F8 for Safe Mode before using Command Prompt. Otherwise, you need to Restart your PC 3 times using the Power button, to open the Automatic Repair window automatically.

If you’re running Windows 7, the Advanced Boot Options page will appear immediately. Simply choose Safe Mode and hit the Enter key.
Step 2: If you’re running Windows 11, 10, 8.1, or 8, go to “Troubleshoot – Advanced Options – Startup Settings” and then select the “Restart” option. The Startup Settings screen will be shown. To boot in safe mode, select “Safe Mode.”
Step 3: The machine should now boot in safe mode, and the problem should no longer appear. You may now do further diagnostics if necessary.
Also Read: How to Boot into Windows 10 Safe Mode
Method 2: Disable Hybrid Sleep
Remember that Hybrid Sleep will not work if you have already deactivated sleep or hibernated on your Windows machine. To correctly disengage hybrid sleep, follow the instructions outlined below:
Step 1: Navigate to the Control Panel<Hardware<Power options.

Step 2: Choose “Change plan settings.” for the Balanced option.
Step 3: Navigate to “Advanced power settings.” on the next screen.
Step 4: A new window opens – Power Options, and here you select “All hybrid sleep” from the “Sleep” menu.

Step 5: All you have to do now is toggle it to “off.”
Step 6: Click “OK” or press enter.
Method 3: Repair Windows 10 Didn’t Load Correctly by Running CHKDSK
You must generate a Windows 10/8/7 installation DVD now that you can boot properly. Then, proceed as follows:
- Step 1: Insert the Windows 10/8/7 installation disc or USB into the PC > boot from the disc or USB.
- Step 2: On the install now page, click “Repair your computer” or press F8.
- Step 3: Navigate to “Troubleshoot” > “Advanced options” > “Command Prompt.”
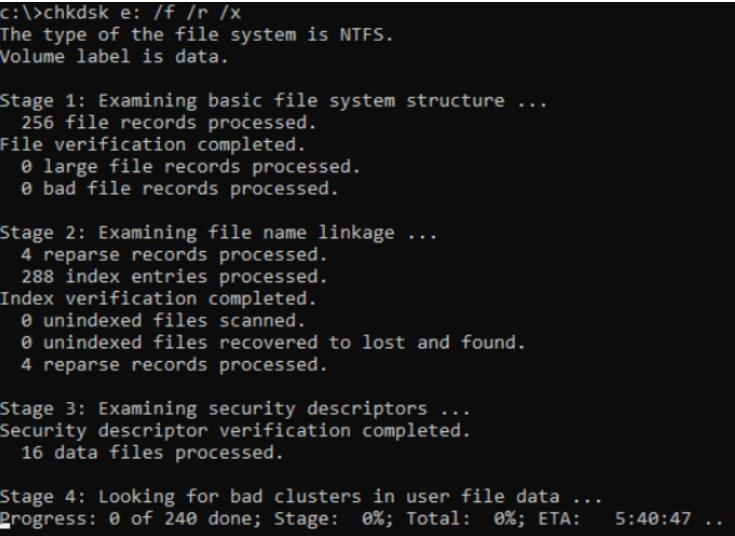
- Step 4: Enter the command chkdsk E: /f /r /x.
- The letter “E” represents the partition’s drive letter to be repaired.
Method 4: Reinstall Windows 10 from scratch.
It is critical to realize that if nothing else works, the best option is to revert to a fresh Windows 10 installation. You’d be amazed to learn that being able to install Windows on your own is a huge life changer. Below is a step-by-step explanation of how to reinstall Windows if it failed to load correctly:
Taking the backup
It is usually a good idea to preserve a backup of your current Windows. If something goes wrong during the installation, you may easily go back to the previous state. There is also the option of backing up to a single drive.
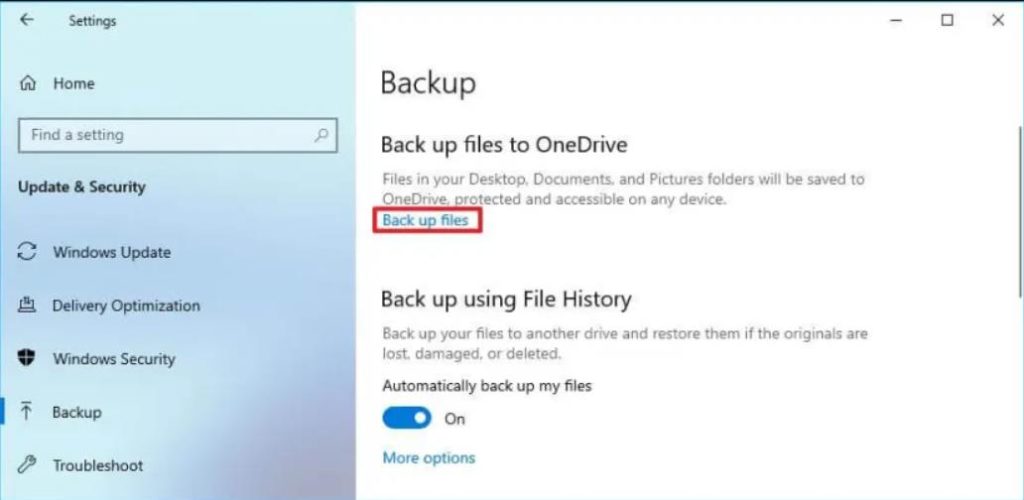
Step 1: Navigate to the “Settings” menu.
Step 2: Select “Backup” from the “Update & Security” menu.
Step 3: Check the box next to “Back up files to OneDrive.” to upload the files to your connected OneDrive.
Also Read: 10 Best Backup Software For Windows (2022) – Paid & Free
Making a Bootable USB
Step 1: Go to the Windows 10 download page.
Step 2: Download and install the “Media Creation Tool.”
Step 3: Click the “Create installation media (USB flash drive, DVD, or ISO file)” button.
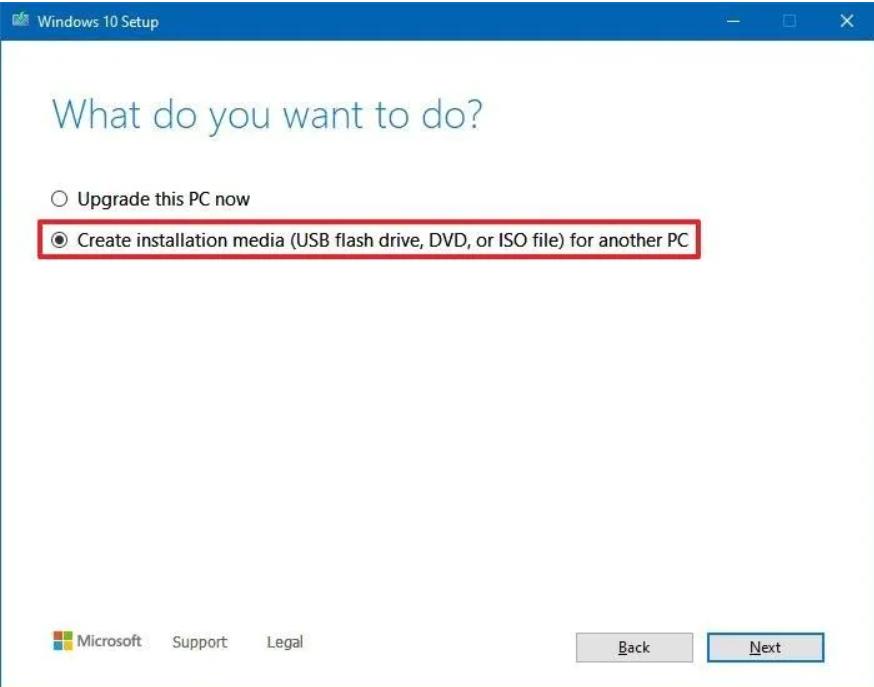
Step 4: Click Next, choose all the appropriate settings before clicking “Finish.”
Windows 10 Installation
After completing the first procedure of producing a bootable USB, installing Windows 10 is simple.
Step 1: Boot up your PC using the Windows 10 USB.
Step 2 – When Windows setup appears, click “Next.”
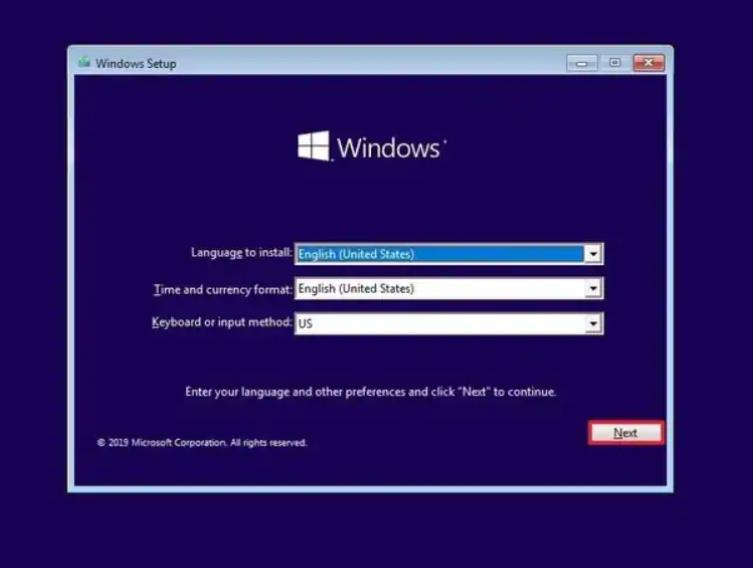
Step 3 – After configuring your language, click the “Install Now” button.
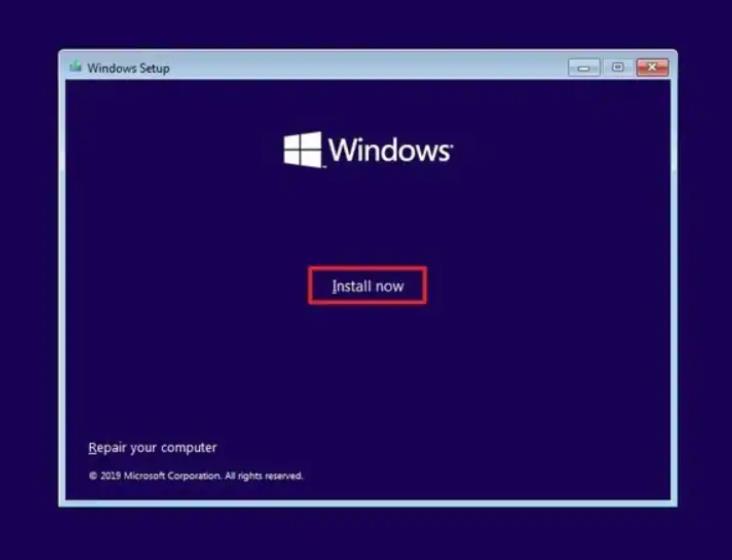
Step 4 – Select the appropriate partition and proceed with the installation.
Method 5: By using Wondershare Recoverit
If you are experiencing this problem, there is a good chance that you will lose some data from your machine when you reboot. So, you must retain a backup and can recover your data correctly. There is no better method to accomplish this than by utilizing Wondershare Recoverit software.
Wondershare Recoverit is a sophisticated yet user-friendly Windows data recovery program. It can recover deleted, formatted, lost, or inaccessible data from a PC, external hard drive, USB drive, digital camera, mobile phone, iPod, MP3/MP4 player, and other storage media.
Features
- The User Interface is modern and up to date. There are options for scanning folders and specific places, such as the Recycle Bin.
- The application may make bootable discs that allow you to restore your data by bypassing the operating system.
- The data recovery software can fix video files that won’t play.
- Rapid scanning speeds can quickly scan drives, lowering total recovery time.
- When previewing photographs, the application can scale and flip them.
Follow the steps mentioned below to recover all of your data using this software:
When attempting to recover data with Wondershare Recoverit software, the following procedures must be followed:
1. Download & Install Wondershare Recoverit on your computer.
Run the setup file and finish the installation process.
2. Launch the application, and all storage devices linked to your computer will display on the screen.

3. Choose the device or disc from which you want to recover the files.
4. After selecting the drive, click on the Scan button. The scanning process will begin, which you may quickly pause or cancel.

5. Once the scan is complete, you may see the files to determine which ones you want to recover.

6. When you’re through reviewing the file, click the Recover button.

7. If you want to recover data from the recycle bin, choose the option for recycle bin recovery. After that, you will be able to obtain data readily.
Frequently Asked Questions –
Q1. How do you fix recovery it looks like Windows didn’t load correctly?
Ans: Follow the steps mentioned below:
Step 1: Restart your computer.
Step 2: Rebuild the BCD.
Step 3: Start the Automatic Startup Repair program.
Step 4: Utilize a System Restore point.
Step 5: In Safe Mode, troubleshoot.
Q2. Why does my computer say it looks like Windows didn’t load correctly?
Ans: This error may occur if the BCD gets corrupted or missing. This might be due to disc write problems, power outages, boot sector viruses, or mistakes while manually setting the BCD. The file system might become corrupted or damaged.
Q3. Why is my computer not loading properly?
Ans: Reboot the computer if it is functioning strangely, frozen, or experiencing difficulties but can boot. Many computer problems can be resolved by restarting the machine. If you can’t restart the computer because it’s frozen, hold the power button for a few seconds until it shuts off.
Conclusion –
Now you know what to do when you face ‘it looks like Windows didn’t load correctly’ error on your PC. We have included different methods in the blog to help you eliminate the issue. However, amongst all the methods using the Wondershare Recoverit is one of the best for recovery. It is a one-stop solution for people who believe it is impossible to recover lost data. Simply comprehend the method and proceed. The free version will also assist you in recovering your files, although it has certain limits. The premium version is a good option if you want to use it indefinitely.
We hope the article was helpful for you in finding out about the ‘it looks like Windows didn’t load correctly’ error. We would like to know your views on this post to make it more useful. Your suggestions and comments are welcome in the comment section below. Share the information with your friends and others by sharing the article on social media.
We love to hear from you!
We are on Facebook, Twitter, Instagram, and YouTube. Let us know of any queries or suggestions. We love to get back to you with a solution. We regularly post tips, tricks, and answers to common technology-related issues.
Related Topics –
How To Clean Junk Files With Advanced PC Cleanup
How To Recover Deleted Restore Points In Windows 11/10
10 Best CPU Benchmark Software For Windows 2022
How to Fix Slow Internet Speed Issue on Windows 11?
10 Best Disk Management Software for Windows 10, 8, 7 (2022)


 Subscribe Now & Never Miss The Latest Tech Updates!