
The stop code HYPERVISOR ERROR indicates a fatal problem with Windows 10 and 11’s Hypervisor virtualization program. On a Windows computer, users can run and manage virtual machines thanks to the Windows Hypervisor Platform (Hyper-V).
Not only this, you can also run Linux distributions on Windows PC using VirtualBox or VMware, as well as Android or iOS, thanks to the Windows Hyper-V functionality. The Hyper-V blue screen is frequently brought on by incorrect Hyper-V settings, memory issues, corrupted data sectors, and even outdated drivers. Thankfully, we’ve gathered a list of possible solutions to fix the Hypervisor Blue Screen issue. We advise trying out several remedies since the problem could appear due to several possible root causes.
(FIXED): HYPERVISOR_ERROR Blue Screen On Windows 11/10
If you’re facing the Hypervisor BSOD error stop code, try the following methods in the sequence shared below.
Method 1: Verify that Hyper-V is enabled.
According to certain experts’ reports, your computer could crash if Windows Hyper-V is improperly set up. Sometimes the simplest solution to the blue screen error is to restart the Hyper-V feature. The following instructions describes how to restart Hyper-V on Windows 10 and 11 PC:
Step 1: To launch the Run dialogue box, press Win + R.
Step 2: Type optionalfeatures and hit OK.
Step 3: Scroll through the Windows Features popup box until you locate Hyper-V.
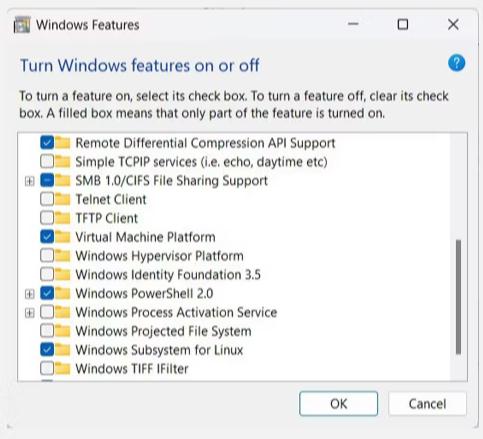
Step 4: Select the option and hit OK if it isn’t checked.
Step 5: Allow Windows to restart when prompted so that the changes can take effect.
Also Read: How to Enable Hyper-V in Windows 11 Home
Method 2: Use the Windows Memory Diagnostics tool.
Your PC’s RAM is automatically scanned by the Windows Memory Diagnostic application to look for any potential problems. The operating system will automatically try to fix the issues as they are discovered. For Windows 10 and 11 PC, use the Windows Memory Diagnostics tool by following the following steps:
Step 1: Open the Start menu, type “Windows Memory Diagnostic” into the search bar, and then click on the best match.
Step 2: After saving any open files, choose Restart now and check for problems.
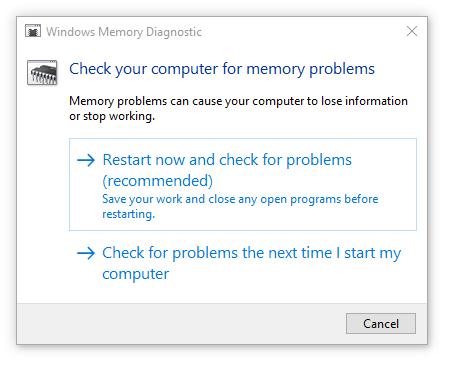
Step 3: After that, your Windows computer will restart and check the memory modules for problems.
Step 4: Windows will reboot automatically after the scan is finished.
Also Read: How To Fix Optional Features Not Installing on Windows 11
Method 3: Launch the Hyper-V Service again.
To keep your hardware and software in synchronization and operating smoothly, the Windows OS depends on background and foreground services. BSOD crashes can be brought on by problems with improper Windows service’s configuration. To fix the blue screen error, we advise restarting the Hyper-V Virtualization service:
Step 1: Open the Start menu, perform a service search, and then choose the best match.
Step 2: Scroll to find the Hyper-V Remote Desktop Virtualization or Hyper-V Virtual Machine Management service.
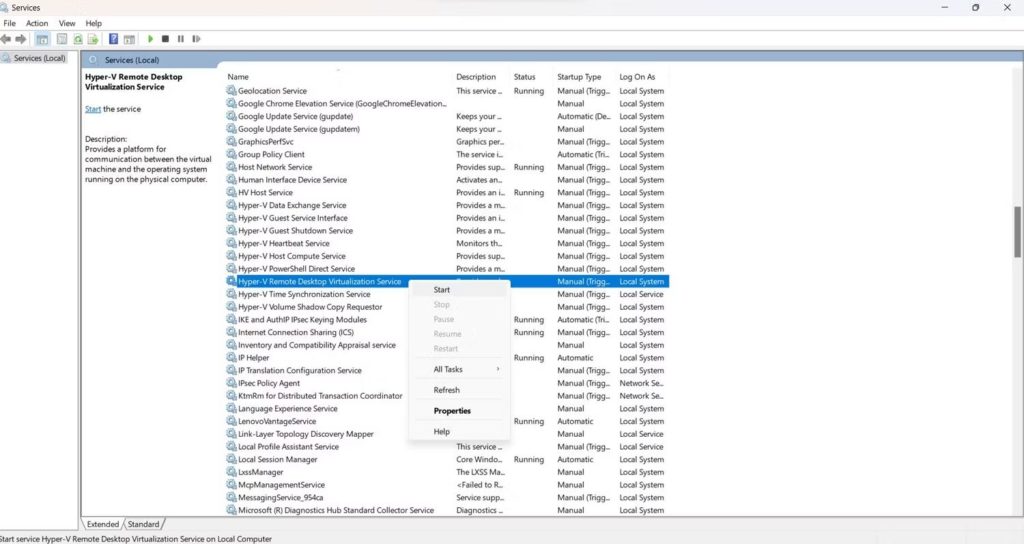
Step 3: Select Stop from the context menu when you right-click the service.
Step 4: Right-click the service and choose Start after a short while.
Step 5: To apply the modifications, restart your computer.
Also Read: Step-By-Step: Enable & Configure Hyper-V Windows 10 To Run Virtual Machines
Method 4: Use Deployment Image Servicing Scan
Corrupt system files on your computer can make the Hyper-V capability stop working properly and result in a blue screen error. If the Windows OS image is damaged, you need to fix it right away. You only need to use your Windows Terminal or Command Prompt to launch the Deployment Image Servicing Scan. To perform a Deployment Image Servicing Scan on Windows 10 or 11, follow these instructions:
Step 1: Search for the Command Prompt in the Start menu.
Step 2: Choose to execute the application as administrator.
Step 3: Press Enter after entering the following command in the Command Prompt window.
DISM.exe /Online /Cleanup-image /Restorehealth
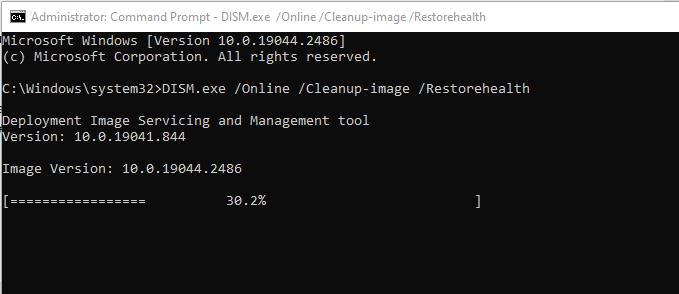
Step 4: Once the scan is finished, reboot your computer.
Also Read: How to Fix DISM Host Servicing Process High CPU Usage
Method 5: Update Drivers
The most common reason for blue screen problems is outdated drivers. We strongly advise updating your drivers with the latest and most compatible versions your device drivers. If your graphic drivers, storage controllers, or system components have an old malfunctioning driver, you may frequently get the Hyper-V blue screen problem.
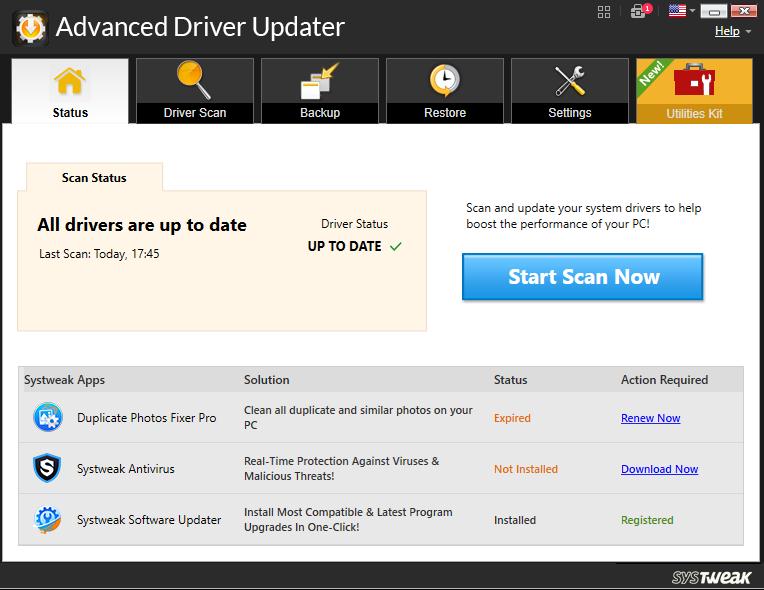
In such a scenario, you would want a third-party driver updater application to check for driver updates. We strongly suggest using Advanced Driver Updater for all of your driver requirements. With the help of this wonderful tool, you can examine your computer and update any outdated or corrupted drivers as well as replace the missing & damaged ones. The following are the steps to using this software:
Step 1: Install Advanced Driver Updater from the button down below.

Step 2: Open the program and choose “Start Scan Now.”
Step 3: The Scan will now begin; the length of time it takes will depend on how many drivers are installed on your computer.
Step 4: A list of outdated drivers will now appear on your screen. For your Network driver, search the list.
Step 5: Click the Update link next to the network adapter to download and install the most recent driver for your network device.
Step 6: Restart your computer to check if the issue is still present.
The Final Word On Ways To Fix The HYPERVISOR_ERROR Blue Screen On Windows 11/10 PC
A ghostly blue screen of death might be brought on by a broken Hyper-V functionality in Windows. The HYPERVISOR ERROR stop code can be fixed by attempting the possible solutions listed above. Potential hard drive problems can also be resolved in order to resolve Hypervisor problems on Windows.
Please let us know in the comments below if you have any questions or recommendations. We would be delighted to provide you with a resolution. We frequently publish advice, tricks, and solutions to common tech-related problems. You can also find us on Facebook, Twitter, YouTube, Instagram, Flipboard, and Pinterest.
NEXT READ: