
System restore is an inbuilt Windows feature that allows restoring system settings from previously saved restore points. This feature has saved us a lot of times, but after updating to Windows 10 some of us face a problem with System Restore i.e. System Restore option is greyed out. This means neither can we restore to an earlier point or can we create a system restore point. Most common way to resolve this problem, is by enabling System Protection but if that too is greyed out then what?
Thankfully we have a solution to resolve system restore greyed out issue on Windows 10.
How to solve system restore greyed out problem in Windows 10?
Here, we bring certain steps using which you can resolve system restore greyed out problem in Windows 10:

Usually, if you’re not logged in as System Admin or disk space usage is not set under system protection, then this problem arises.
Therefore, before we try and follow other methods to resolve the problem. We need to login as System Admin and adjust disk space. For this head to System Properties > Configure > under Disk Space Usage adjust the slider to assign disk space for system protection.
This should help. If this doesn’t work, then try using following methods.
Ways To Resolve System Restore Greyed Out Problem
Method 1: Using Registry Editor
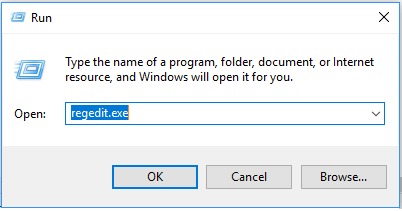
- Open ‘Run’ dialog box by pressing Win + R key together. Here type regedit.exe and hit Enter.

- Next, navigate to HKEY_LOCAL_MACHINE \ Software \ Policies \ Microsoft \ Windows NT \ SystemRestore. You’ll find this location in the left pane of Registry Editor window.
- Next, look for Disableconfig and DisableSR values in the right pane. Select them and delete.

Now restart your machine to apply settings and check if you are able to use System Restore option.
Method 2: Using Group Policy Editor
Note: If you are Windows 10 Home edition, Group policy is not available for you.
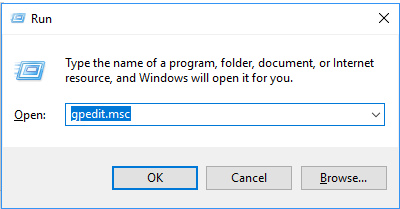
- Open ‘Run’ dialog box by pressing Win + R key together. Here type gpedit.msc
- Now under Computer Configuration head to > Administrative Templates > System > System Restore.
- Here, in the right pane look for “Turn off System Restore” setting. Double click on it and set it to Not Configured or Disabled if set to Enabled.
- Next click Apply to save settings.

To bring changes into effect restart your Windows 10 machine. Now check if you are able to use System Restore option.
Method 3: Using Elevated Command Prompt
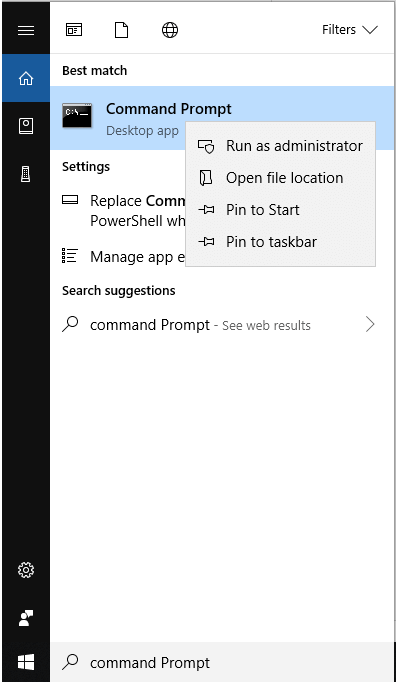
- Type Command Prompt in the search bar. Once you see the search result right click and select Run as Administrator.
- Next, paste the command
“%windir%\system32\rundll32.exe/dsrrstr.dll,ExecuteScheduledSPPCreation”
and press Enter to execute it. - There is a possibility that the related system process may be not running in the background. Therefore, you need to start it.
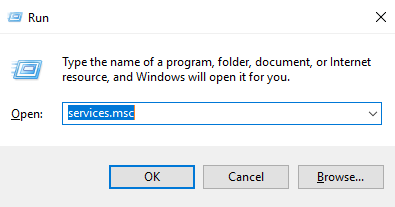
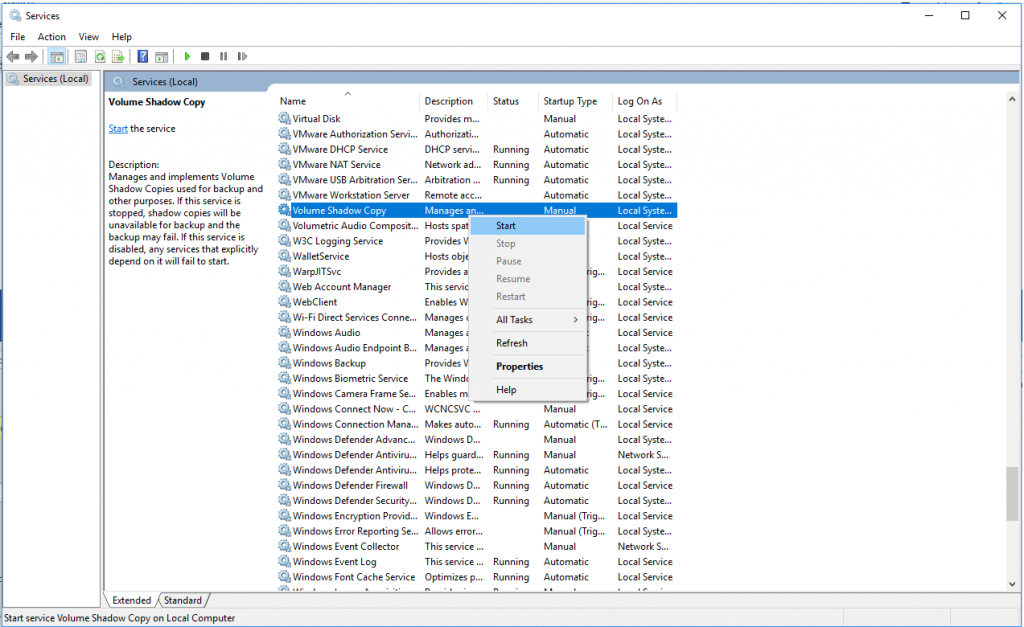
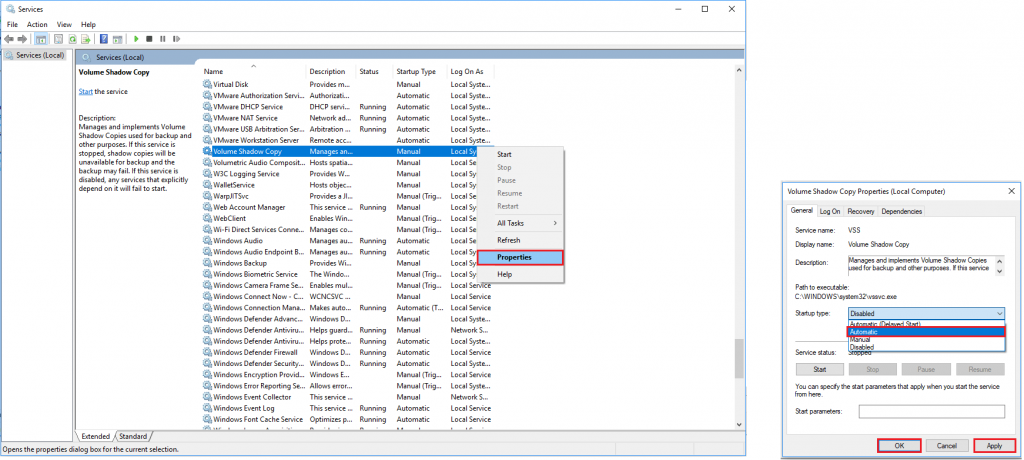
- To do so, Open ‘Run’ dialog box by pressing Win + R key together. Here type services.msc,
- Now under Services Window, locate “Volume Shadow Copy, “service right click on it and from the context menu select Start, If it is running stop it and change Startup type to Automatic.
- From the context menu and then If its Startup type is set to Disabled, change it to Automatic, and click OK.
Now check you should be able to use System Restore.
Alternate way to backup system files and your important data
As a matter of fact, System Restore and Data backup aren’t the same. System Restore only takes backup of your system files and allows to restore when needed. This means none of your personal files likes music, video, photos, documents can be restored using System Restore. In addition, as restore points are saved on the system volume, if the volume crashes, all files on the volume as well as restore points are also compromised thus making the system restore vulnerable. Therefore, for better data protection you can use a backup tool to secure your data.
To backup your important data and system files you can use Advanced System Optimizer. This system optimization tool offers various flexible choices. You can use it to backup both your personal data and system files. To take a simple backup, encrypted backup, with different compression ratio you can use Backup Manager feature of Advanced System Optimizer. Not only this you can even resume an existing backup job, select backup location, take backup of complete drive volume, and can also schedule backup, using Backup Manager.
Advanced System Optimizer has a user-friendly interface, this makes software handling really simple. Moreover, this system optimization tool is compatible with Windows 10/8.1/8/7/Vista/XP.
Let’s see how to protect your data and system file with Advanced System Optimizer.
Step 1. Download, install and launch Advanced System Optimizer. At the main interface, click Backup & Recovery.

Step 2. Next to take backup of your personal data click on Backup Manager option present in the right pane.
Step 3. Name the backup job, to differentiate backups from each other and click Next.
Step 4: Select Backup media type, compression level and click Next.
Step 5: Select a backup location if you wish to store it at some other location. For this click on three dots next to location and click Next to proceed.
Step 6: From here you can backup entire registry, documents and can even backup entire disk partition. For this click on My Folders. Once you have selected files for backup click on Next.
Step 7: Now select the files or driver partition and click on Add that you wish to backup. To add complete drive partition, click on Add All > Next.
Step 8: This is the last step, to start taking backup immediately check the box next to Backup immediately and click Next.
Moreover, if you want to exclude certain files from being backed up check make the box next to Use Exclusion List > Manage Exclusion List.
Click Next to start with the backup process.
This way you will be able to take backup of your selected data.
How to backup system files using System Files Backup & Restore?
Step 1: Launch Advanced System Optimizer. At the main interface, click Backup & Recovery > System Files Backup & Restore.
Step 2: Next, click on Take Backup Now button.
Step 3: Specify the location > Start Backup.
Step 4: System Files Backup & Restore will start taking backup of your system files.
Step 5: Click “Finish” to exit the interface.
We hope using these steps mentioned above, your problem of system restore greyed out in Windows 10 is now resolved. However, if the problem still persists you can use Advanced System Optimizer’s System Files Backup and Restore to backup system files and Backup Manager to take backup of other important data. Let us know which method worked for you. Your feedback is valuable for us.