
Sometimes, you get victimized by your capricious mind and end up losing important files as you hastily delete them. Don’t be disheartened, because luckily, you can use ‘File History’ feature of Windows 8 to retrieve them for you.
It is a marvelous feature that often takes backup of stored data such as photos, music, videos and documents. In case, you lose your files or you have accidentally deleted them, then don’t panic! You can recover permanently deleted files in real time.
Must Read: 5 Ways to Speed Up Your Slow Computer in Windows 8
In this post, we’re going to discuss how to manually recover permanently deleted files in Windows 8 and with a third-party software as well. So, here we go!
How To Recover Permanently Deleted Files in Windows 8 Using Advanced Disk Recovery?
Using Advanced Disk Recovery is the easiest and simplest way to recover the accidentally deleted data. The tool is incredibly designed to recover precious data that has been deleted. It allows you to recover all the types of files and folders on your machine. You can completely rely on the software to recover your files, folders, and subfolders. Here are the steps you need to perform to recover deleted items:

Step 1: Download and install the software on your Windows 8 computer.
Step 2: Select the location from where you would like to recover the deleted item.
Step 3: Choose the drive from the given options and hit on ‘Start Scan Now’.
Step 4: Now you will get two options, Deep Scan and Quick Scan. The deep scan conducts profound scanning and Quick Scan can swiftly scan master file tables.
Step 5: Once the scan is done, you will get a list of deleted items in red font. You need to select the deleted file you want to recover and then click on ‘Recover’.
Step 6: Now, choose the location where you would like to keep the recovered files by clicking on ‘Ok’.
Recover Deleted Files in Windows 8 Without Using Any Software
You can retrieve deleted files in Windows 8 using File History. But for that we need to know how to get files back using File History.
Setting Up Your Drive For File History
But before using File History, you need to choose where you would like to keep the recovered data. You can use an external drive such as, USB and Pen drives or you can save it to a network drive as well. Follow the below-given instructions to do the same.
Step 1: Press Windows key + Q to open the search box and then type file history to open ‘File History Settings’.
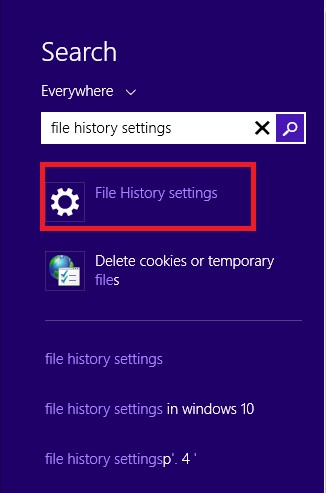
Note: You can access search box, hover the cursor at the right edge of your screen and select ‘Search’.
Must Read: How To Create Restore Point On Windows 10, 8 And 7
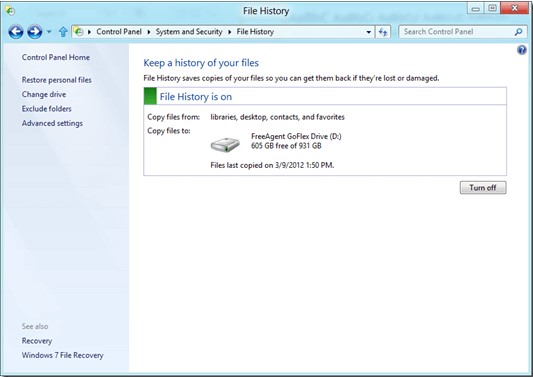
Step 2: Choose the drive or locate an external drive where you want to keep the recovered files and folders.

Step 3: Now, toggle on File History.
How To Restore Files Or Folders Using File History?
Now, you know how to turn on your File History. Let’s learn how to restore folders using File History.
Step 1: Open the search box by taking the cursor at the right edge of your screen and hit ‘Search’ option.
Step 2: Now, insert the files in the search box and Choose ‘Restore your files with File History’. In the search box, you need to type down the name of the file you are looking for.
Note: You can use the right-left arrows to browse through different versions of your folders and files.
Step 3: Choose the file you want to recover to its original location by hitting ‘Restore’.
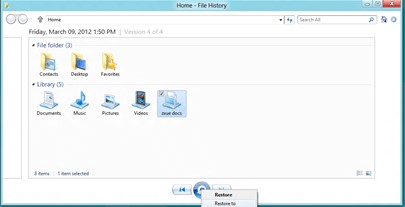
You can also recover files other than the original location. In order to do that, simultaneously press and hold or right-click the Restore button. Click on ‘Restore To’. Now, it will allow you to select a new location.
Now, you know how to recover permanently deleted files on Windows 8 using a third-party software and manually as well. Select any of the above methods to recover your valuable data. Don’t forget to share your opinion about the same in the comment section below.
Next Read: How To Find And Remove Duplicate Music Files Of Windows 10, 7, 8
You can also find us on Facebook, Twitter, YouTube, Instagram, Flipboard, and Pinterest.