
What Is Windows Driver Signature Enforcement?
With Windows 10, Microsoft brought a feature known as Driver Signature Enforcement that ensures users only run the device drivers that are assigned by Microsoft only.
To tighten security even further, Microsoft requires that any driver you install is digitally signed or what they called, should be WHQL (Windows Hardware Quality Labs) certified. Having this makes sure that the device driver you use is really the one that the developer wrote, and it has not been tampered with.
The feature is quite useful if you are really concerned about security and threats. While there can be times, where you wish to install drivers that aren’t digitally signed but appears useful to you for running hardware. According to current system settings, you’ll be blocked from doing so. But, we have certain ways that can allow you to disable driver signature enforcement Windows 10, & install unsigned drivers without any hassles.
Learn How To Disable Driver Signature Enforcement Windows 10?
Learn different ways to disable driver signature enforcement Windows 10. Try them one by one and let us know which worked the best for you to install an unsigned driver.
| Method 1- | Make Certain Tweak With Startup Settings |
| Method 2- | Enable Test Signing Mode Using Command Prompt |
| Method 3- | Using Group Policy Editor |
Method 1- Make Certain Tweak With Startup Settings
Aside from all the methods, changing Startup settings to disable driver signature enforcement is the easiest way. But this method works on a temporary basis. As soon as you restart your PC, the driver signature enforcement feature will get enabled. So, try changing some startup settings to disable it temporarily.
Step 1- Press and hold the Shift key & click on the Restart button.
Step 2- Click on the Troubleshoot option, followed by Advanced options > Startup Settings & hit the Restart button again.
Step 3- On the Startup Settings screen, a list of the following options will be presented to you. Click on 7 or F7 key to find, and select disable driver signature enforcement feature.
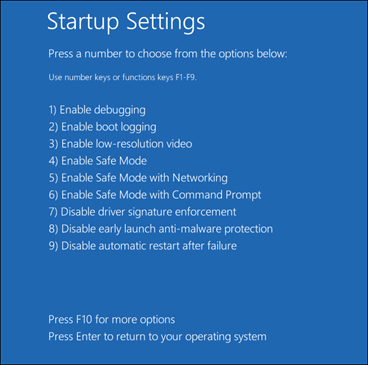
Your computer will automatically restart & will allow you to install unsigned drivers on your Windows 10.
Method 2 – Enable Test Signing Mode Using Command Prompt
Windows brings a Test Signing Mode feature & when you enable this mode, the Driver Signature Enforcement feature gets automatically disabled until you choose to leave the Test Signing mode.
Follow the step by step method below to disable device driver signing:
Step 1- Run Command Prompt as Administrator.
Step 2- Type & Execute the following command: bcdedit /set testsigning on
Step 3- As soon as your press the Enter key, Driver Signature Enforcement will automatically be disabled.
Step 4- If a message “protected by Secure Boot Policy” pops up on your windows, then you’ll be required to disable it first.
Step 5- Restart the computer and repeat Step 1 & 2 to enable the Test Signing Mode.
You’ll witness a ‘test mode’ watermark at the bottom right corner of your screen which means you’ve successfully enabled Test Signing Mode. Therefore, easily install unsigned drivers, without being stopped by your Windows 10 settings!

To leave the test mode:
- Launch CMD and run as Administrator
- Execute the following command: bcdedit / set testsigning off
- Press Enter!
You’ll be taken out of Test Mode, the watermark appearing on the bottom right corner will also disappear!
Method 3 – Using Group Policy Editor
You can modify certain settings in Group Policy Editor to disable driver signing code. To do so, follow the steps below:
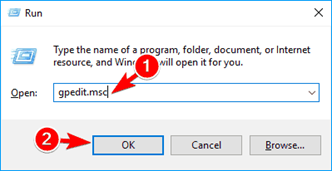
Step 1-Launch Run window on your PC by pressing Win + R buttons on your keyboard.
Step 2- Type gpedit.msc and proceed with the OK button.
Step 3- Local Group Policy Editor will appear on your screen, choose the User Configuration option, you can find it in the left panel of the window.
Step 4- Click on Administrative Templates from the main Window > double-click on System on the next menu > Driver Installation.
Step 5- Select the Code signing for device drivers entry > select the Enabled option and change to Ignore.
Hit the OK button to implement the new settings and restart your PC to get ready to install the unsigned drivers on Windows 10.
Bottom Line
Undoubtedly, the Driver Signature Enforcement feature provides an extra layer of security, but sometimes additional security measures cause problems while installing device drivers.
Hope these methods helped disable Driver Signature Enforcement!
Do share your experience in the comment section below!