
The Windows operating system image can be repaired, modified, and updated with the help of the robust command-line program DISM, but sometimes even the most powerful tools can fail. Sometimes the Deployment Image Servicing and Management (DISM) tool develops problems of its own, resulting in errors like the 0x800F082F error on Windows.
The DISM Error 0x800F082F typically occurs due to issues with the Windows Update component or when the system is unable to find the necessary files to complete the requested operation.
Here are several troubleshooting techniques that can help you permanently fix it.
Also Read: 5 Ways to Resolve the Dism.exe 1392 Error on Windows
Resolving the DISM Error 0x800F082F in Windows: A Step-by-Step Guide
Method 1: Launch DISM in Safe Mode
When DISM collides with a background service or process, it occasionally stops working. By starting your computer in Safe Mode and then using the DISM tool, you may quickly determine whether this is the position you are in.
Launch DISM after the reboot, then carry out the action that caused the issue in the first place. If a background process was the root of the problem, Safe Mode ought to solve it. Then you can proceed and do a system restore, which will essentially take your computer back to a time when the problem wasn’t present.
Also Read: How to Fix DISM Host Servicing Process High CPU Usage
Method 2: Use an Administrator Account Instead
Running DISM necessitates administrative access to Windows since it modifies the system image and uses vital system files. Because of this, make sure you are in into Windows with your administrator account before moving on to the specific troubleshooting techniques.
Additionally, logging into an administrator account will give you access to the essential permissions. Without it, you might run into constraints or limitations that would make it difficult for you to successfully alter the system. Use DISM once more after switching to an administrator account.
Also Read: How to use DISM to Repair Windows
Method 3: Makes Changes In Windows Registry
You can make a minor modification in the Windows Registry Editor to fix this issue. Here are the steps:
Step 1: Press Win + R to open the RUN box.
Step 2: Type “regedit” and press Enter.
Step 3: If the User Account Control box appears then click on Yes.
Step 4: Copy & Paste the following path and paste it on the address bar of the Registry Editor and hit Enter.
Computer\HKEY_LOCAL_MACHINE\SOFTWARE\Microsoft\Windows\CurrentVersion\Component Based Servicing\SessionsPending
Step 5: Locate the Registry entry named as Exclusive in the right panel and make a double-click on it.
Step 6: Alter the data under the Value Data field to ”00000000” and then hit the OK button.
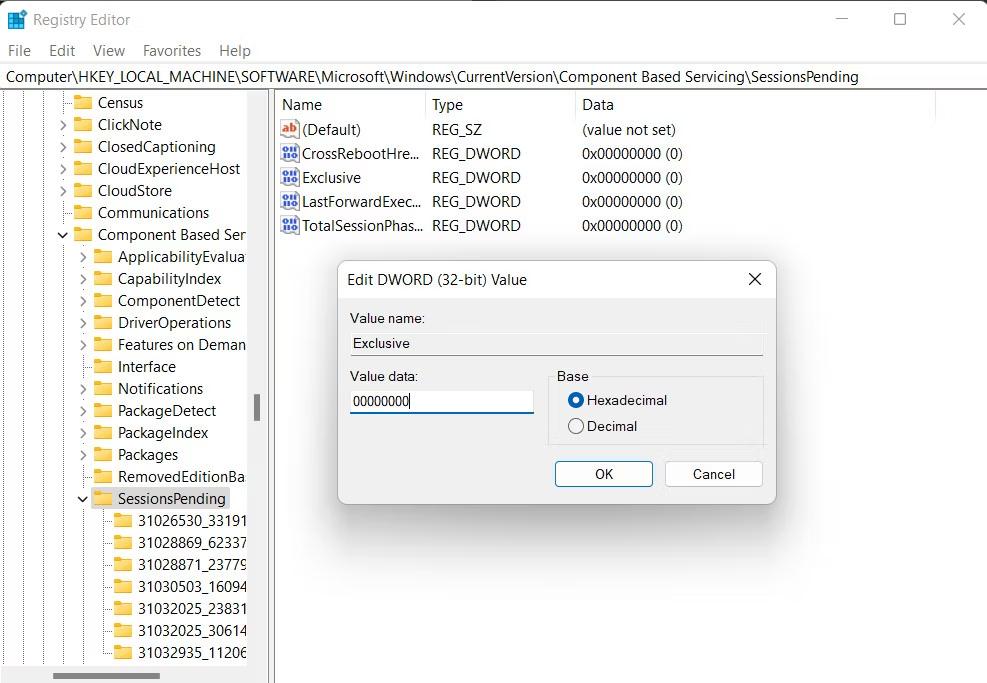
Step 7: Now follow Step number 5 and 6 for another Registry entry labeled as TotalSessionPhases.
Step 8: Close the Registry Editor and reboot your PC.
Also Read: What Is Appx Deployment Service And How To Fix High CPU Usage
Method 4: Replace Files From the Component Store
As we previously indicated, DISM may not be operating properly since the component store may have become corrupted. By using the DISM cleanup command and System File Checker (SFC), you can resolve this by cleaning the component store.
If a problematic file is found, they will swap it out for a fresh cached copy, which will resolve the issue. Here are the steps:
Step 1: To launch Run, press the Win + R buttons simultaneously.
Step 2: To launch Command Prompt as an administrator, enter “cmd” in Run and press Ctrl + Shift + Enter.
Step 3: In the User Account Control window, select Yes.
Step 4: Paste the following commands into the Command Prompt one at a time, then press Enter to run them:
dism.exe /online /Cleanup-Image /StartComponentCleanup
sfc /scannow
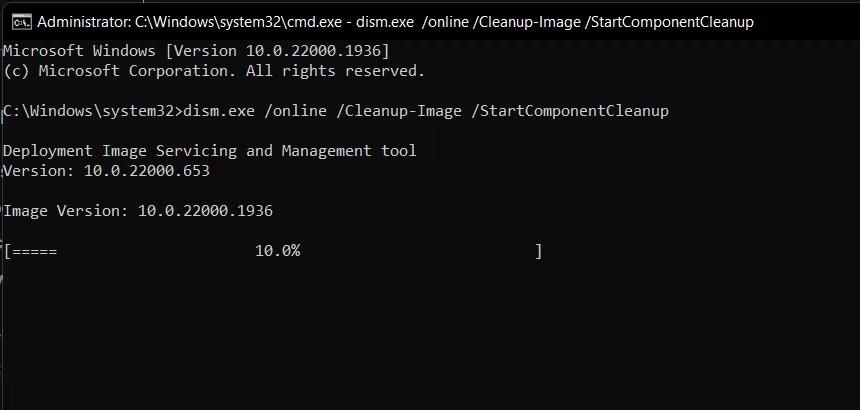
Close the Command Prompt window after the commands have finished running. The DISM should now function without issue.
Issue Resolved: Were You Able to Fix the DISM Error 0x800F082F in Windows?
You can successfully restore DISM by following the procedures mentioned above. We strongly advise sticking to the recommended schedule for system upgrades, avoiding disrupting DISM activities, and keeping a healthy system to prevent this issue from happening again in the future.
Please let us know in the comments below if you have any questions or recommendations. We would be delighted to provide you with a resolution. We frequently publish advice, tricks, and solutions to common tech-related problems. You can also find us on Facebook, Twitter, YouTube, Instagram, Flipboard, and Pinterest.