Blog Summary – If you are confused how you end up with more than one folder for OneDrive on your File Explorer, then this blog will help you. We shed some light on the causes along with the fixes for the duplicate OneDrive folders in Explorer on Windows 10.
First launched in 2007, OneDrive is Microsoft’s internet-based storage platform used by enterprises. It comes bundled with the Office 365 subscription, yet people use it for their accounts too as it allows storing all types of files. Alongside, Microsoft OneDrive easily syncs data allowing you to access it over multiple devices.
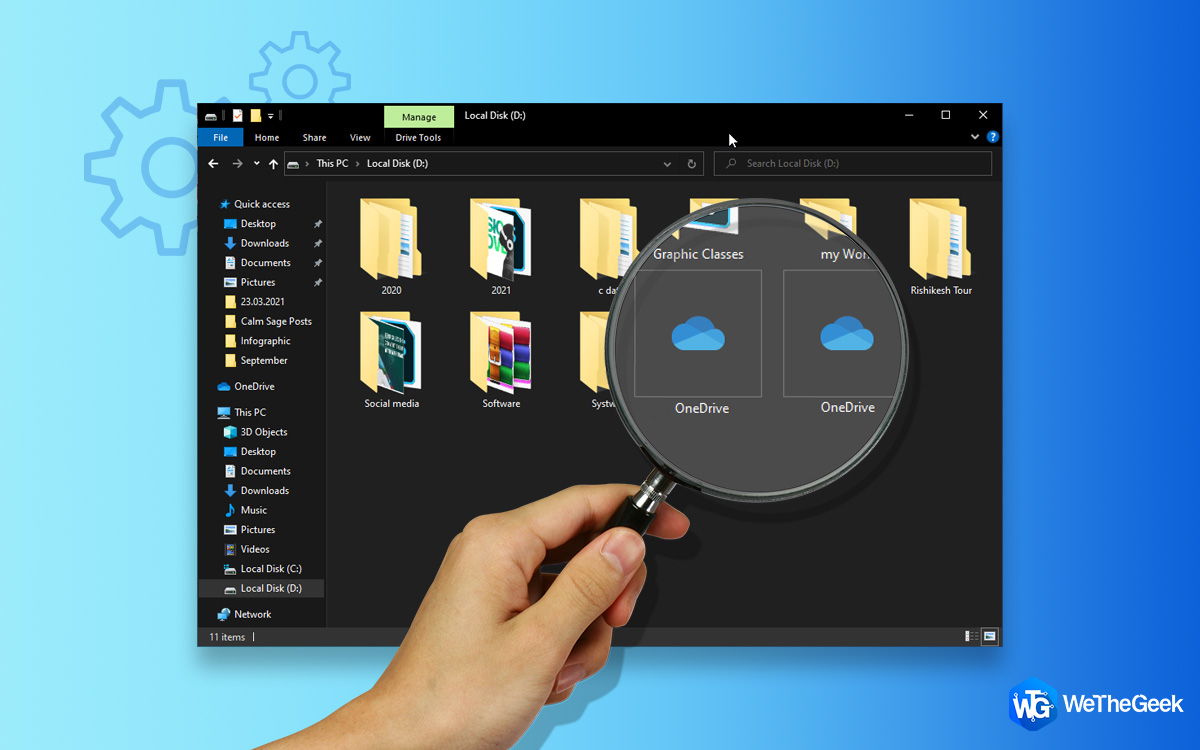
Certainly, the benefits offered by OneDrive are abundant but lately, users have been found complaining about OneDrive duplicate folders in Windows Explorer.
If you too are struggling with the same issue, you’ve come to the right place.
Here, we will discuss the reasons for this problem and how to fix duplicate OneDrive folder in File Explorer.
Reasons for Identical OneDrive Folders in Windows Explorer
- The most common reason for this problem is upgrading from Windows 8 to Windows 10
- Another reason is the drive name. The older version of Windows OneDrive was named SkyDrive. This means when you upgrade to Windows 10 since SkyDrive and OneDrive are different names they will be treated differently and you will see 2 folders. Due to this, the issue is caused and users face problems.
Common Problems Caused Due to OneDrive Duplicate Folders
- Since both folders are of OneDrive, the same data is synched, and this creates confusion. This means in the future if synching is paused in one folder you might lose data.
- Both folders might have different data, this creates issues as everyone wants data to be in one place.
- Though OneDrive duplicate folders have different data. Yet, it has been found that apps store data in the older folder than the new one.
Whatever the reason be, the problem of multiple OneDrive folders can be resolved easily. Below we discuss the most common and workable fixes for OneDrive duplicate folders.
Note: We recommend taking a backup of data stored in the OneDrive folder. This is suggested as a precautionary measure so that you don’t have to suffer any data loss. For this, we recommend using Right Backup – an alternate and multiplatform cloud backup service. Using it, you can easily sync and access data.
Ways to Fix Duplicate OneDrive folder/ icon in File Explorer
Before applying the following fixes, ensure you have backed up local unsynced OneDrive data.
1) Reset OneDrive
To Reset OneDrive on Windows 10, follow these steps:
- Press Windows + R
- Copy and paste the following command :
%localappdata%\Microsoft\OneDrive\onedrive.exe /reset
- Hit OK
Now check if this helps to fix the annoying ‘Duplicate OneDrive Folder Icons in File Explorer’ issue or not. In case the problem persists, go ahead with another workaround.
2) Unlink and Relink OneDrive
This is how you need to reconfigure OneDrive by unlinking & re-linking your PC to OneDrive:
- Look for the OneDrive icon in the system tray
- Right-click on it > Settings.
- This will open a new window navigate to > Account tab

- Hit Unlink this PC. This will redirect you to a new window to confirm you want to Unlink your OneDrive account > select Unlink account.
- Again run OneDrive and relink the account.
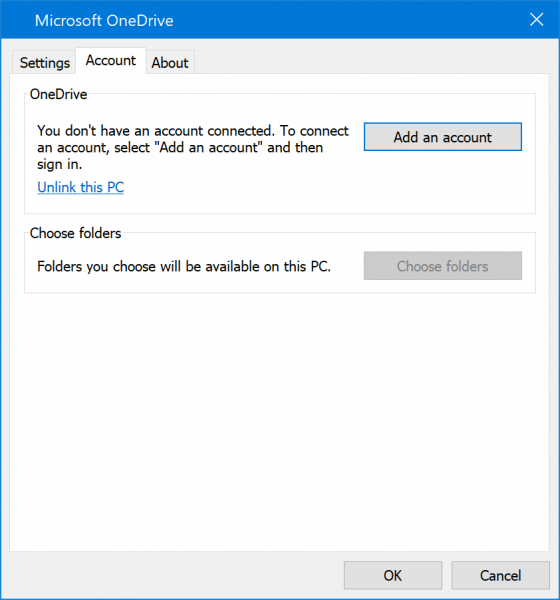
This should work, and you will not see the duplicate OneDrive account any longer. Let us know if this method helps you and share your experience in the comments below.
3) Use The Registry Editor
To resolve your concern regarding ‘Duplicate OneDrive folder icons in File Explorer’, you need to make the following alterations in the Registry Editor.
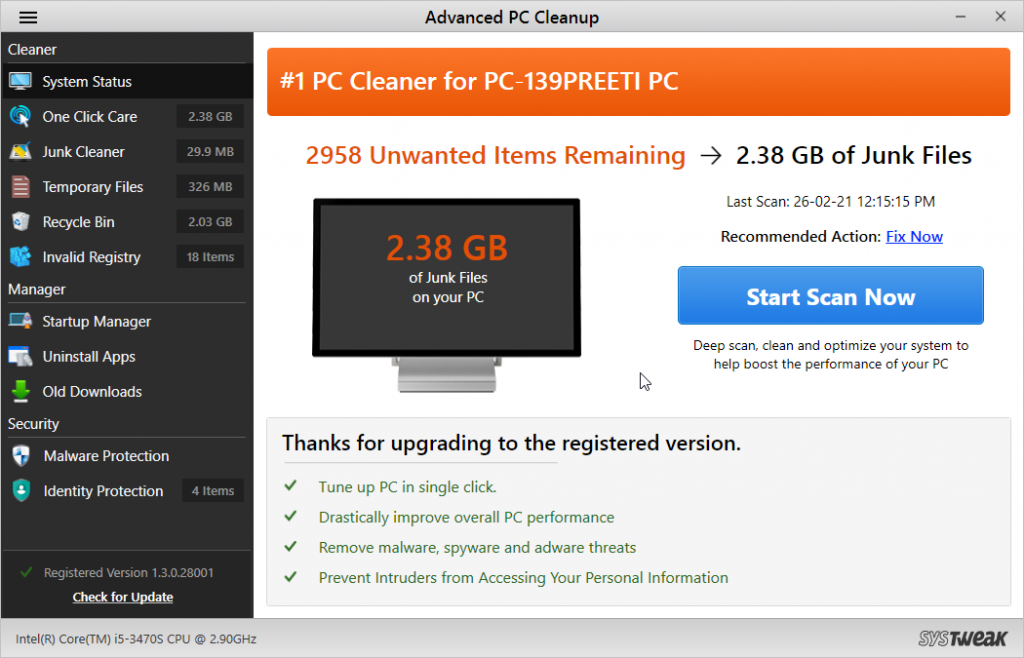
Note: Before making any changes to Windows Registry as a precautionary measure we suggest taking a backup of your Windows Registry. For this, you can try using Advanced PC Cleanup – the best invalid registry cleaner and PC optimizer.
Follow the instructions stated below to learn how does this software work:
- Download and install Advanced PC Cleanup

2. Click the three horizontal lines > Settings > Backup & Restore > Take A Full Backup.
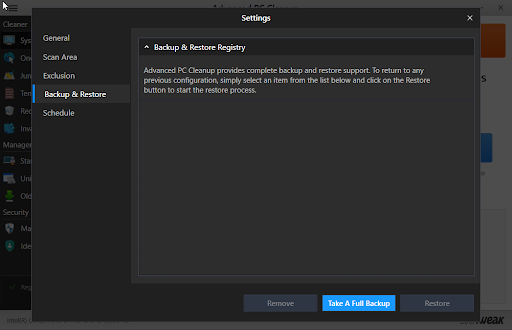
That’s it! You’ve successfully backed up the Registry using Advanced PC Cleanup. In case you wish to restore the entries, you can take the help of the Restore feature provided by the tool.
Now that you have the backup of the registry, you can follow the steps below to fix the duplicate OneDrive folder on Windows PC.
Read More: How To Backup, Restore And Edit Files Using The Registry Editor Windows 10?
- In Windows search bar type Windows Registry
- Select the search result > right-click > Run as administrator
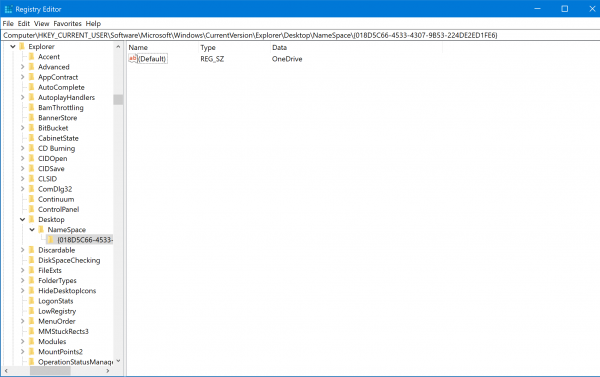
- Navigate to –
Computer\HKEY_CURRENT_USER\SOFTWARE\Microsoft\Windows\CurrentVersion\Explorer\Desktop\NameSpace - Find the folders that have the OneDrive name.
- Next, delete those OneDrive data DWORDs or folders.
- Alternatively, head to
Computer\HKEY_CURRENT_USER\SOFTWARE\Microsoft\Windows\CurrentVersion\Explorer\Desktop\NameSpace
- Look for folders with OneDrive names. Copy folder names that contain the OneDrive folder.
- Thereafter, head to –
Computer\HKEY_CLASSES_ROOT\CLSID
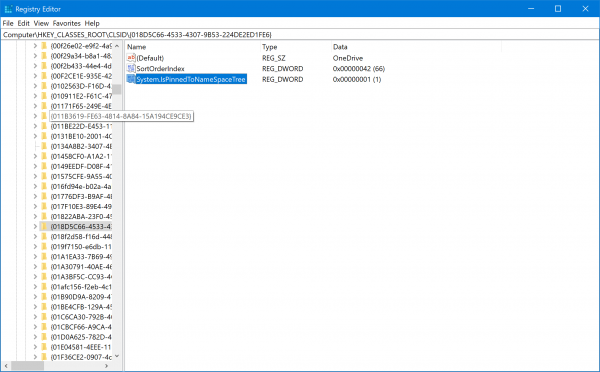
- Find the folder name you copied.
- Double click, here you will see a DWORD named IsPinnedToNameSpaceTree. Set its value data to 0.
- Restart PC to apply changes.
This should definitely remove the duplicate OneDrive folder. If you are still struggling, continue reading the post to find more suitable solutions!
4) Switch accounts
This is what you need to do to switch to a local account & switch back to resolve the ‘Duplicate OneDrive Folder icons in File Explorer’ issue.
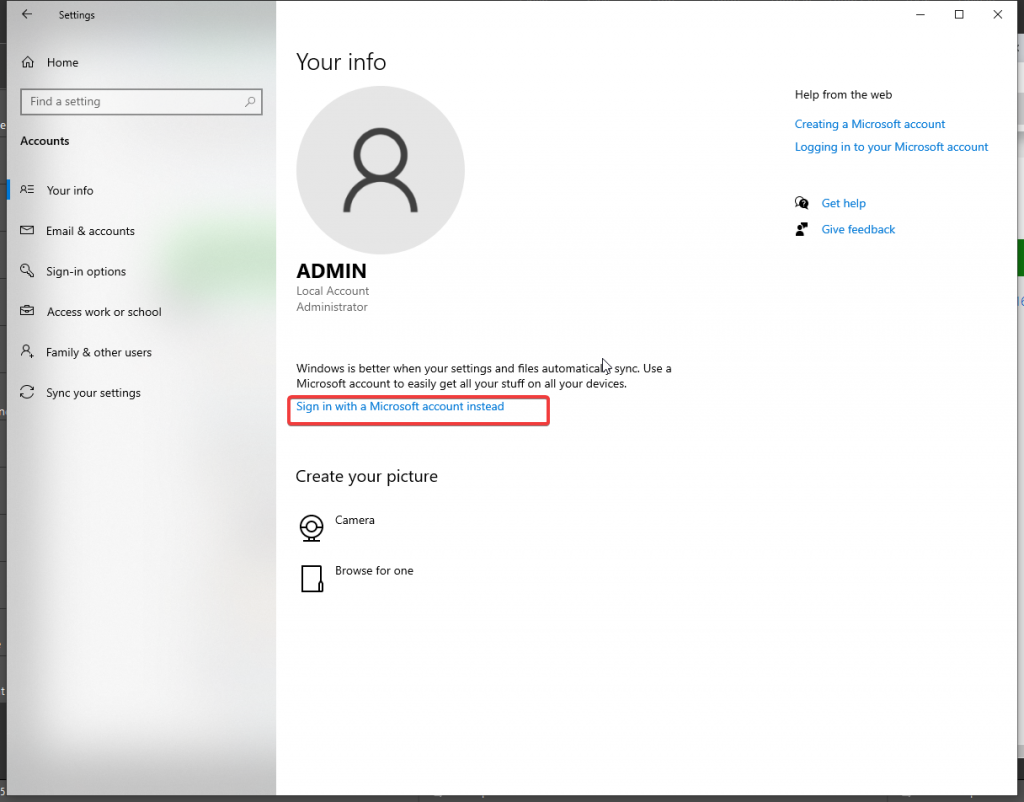
- Press Windows + I
- Select Accounts
- You will now be redirected to a new window. Here click Your info present in the left pane.
- Scroll down and select the option of Sign in with a local account instead.
- Follow on-screen instructions and create a local account.
- Once done, head to You info again and this time click Sign in with a Microsoft Account instead.
- Follow the on-screen instructions to get signed in to your Microsoft Account with your Email address and Password.
- Restart the PC and check if the issue is fixed or not.

In case, nothing has worked so far, try hiding the extra OneDrive instance. Surely, this is not a workaround but can be considered as a hack to conceal the duplicate OneDrive folder.
Hack to Hide Second Instance of OneDrive
To hide the extra OneDrive folder, follow the steps below:
-
- Press Windows + R
- Type exe> Ok
- Head to
HKEY_CURRENT_USER\SOFTWARE\Microsoft\Windows\CurrentVersion\Explorer\Desktop\NameSpace - Find the folders with the OneDrive Open them one by one and check the name of the registry from the right pane. When it says OneDrive, copy or make a note of the name of the folder.
- Navigate to HKEY_CLASSES_ROOT\CLSID\double click HKEY_CLASSES_ROOT > double click CLSID folder
- Thereafter, look for the folder with the same name as the OneDrive folder ( noted in step 4).
- Click the folder
- Double click named IsPinnedtoNameSpaceTree
- Changes its value to 0 > Ok
This will hide the duplicate OneDrive folder. To unhide the folder, repeat the steps and this time change the value to 1.
Using these simple steps, you can easily get rid of the duplicate OneDrive folder and save yourself from the trouble of getting confused due to multiple OneDrive folders. We hope you enjoy reading this post, do share your feedback in the comments section.
Frequently Asked Questions-
Q1. How do I get rid of duplicate OneDrive in File Explorer?
One of the easiest ways to remove duplicate OneDrive in File Explorer is through the Resetting OneDrive application. Follow the instructions stated below to learn how it’s done:
- Press Windows + R shortcut keys.
- Copy and paste the following command:
%localappdata%\Microsoft\OneDrive\onedrive.exe /reset
- Hit the OK button.
Now check if this helps to fix the issue or not. This may help you to easily get rid of “Duplicate OneDrive folder icons in File Explorer” problem as well!
Q2. How do I unlink OneDrive from File Explorer?
To unlink OneDrive follow the steps below:
- Right-click the OneDrive icon present in the system tray > Settings > Account
- Click Unlink this PC > confirm the action by clicking Unlink account
Restart PC and that’s it the account will be unlinked and relinked.
Q3. How do I stop OneDrive from duplicating files?
Windows:
- In the Windows search bar type “credentials,” and select Credentials Manager.
- Choose the Windows Credentials
- Under Generic Credentials, look for any entries containing “OneDrive Cached Credentials” > delete them.
- Restart OneDrive.
Mac:
- Head to Utilities folder > launch Keychain Access from there.
- Search OneDrive > remove OneDrive Cached Credential.
- Run OneDrive.
This should help fix the problem. If this doesn’t work, uninstall and reinstall OneDrive.
Q4. Why is OneDrive duplicating files?
When a conflict occurs during updating data, OneDrive duplicates files. This means when OneDrive has to sync the same data at more than one place file duplication takes place.
Q5. Why is OneDrive listed twice in Explorer?
One of the cases it is possible to have double OneDrive is that you downloaded it again while getting Office applications on your computer. Other reasons include backups, corrupted files and system malfunctions.