
Have you tried to delete a file, folder, or icon from your computer but could not do so and instead received an error message stating “Could not find this item in Windows 10”? This is an uncommon error that rarely occurs in Windows 10 computers and prevents the users from deleting a particular file or folder. The reason for this error is not known but can be because the file intended to be deleted was corrupt or is in use by another program. There are a few steps that can help you resolve this error and successfully delete the file that you wanted to remove.
Also Read: Steps To Resolve DistributedCOM Error 10016 In Windows 10
How To Solve Error Message “Could Not Find This Item” In Windows 11/10?
Before opting for any significant troubleshooting steps, it is recommended to try the necessary steps that are quick and easy to carry out and may fix the “Could Not Find This Item” in Windows 11/10 for good.
METHOD 1 = Restart The Computer

One of the best fixes for unknown or undetermined issues is a simple reboot of the system. A quick restart can fix many issues especially if the computer has automatically downloaded Windows updates but has not been restarted
Also Read: Steps On Registry Repairs In Windows 10 And Fix Import Error
METHOD 2 = End The Windows Explorer Process
Windows Explorer is an application that aids other programs installed to work. However, sometimes it does develop an error and freezes, not allowing any application to function or shut down. In many cases, the entire computer comes to a standstill with limited functionality. You can either restart the computer or have something important that is not saved then follow these steps:
Step 1: Open Task Manager and scroll down in the Processes Tab until you locate the Windows Explorer process.
Note: To open the Task Manager Window, you can use any of the following methods:
- Press CTRL + ALT + DEL keys on your keyboard and select Task Manager from the options displayed on the screen.
- Right Click on a space on the taskbar and select Task Manager from the contextual manager.
- Type Task Manager in the search box on the taskbar and click on the relevant result.
- Press CTRL + SHIFT + Esc keys in the mentioned order and keep them pressed. The Task Manager Window will popup open.
Step 2: The Windows Explorer process will be down below under Windows Process. Make a right-click on it and then click the End Task option from the contextual menu.

Step 3: The Windows Explorer Process will end, and along with it, all the icons will disappear from the taskbar along with the start menu.
Step 4: There is no need to fret as all you have to do is click on the File tab in the Task Manager Window (which did not disappear by the way) and click on New.
Step 5: Now type “explorer.exe” on the text box and click on OK.

Step 6: Everything will be restored to normal.
Now try to delete the file or folder, and you should not face the “could not find this item” in Windows 10.
Also Read: Critical Process Died on Windows 10 – How to Fix This BSOD Error
METHOD 3 = Use The Command Prompt To Rename The File
If the above Windows Explorer process does not resolve the issue, then there is a slightly tricky method that involves using the command prompt.
Note: For this method to work, it is important that the Copy and Paste shortcuts (CTRL C & V) work on your command prompt. To enable them, you can read the article How To Copy In Command Prompt In Windows 10 and then move to the first step.
Step 1: Type Command Prompt in the Search Box on the Taskbar and, from the result, hover the cursor on the result labelled as Command Prompt app and click on Run as Administrator.
Step 2: Next, make right-click on the file that you cannot delete and, at that same time, display the “could not find this item” in Windows 10 error.
Step 3: Choose Properties from the contextual menu, and a new window will open.
Step 4: Under the General tab, look for Location and select the path mentioned next to it and copy it by pressing CTRL + C on the keyboard.

For Example – C:\Users\Madhuri\Desktop\Test Folder
Step 5: Now go back to the Command Prompt Window and type the following command and press enter
cd {paste the file path you just copied of the problematic file}If the CTRL + V does not work, you can make right-click at the blinking cursor in the command prompt windows and choose Paste.
For Example – cd C:\Users\Madhuri\Desktop\Test Folder

Step 6: Next step is to type the next command provided below:
dir/A/X/P
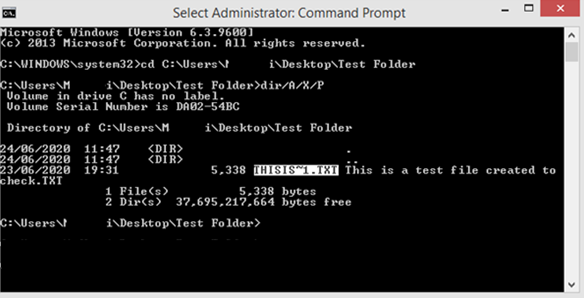
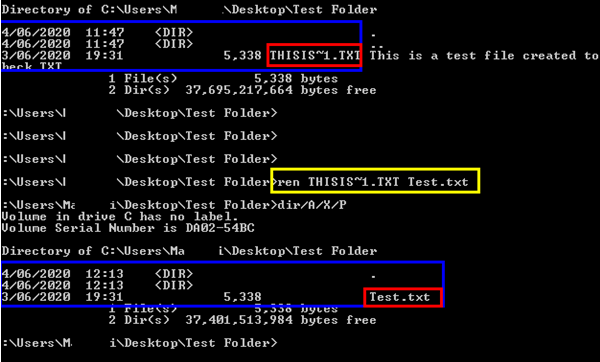
Step 7: Now, you will see the file listed that has been giving them trouble. You can rename this file by using the following command. The file has a lengthier file name, and hence the complete name will not be displayed. Instead, the name is shortened to THISIS~1.TXT.
Note: You can select the shortened name and copy it and then paste it in the following rename command. Then type a new name of your choice with the relevant extension.
Ren (old file name) (new filename)
For Example – Ren THISIS~1.TXT Test.txt

Step 8: The file will be instantly renamed and lose connection to whatever was holding it from being deleted. This file can now be deleted using the Windows folder with ease.
Also Read: How Can I Fix Fatal System Errors On Windows 10?
METHOD 4 = Deleting Files In Safe Mode
Another method to resolve the “could not find this item” in Windows 10 is to reboot your computer in Safe Mode and then delete those files. To reboot your computer in Safe Mode, follow these steps:
Step 1: Press Windows + R key from your keyboard and wait for the Run Box to open.
Step 2: Type “Msconfig” in the text box and click on OK.
Step 3. Click on the Boot tab in the MSConfig Window and check the box next to Safe Mode.

Step 4: Click on Apply and then OK.
Step 5: Restart your computer, and it will reboot in Safe Mode.
Step 6: Delete the problematic file and follow the above steps to remove the checkmark in the box next to the Safe Mode.
Step 7: Restart the computer, and it will reboot in normal mode, and the file will also be deleted.
This way, you will get rid of the file causing issues related to “Could not find this item” in Windows 10.
Read Also: How to Fix “The Software for this Device has been Blocked” Error on Windows 10 (Code 48)
METHOD 5 = Kill The Process That May Be Using The File
Chances are there might be some program running on your PC that is using the file in some way. To make sure the particular item is not the culprit, consider closing the program process via Task Manager and then further remove the file.
Step 1: Right-click on the Taskbar and select Task Manager from the pop-up menu.
Step 2: Navigate to the Processes tab and locate the process that you think might be interfering with the file you’re trying to delete.
Step 3: Once you find it, simply right-click on the same and hit the End Task option to kill the process.

Hopefully, this resolves the error of “Could Not Find This Item” In Windows 11/10!
The Final Word On How To Solve Error Message “Could Not Find This Item” On Windows 11/10?
These were the steps to resolve the issue of “Could not find this item” in Windows 10 when you tried to delete a random file and could not do so. A simple restart and terminating of the process can also help, but if the issue persists, you can rename the adamant file through Command Prompt and delete it.
Follow us on social media – Facebook and YouTube. For any queries or suggestions, please let us know in the comments section below. We would love to get back to you with a solution. We regularly post tips and tricks, along with solutions to common issues related to technology.
Next Read:
- SYSTEM_THREAD_EXCEPTION_NOT_HANDLED: Windows Error Fixed
- How To Fix Windows Error 1603
- How to Fix “Windows Cannot Load Device Driver” Code 38 Error on Windows 10
- 4 Ways to Fix “Windows Cannot Identify this Hardware” Code 9 Error
- How to Fix “This Device is Disabled” (Code 22) Error on Windows 10
- What Is CLOCK_WATCHDOG_TIMEOUT Error & How To Fix It On Windows 10
- 6 Fixes for “No Audio Output Device Is Installed” Error in Windows 10