Transferring photos from iPhone to Mac is mostly a very straightforward and hassle-free process. All you have to do is connect your iPhone to your Mac and access the Apple folder to transfer photos from your iPhone to your Mac. If you are new to transferring photos from iOS to Mac, you can check this comprehensive guide that’ll help you get started,
However, there are times when things might not turn out to be as you expect. You might not be able to import photos from your iPhone.
Thankfully, we have come up with some effective ways in which you can fix the issue and transfer photos. But, before we discuss the measures you can take if you aren’t able to transfer photos, let’s have a look at some of the reasons that may stop you from importing photos from your iPhone to your Mac –
Reasons Why You Might Be Unable To Import Pictures from iPhone to Mac
- You are trying to transfer thousands of photos at once.
- There are connectivity issues.
- The photos you are trying to transfer bear a format not recognized by your Mac.
- Incorrect iCloud settings.
- Software-related glitches.
- You have turned on the Optimized iPhone Storage If this is the case, when your iPhone storage is low, your high-resolution photos will be replaced with smaller versions and you might not be able to transfer them to your Mac.
In this post, we’ll have a look at ways in which we can fix all the above issues.
Unable To Import Photos on Your Mac from Your iPhone? Try these fixes
Solution No. 1 – Restart iPhone and Mac
Much before you try out any advanced means, a simple restart is probably all that you’ll need. In this case, we urge you to restart both your Mac as well as iPhone for once. Here’s how you can restart your iPhone.
To restart Mac –
Step 1 – Click on the Apple logo.
Step 2 – Click on the Restart button from the drop-down.
To restart iPhone –
Step 1 – Press and hold either volume or side button until you see the power off slider.
Step 2 – drag the slider and wait for nearly 30 seconds until your device turns off.
Solution No. 2 – Check If There Are Any Connection Issues
It is advisable that you rule out any connection-related issues such as the ones mentioned below –
- Check for broken cables.
- Switch to a different cable.
- Ensure that your iPhone is unlocked and when prompted on Mac, ensure you select Trust this device.
Solution No. 3 – Upload a Small Number of Photos To Mac
Transferring a handful of photos from iPhone to Mac might not cause an issue. But, if, for instance, you are trying to transfer several hundreds or thousands of photos, the photos program might become sluggish. In that event, try transferring a small batch of photos.
Writer’s Tip
It would be a wise move if you get rid of any duplicate photos both on your Mac as well as iPhone. Since we know that manually, it would take you forever to identify and remove duplicates, you can instead take the help of a third-party app that will help you locate duplicates and delete them safely.
Duplicate Photos Fixer is one such app that is available on both iOS as well as macOS. To remove duplicate photos from your iPhone using Duplicate Photos Fixer, you can install the Duplicate Photos Fixer app on your iOS smartphone and follow the steps mentioned in this post.

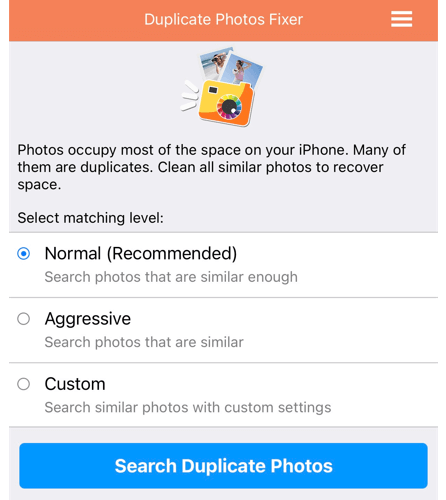
Next, you can head to your Mac, install Duplicate Photos Fixer Pro for Mac.

Solution No. 4 – Update macOS and iOS
The functionality of both your Mac as well as iPhone can get hampered if they are running outdated operating systems. One of the things that you can do in case you are unable to transfer photos is to check updates on either device –
On Mac –
Step 1 – Click on the Apple menu.
Step 2 – Go to System Settings > General
Step 3 – Click on Software Updates and further click on Upgrade now.

On iOS
Step 1 – Go to Settings.
Step 2 – Click on General > Software Update.
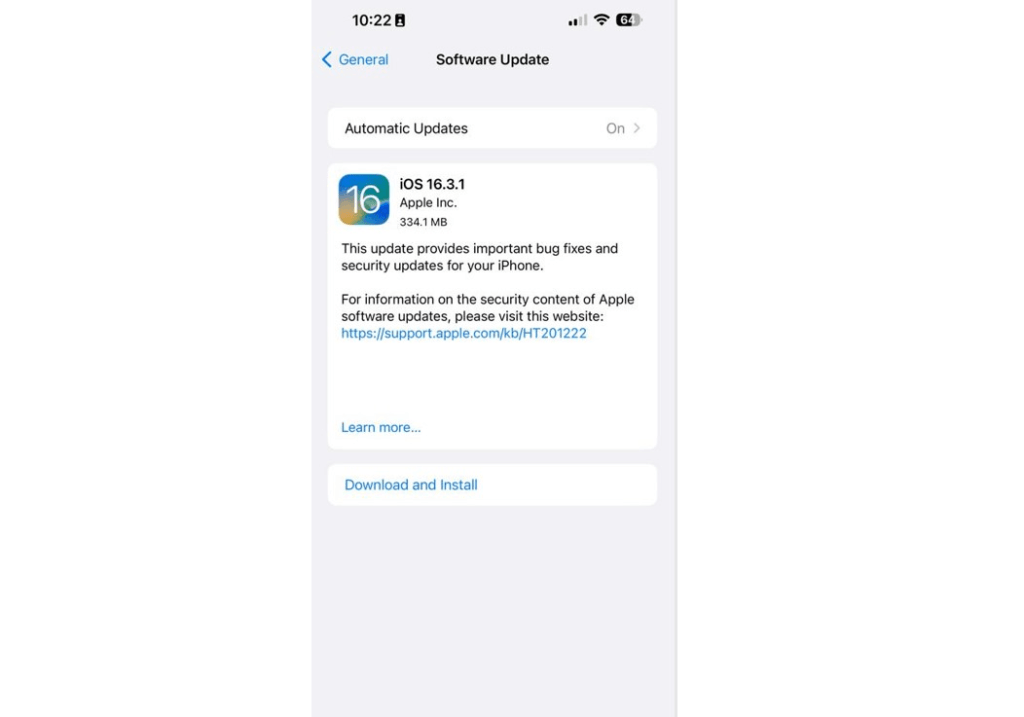
Step 3 – If an update is available, click on Download and Install.
Solution No. 5 – Disable iCloud Photo Library
Until you have enabled iCloud Library, iPhotos won’t be able to import photos from your iPhone to your Mac via USB. Here, first, check if the option is enabled. If it is, disable iCloud Photo Library and then try transferring photos from your iPhone to your Mac. Here are the steps for the same –
Step 1 – Go to Settings on your iPhone and select Profile.

Step 2 – Turn off iCloud Photos by going to iCloud > Photos and tapping on the toggle switch next to it.
Solution No. 6 – Reset Location and Privacy Settings
If you are having trouble transferring photos from iPhone to Mac or vice-versa, chances are there are connection-related issues caused by your iPhone’s location and privacy settings. To fix that –
Step 1 – Go to Settings.
Step 2 – Select General > Reset/ Transfer or Reset iPhone
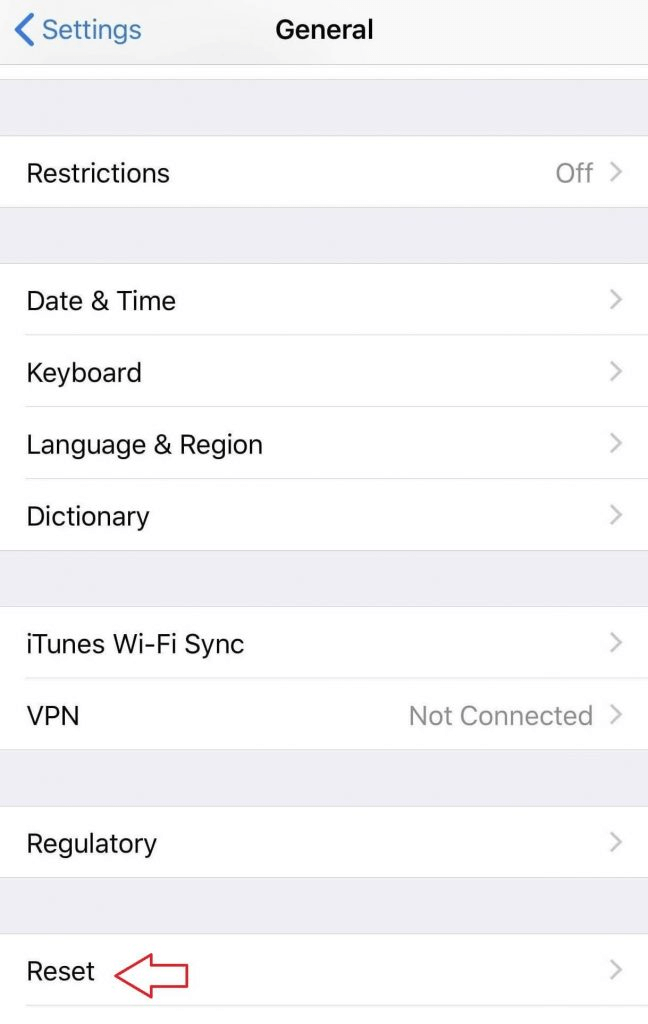
Step 3 – Tap on Reset Location & Privacy.

Solution No. 7 – Repair Home Folder Permission
In the event that you are unable to import photos from your iPhone to your Mac, you can try repairing your home folder permission. To do that –
Step 1 – Press Command + R to activate Recovery Mode.
Step 2 – Choose Terminal in the Utility Menu.
Step 3 – Press the Return key and type repairHomePermission.
Step 4 – Enter the admin password and click on Next. Wait for the procedure to complete.
Step 5 – Once the process is finished, press Exit and restart in normal mode.
We Hope That You Are Now Able to Transfer Photos Smoothly Between Your iPhone and Your Mac
To summarize the methods – In the event that you are not able to transfer photos from iPhone to Mac, you can begin by simply restarting both your Mac as well as iPhone. You can then rule out any connectivity-related issues. Simultaneously, try and transfer a small bunch of photos especially while the issue is persisting. If these basic fixes don’t seem to work, you can move to some advanced measures such as repairing home folder permission, resetting location and privacy, and a few others that we have discussed in this post.
And, if you troubleshoot the issue using some other trick (that was not up our sleeve), do share it in the comments section below and we’ll update this post. For more such content, keep reading WeTheGeek. You can also reach out to us on Facebook, Instagram, Twitter, YouTube, and Pinterest.
