
From podcasters to Instagram Reels, social media personalities use screen recorders to get 4K video recordings and create attention-grabbing live streams and podcast interviews. However, creating such engaging content takes effort and time. It is possible if you are looking for a way to auto split the video files into small videos to create different ones.
Nonetheless, the process becomes simpler and faster with suitable video editing tools. You don’t need to worry much with Advanced Screen Recorder – a brilliant software that assists you with creating high-definition videos quickly and easily. In this blog, we will tell you how to make a high-quality 4K video recording with Advanced Screen Recorder.
Brief Introduction To The Screen Recorder For Windows
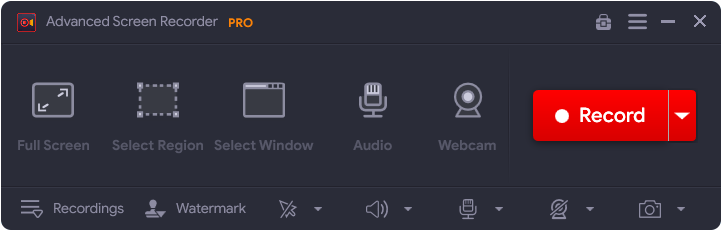
Advanced Screen Recorder is among the best 4K video recorders for Windows 11. It captures details of selected areas, full screen, and records high-quality videos in various formats. Further, you can easily manage the size and frame rate of the recordings and customize the watermark layout. You can easily record webinars, live streaming, webcam feeds, Skype calls, and gameplay on your Windows.
Features of Advanced Screen Recorder
- Records screen in different modes – single window, full screen, selected region.
- Record system audio and
- Mouse movements and clicks can be recorded.
- Take screenshots while recording.
- Customize watermark.
- Allows recording videos in HD, 4K, and up to 120 fps.
- Screen overlay recording using the webcam.
- Scheduling training sessions, webinars, meetings, and online classes.
- Auto-stop option to stop recording automatically once a specific recording time or size is reached.
- Auto split the screen recording.
How To Auto Split 4k Video In Windows 11
Advanced Screen Recorder offers an auto split feature that lets you split a single file into multiple ones depending upon the file size or time duration. Check the steps below to learn how you can use this feature in Advanced Screen Recorder:
Step #1: Download and install Advanced Screen Recorder on Windows 11 PC.

Step #2: Complete the installation and give it the necessary system permissions. Launch the application on the PC.
Click on the Upgrade Now button to purchase the product to enjoy all its features.
Step #3: Now, click on the icon with three horizontal lines on the top right corner, and open the menu. Click on the Auto Split.
Step #4: Auto Split tab will open and you can view the option for time and size, choose one of these options –
- When the recording time reaches (Minutes) will define the time limit for splitting the video recording on your screen.
- When the file size reaches (MB) will set the time limit for the file size and split the video file once it is crossed.
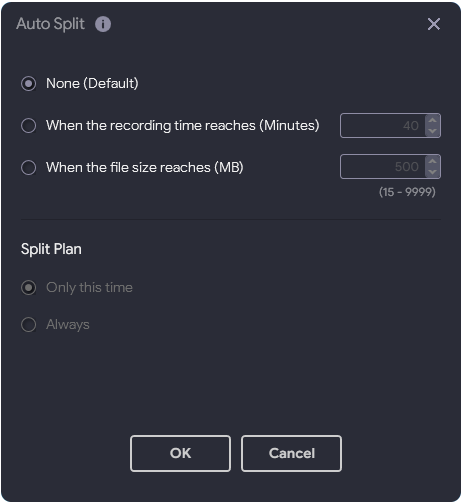
Once the selection is made, you can also make these settings permanent by choosing the Split Plan as Always or leaving it at Only this time by default. Click on Ok to confirm the selections.
Step #5: Now, go back to the home screen of Advanced Screen Recorder. Select from the different screen capture options (full-screen, select region, select window, select webcam) to record the video.
Step #6: Click the “Record” button to begin the process. You can see a small tab showing you the screen recorder. It has a timer and a pause/stop button and shows recording time. To end the 4K Video Recording, click the STOP button once you are done.
Later you can find the recordings under the Recordings section on Advanced Screen Recorder. It is also saved in the location assigned by you under the Advanced Settings.
Conclusion –
Whether you are a novice or a pro in video production and editing, you need software to adjust the video and audio files to create high-quality and engaging content for your audience. As per my personal experience, we find Advanced Screen Recorder a straightforward tool for creating 4K video recordings. It downloads in a few seconds and doesn’t consume much of your RAM. It comes with different features and can be used as a complete suite to record videos for your channel. The Auto Split features tasks such as adding videos in the recording section for clipping and adding the videos to your storytelling.
We hope the article was helpful for you to learn how to record 4k video in Windows 11 and use the auto split feature. We would like to know your views on this post to make it more useful. Your suggestions and comments are welcome in the comment section below. Share the information with your friends and others by sharing the article on social media.
We love to hear from you!
We are on Facebook, Twitter, Instagram, and YouTube. Please let us know of any queries or suggestions in the comments section below. We love to get back to you with a solution. We regularly post tips and tricks and answers to common issues related to technology.
Related Topics –
How To Clean Junk Files With Advanced PC Cleanup
How To Recover Deleted Restore Points In Windows 11/10
10 Best CPU Benchmark Software For Windows