Blog Summary: If your Windows 11 taskbar isn’t responding, it could be due to issues with device drivers or outdated Windows services. Our blog offers solutions for all these potential causes.
Windows 11 Taskbar is an essential component of the Operating System that provides quick access to various applications and system settings. However, there are instances when users encounter unresponsive taskbar buttons, missing icons, or other related problems. Some common causes that cause non-functional Taskbar are: Running outdated drivers, corrupted system files, software glitches, and compatibility issues with system updates.
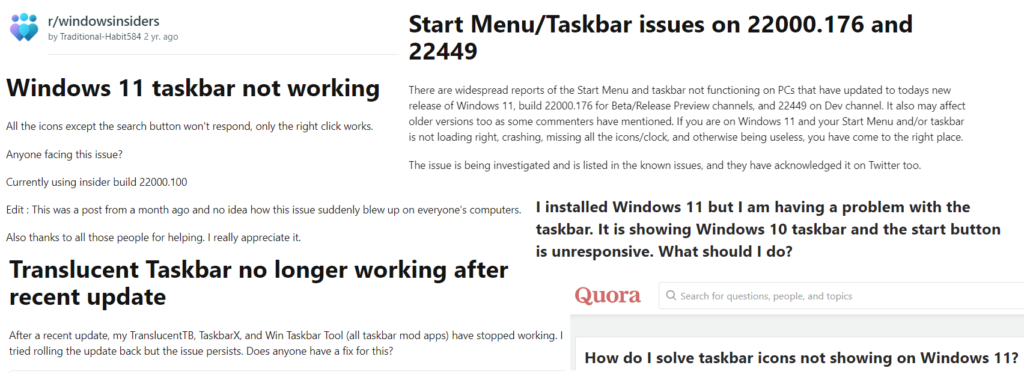
Several users are experiencing issues with the Windows taskbar. And, if you are one of them, keep reading this article as we’ll discuss a few quick and effortless methods to get it back up and running:
Quick Solutions:
- Restart Windows Explorer: Use Task Manager to restart the Windows Explorer process, which often resolves taskbar issues.
- Run System File Checker (SFC): Open Command Prompt as administrator and run the “sfc /scannow” command to scan and repair corrupted system files.
- Check for Updates: Ensure your Windows 11 system is up to date by installing any pending updates, as Microsoft frequently releases patches to address known issues.
Windows 11 Taskbar Not Working After Update? Here Are The Tried & Tested Fixes!
Restarting your device can sometimes resolve issues with the Windows 11 Taskbar not responding properly. This process can help refresh the system and potentially fix temporary issues with the taskbar. In case this doesn’t help, you can try following the quick tips and tactics shared below to repair Taskbar on Windows 11!
1. Restart the Services
As the Taskbar is currently stuck right now, press the Control + Shift + Escape key combination to open the Task Manager. In the Task Manager window, switch to the “Processes” tab, look for the “Windows Explorer” service. Right-click on this service and select “Restart”.

Now, switch to the “Details” tab in the Task Manager. Look for the below-listed services, right-click one each, and select “End Task” in the same order:

ShellExperienceHost.exe
SearchIndexer.exe
SearchHost.exe
RuntimeBroker.exe
As soon as you ‘End Task’ for all the aforementioned processes, simply close the Task Manager window and you’ll be able to resolve the Windows 11 Taskbar not showing issue in no time.
Also read: How To Disable File Explorer Search History In Windows 11
2. Update Graphics Driver (Recommended Way To Fix Windows 11 Taskbar Glitch)
Another major culprit behind ‘Taskbar not working on Windows 11’ could be an outdated graphics driver. You can consider following the list of effective methods to update Windows drivers. However, one of the safest and easiest ways to update faulty drivers is using a professional driver updating tool like Advanced Driver Updater (ADU). The application saves your valuable time and effort for finding and updating Windows drivers in bulk. It runs a thorough scan, lists out all the drivers that need immediate attention, and lets you download the most authentic and compatible driver versions from trustworthy sources.
It even offers tools to backup, restore and schedule automatic scans for updating drivers to maintain system stability. Follow the instructions below to update your graphics driver and fix the annoying Windows 11 Taskbar glitch.
How To Use Advanced Driver Updater?
Updating drivers with Advanced Driver Updater is a simple & straightforward process. All you need to do is:
STEP 1 – Install the latest version of Advanced Driver Updater on your computer. The utility supports Windows 11, 10, 8, 7, XP, and Vista OS versions.

STEP 2 – With the free version of ADU, you can update outdated, corrupted, incompatible, damaged, and missing drivers one by one. Using the premium edition, you install and replace all the faulty Windows drivers in one go. So, we highly recommend our users to get registered with the product & make the most out of it!
STEP 3 – From the main screen, initiate a scanning process by hitting the Start Scan Now button. All the faulty drivers will appear on your screen in a fraction of a moment.
Please be patient and let Advanced Driver Updater do its job and identify all the problematic drivers on your PC.
STEP 4 – As soon as the scanning process gets completed, look for the outdated graphics driver that needs to be updated. Once found, hit the Update button next to it. Alternatively, you can also click on the Update All button to install the latest Windows drivers in bulk!
Pretty convenient, right? Don’t forget to restart your computer to implement the changes. After updating the graphics driver, we hope you don’t have to search for “How to fix Taskbar not Working on Windows 11”.
Most users have reported that updating their drivers helped them fix Taskbar not working on Windows 11. Did it help you the same way? If yes, do share your experience in the comments section below!
3. Repair System Files
The next workaround to fix the “Windows 11 taskbar not working” issue is to repair the system files by using the Command Line terminal.
Press the Windows + R key combination to open the Run dialog box, type “cmd” and hit Enter. You will now be redirected to the Command Prompt window.
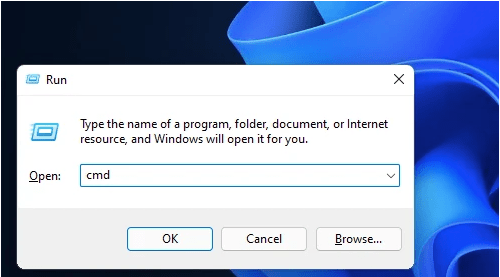
Enter the following commands and hit Enter after each:

Dism /Online /Cleanup-Image /ScanHealth
Dism /Online /Cleanup-Image /RestoreHealth
sfc /scannow
Executing these commands will repair the damaged and corrupt system files on your device. Close the Command Prompt window and then try accessing the Taskbar again to see if you are still stuck with the “Windows 11 taskbar not loading” issue
Also read: How to Create a Bootable Windows 11 USB Drive
4. Create A New User Profile
Sometimes, Taskbar issues can be caused by corrupt user profiles. Hence, creating a new user profile can resolve this issue. Simply, follow the instructions stated below:
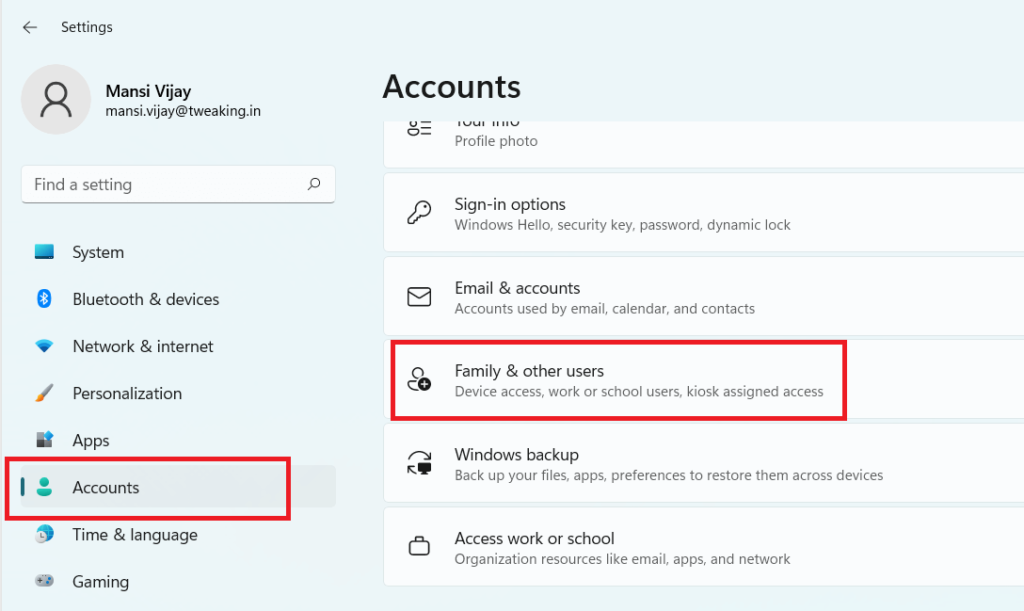
STEP 1 – Press the Windows key + I to open Settings.
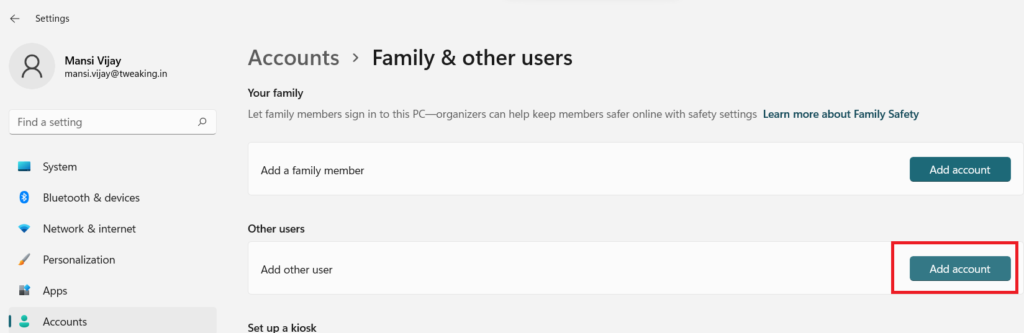
STEP 2 – Navigate to the “Accounts” tab and click on the “Family & other users” option from the right-side window.
STEP 3 – Click on the “Add account” option under the “Other users” section.
STEP 4 – Choose the option “I don’t have this person’s sign-in information.”
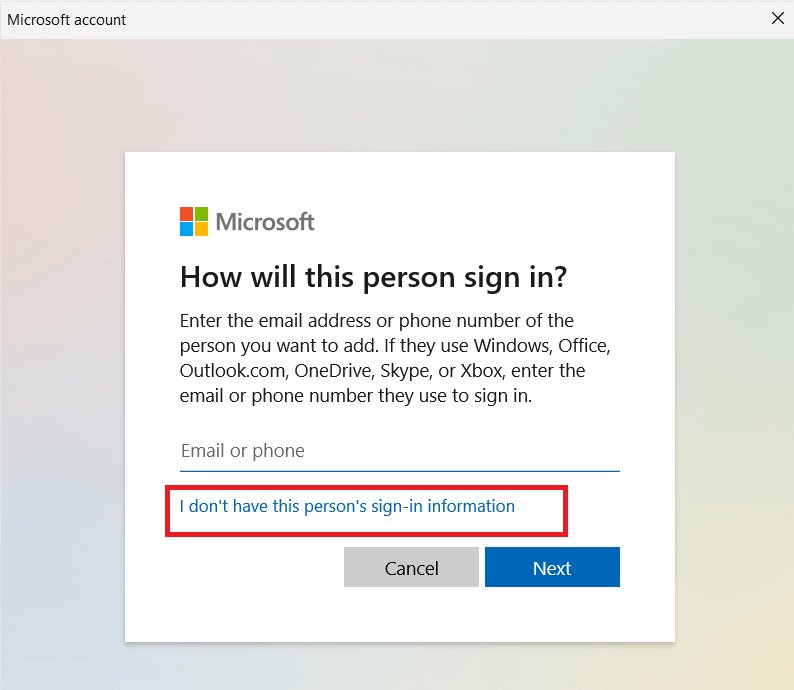
STEP 5 – Hit the “Next” button & select “Add a user without a Microsoft account” and fill out the required fields to create a new local account.

Log out of your current account and log in with the newly created account to check if the “Taskbar is stuck or not responding properly” issue has been resolved.
5. Reinstall UWP
Here comes the next solution to resolve the Windows 11 taskbar not loading problem. Reinstalling the basic UWP (Universal Windows Program) can allow you to fix the “Windows 11 taskbar not visible” issue. To reinstall the UWP, you will need to run a command in the Windows PowerShell (Admin). Follow these quick steps:
Press Windows Key + S to open the search bar and type Windows PowerShell. Select the “Windows PowerShell (Admin)” option from the list.

Enter this command and hit Enter to execute it:
Get-AppxPackage -AllUsers | Foreach {Add-AppxPackage -DisableDevelopmentMode -Register “$ ($ _. InstallLocation) \ AppXManifest.xml”}
If you meanwhile see a few red texts in the PowerShell window, don’t worry! Wait for a few minutes until the command is successfully executed. Hopefully, this will help you to instantly get rid of the annoying “Taskbar not working on Windows 11 issue”.
6. Create the XAML
By editing the XAML (Extensible Application Markup Language) file in the Registry Editor, you can easily fix the Start menu or Taskbar on Windows 11. Here’s what you need to do.
Press the Windows + R key combination to open the Run dialog box. Now type “Regedit” in the textbox and hit Enter to open the Registry Editor.

In the Registry Editor window, navigate to the following folder location:
HKEY_CURRENT_USER \ Software \ Microsoft \ Windows \ CurrentVersion \ Explorer \ Advanced
Right-click on the Advanced folder and select New> 32-Bit D-word value.

Set the new parameter as “EnableXamlStartMenu”. Double-click on the “EnableXamlStartMenu” file and set the value as “0”.
Close the Registry Editor and check whether it fixed the Taskbar not working on Windows 11 issue or not. If the problem persists, don’t panic, as we’ve got a couple of more effective workarounds listed below.
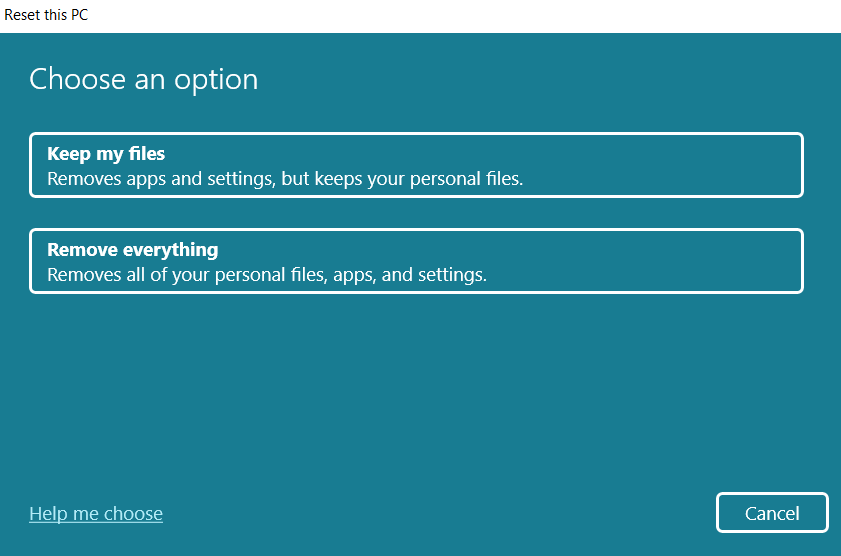
7. Reset Windows 11 PC
If none of the above solutions work, resetting Windows 11 is your last resort to resolve unresponsive Taskbar issues. Follow the instructions stated below:
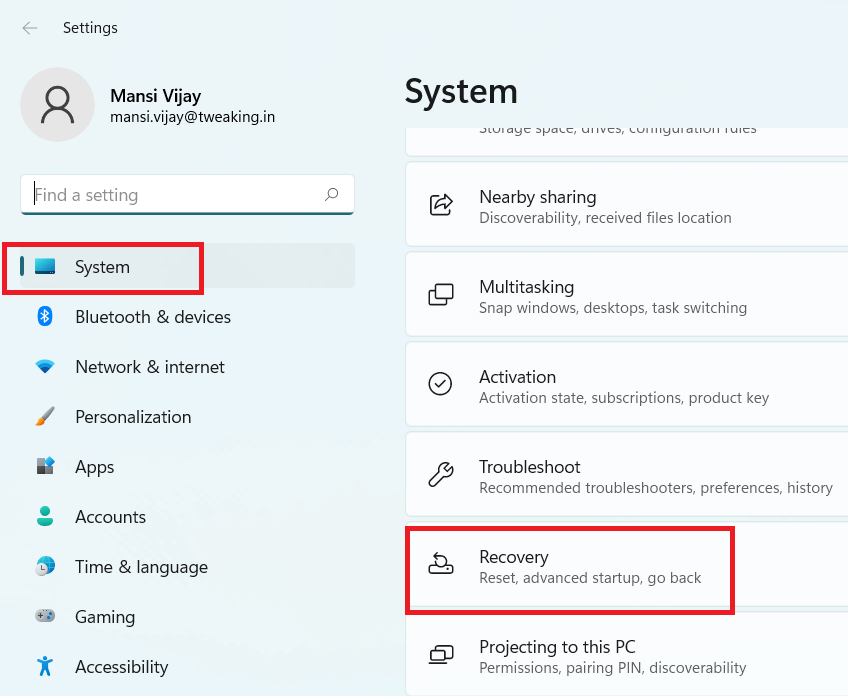
STEP 1: Press Windows key + I to open Settings.
STEP 2: Click on the “System” module and then hit the “Recovery” option.
STEP 3: Under “Reset this PC
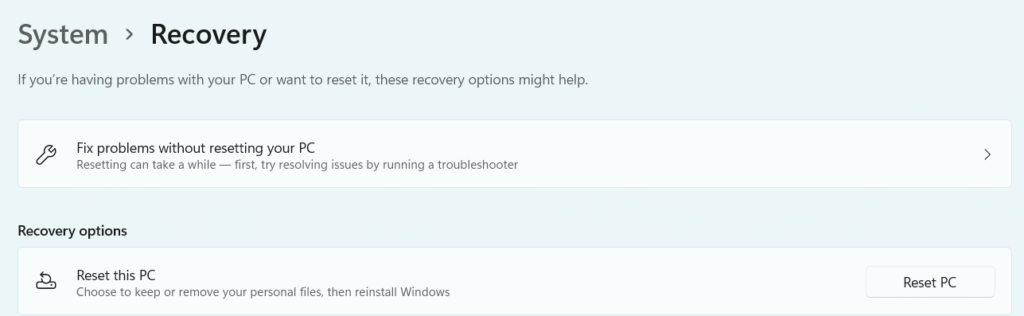
STEP 4: Choose whether you want to keep your files or remove everything, and accordingly follow the on-screen instructions to reset your PC completely!
Final Verdict
This wraps up our guide on how to fix the Windows 11 taskbar not loading problem using different methods. In conclusion, troubleshooting issues with Windows 11 Taskbar settings not working requires patience and a systematic approach. While these methods should help resolve most common problems, it’s important to remember that each situation is unique, and results may vary. In case none of the workarounds shared above help, we advise you to consider consulting a professional technician for further guidance.
PEOPLE ALSO ASK:
1. How do I restore the taskbar in Windows 11?
The process of restoring the Taskbar is straightforward. For this all you have to do is, open the Task Manager by pressing CTRL + SHIFT + ESC. Now, simply head towards the Processes tab > look for Windows Explorer and right-click on the same to choose the Restart button!
2. Has Microsoft fixed the Windows 11 taskbar?
Well, Microsoft consistently releases updates and bug fixes to maintain the flawless performance of Windows 11. They have also made efforts to enhance Taskbar functionality, such as allowing drag-and-drop apps onto the taskbar for quick access. Therefore, we recommend keeping your operating system up-to-date with the latest updates to fully enjoy the benefits of these improvements.
3. What is the Windows 11 Taskbar issue 2023?
Windows 11 Taskbar issue in 2023 indicates a problem where users reported that the Taskbar doesn’t work, crashes, or freezes after installing specific Windows 11 builds such as 22000.176 or 22449. To repair Windows 11 Taskbar problems, you can try restarting the service, updating relevant drivers, and more.
Dileep
Thanks step 1 worked like a charm. ! Thanks ?